markleteenie
4 of a Kind
That's a nice rail. I also like how the table doesn't look to be really tall.
Why did you go with 8 cup holders and 7 hand spots? I don't play blackjack so I don't know what the typical layout is.
That's a nice rail. I also like how the table doesn't look to be really tall.
That's a gem....love the stiched leather rail
No diffuser for the led ?
Damn, always a good job Tony! I love that table base, that's super classy.I'm quite happy with this one. Solid walnut legs and dining table cover. 42"x84" for the poker table and 45"x87" for the topper. The walnut topper has a natural water based lacquer, no stain.
Not sure why the lights on the left of the outside look so funny, but it's a nice glue glow all the way around.
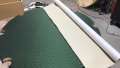
View attachment 428200View attachment 428201View attachment 428202View attachment 428203View attachment 428204View attachment 428199View attachment 428198
 . He can satisfy and make a reality of even the sickest of imaginations (either in the good or bad sense)
are you able to put a link in to the company website where you got the felt from?Some really nice stuff in here! My first build I completed in the fall with a surplus layout from The Layout Company. Such a steal.
View attachment 76990
https://www.ebay.com/usr/thelayoutcompanyare you able to put a link in to the company website where you got the felt from?
Thanks for the compliments. The table height is easily adjustable from standard chair height to barstool height as you would have in a casino. I went with 8 holders to even out the layout. Players can use either side for drinks. Usually not every player is drinking at the same time.That's a nice rail. I also like how the table doesn't look to be really tall.
Why did you go with 8 cup holders and 7 hand spots? I don't play blackjack so I don't know what the typical layout is.
are you able to put a link in to the company website where you got the felt from?
Love the blue and grey, Nav. Simple and classy. One day I’ll be there when you felt the Empress Star set.I'd like to throw my hat in the ring, I don't have any bells and whistles with my tables like fancy buttons and lights...but they are poker tables and here is the pr0n..
View attachment 433750View attachment 433751View attachment 433752
That is a dream Scott! You are sooooo more than welcome! One fine day. I'm itching to get the ES out. I've expanded a bit too.Love the blue and grey, Nav. Simple and classy. One day I’ll be there when you felt the Empress Star set.
Nice thread! I love tables, almost obsessed with them.
Poker tables (4'x8'):
Main Table:
View attachment 74754
Secondary poker table (4'x8') (doubling as a table game table for casino night in the pic) (bought this one and immediately resurfaced it)
View attachment 74750
Craps table (10x5'):
View attachment 74749
Roulette table (4'x8'):
View attachment 74755
Don't forget a sweet ass base too. Sexy table!Raised and suede rail, custom felt - all the bells and whistles you need brotha. Very nice tables
Nice table!
@Richard Cranium
I just watched the entire video. Amazing build, video, edit and I am just blown away. I love how you showed everything. I am not nearly as handy, but I am willing to give it a try perhaps...
is there a list of every tool, materials, sprays, etc, that you used..?
I would love to try to undertake this challenge and build a table that can easily be refelted anytime... although pulling old staples out may be annoying!
love that video!!!!! I may watch it every day for inspiration!
Thank you!
@Richard Cranium
I just watched the entire video. Amazing build, video, edit and I am just blown away. I love how you showed everything. I am not nearly as handy, but I am willing to give it a try perhaps...
is there a list of every tool, materials, sprays, etc, that you used..?
I would love to try to undertake this challenge and build a table that can easily be refelted anytime... although pulling old staples out may be annoying!
love that video!!!!! I may watch it every day for inspiration!