Here’s an example of the reflectivity problem (on a different chip, but with a similar size inlay). The crisp artwork is basically spoiled when reflecting even a little light:

-
PCF is an eBay Partner. If you make a purchase through one of our links, we may earn a commission at no extra cost to you. Thank you for your support!
You are using an out of date browser. It may not display this or other websites correctly.
You should upgrade or use an alternative browser.
You should upgrade or use an alternative browser.
Relabel these chips with me in real time (1 Viewer)
- Thread starter GreekRedEye
- Start date
And here’s their other textured material on a larger 43mm chip. I can live with this amount of reflection as the size allows the image to still be readable. But on a smaller inlay the same textured grid becomes a little problematic:

Here’s the inlay I am trying to replicate. The texture is the same as the chip itself—visible, but quite fine.

OP
OP
GreekRedEye
Flush
I see. The photos help. I have so far only used the fine mesh and crisp linen on simple designs with high contrast. I wonder if double laminating would work? Like, laminate with crisp linen/fine mesh and then laminate OVER that with smooth satin? Would probably be a hot mess, but only one way to fine out!
I see. The photos help. I have so far only used the fine mesh and crisp linen on simple designs with high contrast. I wonder if double laminating would work? Like, laminate with crisp linen/fine mesh and then laminate OVER that with smooth satin? Would probably be a hot mess, but only one way to fine out!
Huh. I would worry about the inlays getting too thick. Also about the texture on the underlayer creating tiny air pockets under the top layer that could allow in moisture or just feel/look weird.
I’d rather just find another brand of lamination, but it may not exist in self-seal types besides Llama.
For those still interested in handmade labels, I have made a switch from using a tube or roller for the self-sealing laminate applications.
After watching a zillion (mostly annoying) how-to videos on YouTube, I tried using a hard resin squeegee instead, like this:

After peeling back about 3/4" inches of the backing paper, and folding it widthwise, I move the squeegee back and forth across the width of the paper, very slowly pushing the laminate onto the glossy sticker paper.
I really take my time, especially in the early stages (which seems to be when most problems begin).
Before switching to the squeegee, I was losing as much as 30-40% of the labels on each sheet to wrinkles and air bubbles. Of the last six sheets that I did this way, I have almost perfect results—maybe two bad ones out of over 360 labels.
After watching a zillion (mostly annoying) how-to videos on YouTube, I tried using a hard resin squeegee instead, like this:
After peeling back about 3/4" inches of the backing paper, and folding it widthwise, I move the squeegee back and forth across the width of the paper, very slowly pushing the laminate onto the glossy sticker paper.
I really take my time, especially in the early stages (which seems to be when most problems begin).
Before switching to the squeegee, I was losing as much as 30-40% of the labels on each sheet to wrinkles and air bubbles. Of the last six sheets that I did this way, I have almost perfect results—maybe two bad ones out of over 360 labels.
OP
OP
GreekRedEye
Flush
For those still interested in handmade labels, I have made a switch from using a tube or roller for the self-sealing laminate applications.
After watching a zillion (mostly annoying) how-to videos on YouTube, I tried using a hard resin squeegee instead, like this:
View attachment 1322982
After peeling back about 3/4" inches of the backing paper, and folding it widthwise, I move the squeegee back and forth across the width of the paper, very slowly pushing the laminate onto the glossy sticker paper.
I really take my time, especially in the early stages (which seems to be when most problems begin).
Before switching to the squeegee, I was losing as much as 30-40% of the labels on each sheet to wrinkles and air bubbles. Of the last six sheets that I did this way, I have almost perfect results—maybe two bad ones out of over 360 labels.
Thanks for the tip. After laminating a dozen sheets with the tube method, I had one air bubble that ruined about 3 chips. The tube method definitely initially leaves small bubbles, but I can squeegee them out if I start from the center and work outwards.
I'd love to hear details on your St. Maarten project! I have a rack of the $5s in a base T5 mixed ASM mold set and I absolutely love them!
jamesjkim
Full House
I do the same method. I’m 700 labels in on my current project. Zero casualties. I actually trim the laminate to fit within the cut guides and save all excess for smaller projects - too much waste and potential for more bubbles/wrinkles otherwise. It’s an added step but I think it’s worth it.For those still interested in handmade labels, I have made a switch from using a tube or roller for the self-sealing laminate applications.
After watching a zillion (mostly annoying) how-to videos on YouTube, I tried using a hard resin squeegee instead, like this:
View attachment 1322982
After peeling back about 3/4" inches of the backing paper, and folding it widthwise, I move the squeegee back and forth across the width of the paper, very slowly pushing the laminate onto the glossy sticker paper.
I really take my time, especially in the early stages (which seems to be when most problems begin).
Before switching to the squeegee, I was losing as much as 30-40% of the labels on each sheet to wrinkles and air bubbles. Of the last six sheets that I did this way, I have almost perfect results—maybe two bad ones out of over 360 labels.
I'd love to hear details on your St. Maarten project! I have a rack of the $5s in a base T5 mixed ASM mold set and I absolutely love them!
I traded for about 800 here on the forum: Two racks of yellow/green $1s, four of red/blue $5s, two of cream/black $25s, and a handful of drilled blurple/pink (?) $100s. I then bought another rack of $5s from another PCF member in my area (in-person purchase!).
All HHRs.
~100 of the $1s are “replicas” which were made by @AKChip with CPC.
Since it appears to be impossible to find more of the blurple $100s, and I do use hundos in my 2/5 game, I bought 120 black HHRs with the matching (pink) spot pattern from @Gear. Nice deal—already murdered! I’m just finishing making and applying inlays for those. Since I’d already done the design work, I also bought a barrel of purple HHR Atlantic Clubs, which I’m in the process of murdering, to turn into $500s.
So now the set (including ~220 replicas and tributes) is more like 1,000+ chips.
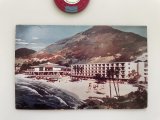
I was able to find typefaces which matched the Sint Maarten Isle Hotel inlay pretty closely. They required a bit of manual tweaking to get a better match, and then I had to do color matching. I also made the background color slightly off-white to fit in with the vintage inlays on the original chips, which were probably white when they were printed but now are very slightly yellowed.
Lastly—and I’ll do a big separate post about this once everything is done—I went on eBay and some other sites and found a bunch of vintage ephemera from this hotel/casino, which opened in 1968 but only lasted a decade or so: matchbook covers, postcards, dice, a token strike, etc. Also bought a short book with a history of Caribbean casinos, and some other specifics about the place online. I’m going to keep all this with the set in the case, and will include them if I ever sell the set.
Attachments
That's what I do as well except I space my labels so there's 4 quadrants and I cut out 4 smaller pieces of the laminate and apply to each quadrant to maximize success and minimize damage if I do mess up.I do the same method. I’m 700 labels in on my current project. Zero casualties. I actually trim the laminate to fit within the cut guides and save all excess for smaller projects - too much waste and potential for more bubbles/wrinkles otherwise. It’s an added step but I think it’s worth it.
View attachment 1323000
OP
OP
GreekRedEye
Flush
I traded for about 800 here on the forum: Two racks of yellow/green $1s, four of red/blue $5s, two of cream/black $25s, and a handful of drilled blurple/pink (?) $100s. I then bought another rack of $5s from another PCF member in my area (in-person purchase!).
All HHRs.
~100 of the $1s are “replicas” which were made by @AKChip with CPC.
Since it appears to be impossible to find more of the blurple $100s, and I do use hundos in my 2/5 game, I bought 120 black HHRs with the matching (pink) spot pattern from @Gear. Nice deal—already murdered! I’m just finishing making and applying inlays for those. Since I’d already done the design work, I also bought a barrel of purple HHR Atlantic Clubs, which I’m in the process of murdering, to turn into $500s.
So now the set (including ~220 replicas and tributes) is more like 1,000+ chips.
I was able to find typefaces which matched the Sint Maarten Isle Hotel inlay pretty closely. They required a bit of manual tweaking to get a better match, and then I had to do color matching. I also made the background color slightly off-white to fit in with the vintage inlays on the original chips, which were probably white when they were printed but now are very slightly yellowed.
Lastly—and I’ll do a big separate post about this once everything is done—I went on eBay and some other sites and found a bunch of vintage ephemera from this hotel/casino, which opened in 1968 but only lasted a decade or so: matchbook covers, postcards, dice, a token strike, etc. Also bought a short book with a history of Caribbean casinos, and some other specifics about the place online. I’m going to keep all this with the set in the case, and will include them if I ever sell the set.

OP
OP
GreekRedEye
Flush
Gotta bring my receipts!I do the same method. I’m 700 labels in on my current project. Zero casualties. I actually trim the laminate to fit within the cut guides and save all excess for smaller projects - too much waste and potential for more bubbles/wrinkles otherwise. It’s an added step but I think it’s worth it.
View attachment 1323000
I hadn't made any labels for chips in a few months, but fired up the Cricut Maker 3 to run a very short batch to relabel a barrel of Jack Cincinnatis.
After doing a software update, I am suddenly having problems which didn't occur just a few months ago. Specifically, it seems that the Maker 3 is having a lot of problems with the Llama self-sealing “Fine Mesh” laminate.
I’ve calibrated several different cutting blades, with no problem. It can cut shapes from materials like cardstock, also no problem.
But when I try cutting circles on the same waterproof vinyl with the Llama laminate applied on top, everything goes haywire.
The machine scans my print-and-cut cropmarks/outlines normally. But when it goes to cut the first circle, it starts moving back and forth jerkily over the same area, over and over again until I cancel the job. This has happened now four times in a row.
Since the machine is able to cut matte materials normally, I suspect that it has something to do with the reflectivity of the laminate. Something in the update may have changed the way the machine “sees” the material. Once it starts cutting, it seems to lose its place and just go over the same area repeatedly. The cuts it makes are 1/4 of a circle or less, and only on the first label.
Anyone else made labels with a Cricut using laminates recently? It seems there are only a few of us doing this on this site.
That's weird, as far as I can tell it only needs to read the print-then-cut orientation marks first, and then it doesn't read at all (the light isn't on) while it's doing the cutting. When I've used glossy laminate in the past that covered the orientation marks, I've had to put matte clear tape over them for the Cricut to read the marks, but it didn't care that the rest of the material had glossy laminate.
I'm on an Explore Air 2, not a Maker 3, so maybe it's different on the more advanced models.
I'm on an Explore Air 2, not a Maker 3, so maybe it's different on the more advanced models.
.... Aaaand after further testing, I don’t think the laminate is the issue.
Got the same problem test-cutting a sheet of labels (~2.2cm diameter) printed on 65-lb. cardstock. After scanning the cropmarks, it jitters back and forth trying to cut the first label in the upper righthand corner.
Bizarre, because if I run a job as a straight circular cut (not print-and-cut) it is fine.
So to further diagnose things, I went back to an old label project I created last fall.
It ran perfectly.
I assume then that the jitter problem is something to do with the project file I created just recently. Maybe it got corrupted. Will have to try starting it over from scratch.
The good news is that the Cricut machine itself seems to still work. Will have to get on the phone with the company on Monday.
OK... So re-creating the project from scratch resolved the issue.
I went back to my image file and re-saved it (as an HEIC, which I find preserves resolution better than JPEGs with the Cricut uploader).
Re-uploaded the image, created a black circle to slice the image, deleted the circle and the trim, duplicated the result as many times as would fit on a page, etc.
This time it had no problem.
So I guess it was just a screwed-up or corrupted layout before. Moral of the story, when in doubt start over?
OP
OP
GreekRedEye
Flush
Can anyone recommend really thin glossy vinyl sticker paper for inket?
As I cannot leave well enough alone...I'm going to relabel the Cache Creeks again to $20. Printed my existing labels on this vinyl on an inkjet: https://www.amazon.com/dp/B07T83CSCG. I am happy with the color and durability. However, if I can find thinner sticker paper that would be better as these are over-labels.
Similar threads
- Replies
- 146
- Views
- 9K
- Replies
- 9
- Views
- 334
- Replies
- 10
- Views
- 410