Custom inlay on generic chips, design feedback appreciated (1 Viewer)

KristanG

High Hand
Joined
Feb 6, 2018
Messages
66
Reaction score
93
Location
Norway
So, as I wrote in another thread here somewhere, I got roughly 800 chips for free. The labels are from a betting company, and I figured, why not try to make my own design instead.
The chips that I got are these:
1684790428846.png

With "Betting Company and X Value" tournament types. Was thinking of relabeling them to better suit a cash game, and took some inspiration from our municipal coat of arms.
1684790622798.png


1684790506352.png


Looking for some honest feedback. 30mm inlay.

"Krone" is our equivalent to Dollar. 10 kroner = ~1 dollar.

Free chips and relabeling with not so expensive labels will cost me roughly 90 USD.
 
Last edited:
Im general, it’s usually not economical to label over the cheaper plastic chips, unless you really like them. With labels costing 20-30 cents per chip, you may do better getting custom cards molds or no-mold chips.
 
Im general, it’s usually not economical to label over the cheaper plastic chips, unless you really like them. With labels costing 20-30 cents per chip, you may do better getting custom cards molds or no-mold chips.
Yea, I realise that, but given the fact that I didnt pay for the chips, and shipping to my adress will be quite expensive for a quality set, I'm inclined to give it a go, atleast for testing purposes. If/when I buy higher quality blanks at a later time, atleast I'll know if the quality from the shop im buying labels from is ok. I dont have a group to play cards with yet either, so I wont be investing too heavily at this time.

(as a side note, I played with these exact chips at a local underground card club a couple years ago, and being a total chip ignorant, i never thought of them being of a lower quality, probably for a lack of anything to compare them to)
 
Sounds like it’s a go! Good luck with these
Thanks! Im afraid to fall into the rabbit hole though, in case it's a success and I manage to get a good group going.


Anyway, printed a super basic test yesterday:
 

Attachments

  • IMG_3269.jpeg
    IMG_3269.jpeg
    192.7 KB · Views: 72
Thanks! Im afraid to fall into the rabbit hole though, in case it's a success and I manage to get a good group going.


Anyway, printed a super basic test yesterday:
Looks surprisingly good...
 
Fwiw, you can print, laminate, and punch your own labels for much cheaper than you can order them, if cost is the issue. See my threads in this forum to see how I did it. By the time my looney tunes set was done I was getting professional-ish results.
 
Why not use most of the coat of arms as is and putting the denomination in the blue field above the whale?
1684954962518.png

I tried using the whole coat of arms, but with the shield itself, the denomination becomes so small, unless I alter the size of the shield it self. Maybe this is an ok version?
 
Fwiw, you can print, laminate, and punch your own labels for much cheaper than you can order them, if cost is the issue. See my threads in this forum to see how I did it. By the time my looney tunes set was done I was getting professional-ish results.
I have already seen the Looney Tunes chips and those are truly great! I've been looking at some stickerpaper from Avery, seems ok.
Do you have a post on the lamination process?
My inlay is 30mm, so this 1,18" circle punch would do the job.
https://www.amazon.com/Scrapbooking...?keywords=30+hole+punch&qid=1684617104&sr=8-7
 
Didn't really do a write-up, it's something like:

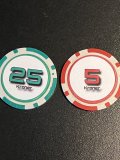
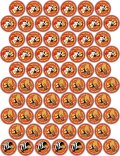
1. I used inkscape to make vectors of all my graphics, and sized them so that they would be maximum quality when printed. I then exported my completed label sheets (I got 65 1" labels per sheet) and turned them into BMPs. I then did test prints on regular paper, making tweaks until I was sure the labels would be sized perfectly for my chips. As seen in the image below, each label has a grey circle outside the label area to aid in centering the punch.

2. Print out my HD labels image (2550x3300 pixels per sheet) onto 8.5x11 laser printer compatible adhesive vinyl. I chose laser because I was worried inkjet might smear, and my wife has free use of a professional quality laser printer at work. This is the vinyl I chose: https://www.amazon.ca/dp/B09B28DBDG?psc=1&ref=ppx_yo2ov_dt_b_product_details

3. Cut my laminate material into 8.5x11 sheets, and apply it to the printed sheets, being careful to allow no bubbles between sheets. The laminate I got was 3m and came on a roll. It was not advertised as 3m, but had markings on it to indicate that. This is the stuff I used, it's glossy but I'd have preferred matte if I could have found it: https://www.amazon.ca/dp/B09HL5GC1R?psc=1&ref=ppx_yo2ov_dt_b_product_details

4. I found a piece of thick-walled steel tubing close to the right size for my labels. I carefully filed, sharpened, and shaped it until it was making the exact size circle I needed. This took awhile to dial in, but it worked great. You can see it in the pics in this thread: https://www.pokerchipforum.com/threads/you-guys-decide.102594/

5. I made an anvil table. Basically this was a 4"x4"x30" length of timber that ran continuous from the concrete floor to the underside of my plywood work surface, so that every hammer blow while punching was as efficient as possible, no wiggle at all. I put a "T" set of legs on it just to balance it upright, then routered out a square in the top of the work surface directly over the 4x4 for a 1/4" thick, 2" square of lexan (polycarbonate plastic) to hammer into. I found this was the perfect surface to punch into to make very crisp punches. The lexan was sacrificial and had to be replaced every sheet or 2, but it was very worth the hassle.

6. Put in earplugs. Hammer and punch and sharpen, hammer and punch and sharpen, hammer and punch and sharpen, hammer and punch and sharpen, hammer and punch and sharpen, hammer and punch and sharpen, hammer and punch and sharpen, hammer and punch and sharpen, hammer and punch and sharpen. You get the idea. For HOURS and HOURS.

All in all it was a very fun project, and I did over 2800 pro-quality labels for under a hundred bucks, if you don't count money I spent experimenting. Under $200 Canadian even with the failures and experiments in the beginning. I'd definitely do it again.
 

Attachments

  • a print 6.jpg
    a print 6.jpg
    349.7 KB · Views: 59
Last edited:
Do NOT go this route. Those punches are toys and caused me nothing but misery. Go on a mission to make your own. This was the #1 cause of frustration on my project.
Oh, then the alternative I thought of might be better. My step dad can turn som steel with inner diameter of whats needed and make a sharp edge there. Great write up, saw you posted it in the original thread too. Thank you very much for the feedback!
 

Create an account or login to comment

You must be a member in order to leave a comment

Create account

Create an account and join our community. It's easy!

Log in

Already have an account? Log in here.

Back
Top Bottom