3 in 1 Poker table repair HELP (1 Viewer)

Personally, I'd replace the original wood surface piece with a hardboard insert that fits flush with the outer wood, fill in those outer grooves, drill out the cup holder holes all the way through the table, and put down full-size foam and speed cloth over the entire thing. Add some real metal cup holders and call it a day.

What is the outside diameter of the table?
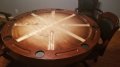
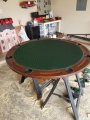
Don’t think it’s deep enough for cup holders because of it being a 3-n-1, not sure if he plans on having it be a regular table.
 
A rail and drilling thru the table aren't an option. The majority of the time the table when not in use will have the playing surface face down and the plain wood table surface would be face up. I think I'm going to go the way of the router suggestion and redo the entire inner area to allow for a pad (and of course I can't forget the T nuts ). Wish me luck this weekend guys. The table as of this writing is stripped of glue and waiting for a quick sand. Let's hope my routrer work doesn't destroy this monster.
 
Not sure how you plan on using t-nuts? Typically they need to be a through bolt type option Even if you epoxy them in you won’t be able to screw down the playing surface with the fabric and foam on it and therefore not making installing/uninstalling beneficial. Probably better to use Velcro or the 3M equivalent.
 
Not sure how you plan on using t-nuts? Typically they need to be a through bolt type option Even if you epoxy them in you won’t be able to screw down the playing surface with the fabric and foam on it and therefore not making installing/uninstalling beneficial. Probably better to use Velcro or the 3M equivalent.

Tnuts in the bottom of the playing surface, bolting through the bottom of the table. That way the insert can be securely installed, but can be easily removed when necessary.
 
Yeah, but he's said drilling through the table isn't an option.
 
C'mon, Randy... I'm smarter than that...

sdgehlsdgkh23oh2.PNG
 
Ok this may sound stupid, but y'all have got me this far. How to I route out that lip? Is there a circular guard I can use so I don't cut too deep into the table? Or do I have to go free hand and be careful to not pull it in too deep. (Not worried about vertical depth I know that's easily set, worried about lateral depth)
 

Attachments

  • 151519549145697214944.jpg
    151519549145697214944.jpg
    69.6 KB · Views: 187
  • 1515195524698794676987.jpg
    1515195524698794676987.jpg
    85.7 KB · Views: 158
Ok this may sound stupid, but y'all have got me this far. How to I route out that lip? Is there a circular guard I can use so I don't cut too deep into the table? Or do I have to go free hand and be careful to not pull it in too deep. (Not worried about vertical depth I know that's easily set, worried about lateral depth)


Flush trim router bit.

FFC8A2D3-308E-4664-AFA3-B47C0D81DB4D.jpeg
 
String/rope/board the length (radius) you need and attach it to the center. You can also buy a jig at any wood working store.
 
String/rope/board the length (radius) you need and attach it to the center. You can also buy a jig at any wood working store.

Ooor, a flush trim router bit above...

Simply adjust the height, so the bearing rides on the outter rim, and it shaves away all the lower wood...

2C8A0B5D-651F-4945-99DE-7A846E5A7141.jpeg
6B321271-3F3A-4A89-B57E-7CCFE1BD9360.jpeg
 
Last edited:
UPDATE:

Well I got lazy and put this project on the back burner, but I finally finished. Since I needed to cut a new circle as well I didn' use a flush trim bit, but got a circle jig instead. Knowing now I wish I got both....for a first project I'm happy with the results. I used 1/4" plywood from home depot. They sell a half sheet for $15 which was the perfect size for the 40" circle. I bought 1/4" volara pad and suited speed felt to cover it. Spray adhesive and a plethora of staples. The results:
 

Attachments

  • 20180310_183823.jpg
    20180310_183823.jpg
    94.3 KB · Views: 202
  • 20180311_140206.jpg
    20180311_140206.jpg
    165.6 KB · Views: 209
  • 20180311_143545.jpg
    20180311_143545.jpg
    190.8 KB · Views: 191

Create an account or login to comment

You must be a member in order to leave a comment

Create account

Create an account and join our community. It's easy!

Log in

Already have an account? Log in here.

Back
Top Bottom