Oiling Chips Done Right (5 Viewers)

The next step is another factor you wont see in the instruction manuals of chip oiling. If you use plastic trays, then you should know that they, too, are porous microscopically. Yes, get that rag out and oil the inside of your trays also, and let them air dry for 1-2 days along side of your chips. You'll be glad you did, as the charge from the plastic can withdraw active oils from within the clay. Oops! Who'd thought their plastic trays were drying out their chips? Just seal them the same way.
View attachment 53918
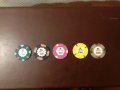
Will my wooden case be affected by the oil in any way? Will the oil ruin the finish on the mahogany? Will the wood draw-in the mineral oil from the chips? Is it safe & recommended to also oil wood racks, just like plastic?
 
Didn't get updated on all the new posts folks, but you're in great hands as many questions were answered well. Also, a hearty "you're welcome" to the many thanks.

I will say, if you're hurting your fingers using this process, you're pressing way too hard. Compression doesn't mean a vice grip hold, and pressing too hard may actually just wipe the oil off as you go. I would apply as much pressure as it takes to hold the weight of a deck of cards with two fingers.

Also, yes, Paulsons respond very, very well to this method. The other question, the facing (center) isn't necessary to oil for labelled chips--in fact, unless a chip is splotchy, just doing the edges is sufficient in most cases. If the chip is new, though, I'd definitely do the edge facings for an initial pore seal.

As for Hourglass, oiling wood is very common. I do this on all cutting boards I collect for my gardening and fishing habits in order to seal them, etc. You can find some very expansive videos on this in YouTube.

That said, if the wood has been treated with just a stain, you can oil it; but if it has been sealed with any type of clear coat, urethane or other noticeable form of gloss or matte coating, then I would not suggest getting any oils on that--nor would there be a need since it is already sealed if so.

To restore wood which has been coated in such fashion, you actually have to sand it with variable grits and recoat it with a similar seal.
 
I found this thread very informative. I tried oiling chips once in 2005 when my new TR King set arrived. I used mineral oil and carefully and painstakingly oiled each of the ~750 chips. Needless to say, after a few days, they looked just as chalky as they did coming from the factory. I was pretty discouraged and never spent the time and effort to oil chips again. I really love those TR Kings, but damn are they dusty. I can imagine how great they would look after being properly oiled. Maybe I will give it another shot! Thanks again, OP!
 
Not sure you see very well.... but whaouw... the difference!
 

Attachments

  • IMG_0684.JPG
    IMG_0684.JPG
    85.9 KB · Views: 509
  • IMG_0685.JPG
    IMG_0685.JPG
    131.5 KB · Views: 479
  • IMG_0687.JPG
    IMG_0687.JPG
    132.6 KB · Views: 538
  • IMG_0688.JPG
    IMG_0688.JPG
    173.5 KB · Views: 467
I am oiling my CPC chips and I notice a negligible difference on the face of the chip (makes a huge difference on the edges), has anyone else noticed this for CPC's?
 
I am oiling my CPC chips and I notice a negligible difference on the face of the chip (makes a huge difference on the edges), has anyone else noticed this for CPC's?

Yes, facing will be negligible for the most part. You can apply a little more oil, but it really isn't worth it. Edges are the part which are seen most and where the cosmetic factor comes in. The rest is a matter of sealing it so the chip facing doesn't have soils getting into the pores.
 
Since I’m sure a lot more people have tried this...any feedback on how long you needed to let your chips air dry?
 
Since I’m sure a lot more people have tried this...any feedback on how long you needed to let your chips air dry?
So long as they've been hand-towel dried, anywhere from 12 to 24 hours with good air circulation is usually plenty.
 
I have never oiled before, but will definitely be coming back to reference this thread when I do! Thanks! :)
 
As i have and play with BG or matsui chips i just put a bit of oil with a sponge and then wipe them with cloth. the process is very useful especially for used BG chips as it makes the colors to pop and get more vibrant, however i find that the chips get a bit more stickier and stick to one each other after they stay in trays for awhile.
I just got a brand new set of Matsui chips. Do you think oiling them would help with the slickness?
 
Does anybody have experience with how the CPS chips respond to oiling? I followed this method with my spirit mold china clays and it made a SIGNIFICANT difference. They still hold their improved color and shine to this day.

I finally finished labeling the CPS blanks, but I won't have time to oil them before my tourney this Saturday and I am chomping at the bit to put them in play.
 
Thanks for the response :) I oiled 10 of them and it didn’t make a difference for the better. I guess I will have to wait until finger grime kicks in :wtf:
 
@Stibnite Have you ever done a side by side comparison of your complete method vs just compression oiling a rack at a time, then wiping the oil off after? I am of the belief that the dry time and recoat is unnecessary, and will only yield minimal gains if any.
 
So a big thank you to @Stibnite for this guide. I oiled my new 600 chip set of Milanos over the last few days and am super impressed with the results.

After washing and leaving my chips to dry for 24hrs, I started oiling n Sunday evening (it's now Tuesday night...)

I went a little lighter on the oil than was originally suggested by OP, using only probably half a cap of oil for all 600, maybe a tad more but barely. This was mostly because i would always prefer to under oil than over oil! I also was quite rigorous with my application, taking 15-20 seconds on each chip. I then have left them to dry out flat for the last 2 days and tonight wiped them down to get any remaining oil off them.

The colours are 100x better than before, and the chips have started to developed an odd matte sheen that i love. I would not say they are glossy at all, i think a benefit from the less amount of oil and the pressure put on during application, as well as air drying...

As of right now there is the tiniest almost imperceptible amount of oil still on the chips that you can feel from shuffling - i assume that this will disappear as they continue to air dry over the next 3 days before my first East Village home game on Friday. New re-felted Barrington table (my post if you haven't seen!), new Copags, new chairs and now freshly oiled new chips - I think we may be ready!

Oiled Milano Pron for you all!

milano1.jpg


milano2.jpg


milano3.jpg
 
May as well post this here, since this thread was the inspiration for a video I made about chip cleaning and oiling. The video is cheesy, and I’m not Steven Spielberg when it comes to cinematography... but if you skip to the last couple minutes it details the oil/water trick, and has comparisons to the method of pressing in the oil by a rag... pretty much the same results. Enjoy (or get a good laugh).

 
I compression oiled my spirit mold china clays the first time and it made a significant difference. now, months later, I noticed they were getting a bit dull so I did @Trihonda's method and it pepped them right back up. The first time I oiled them, I'm glad I went with the compression method, it pulled a significant amount of gunk off the chips. The second time, I'm glad I did the oil and water, because I didn't feel like spending hours doing it. Long story short, they both work!
 
I compression oiled my spirit mold china clays the first time and it made a significant difference. now, months later, I noticed they were getting a bit dull so I did @Trihonda's method and it pepped them right back up. The first time I oiled them, I'm glad I went with the compression method, it pulled a significant amount of gunk off the chips. The second time, I'm glad I did the oil and water, because I didn't feel like spending hours doing it. Long story short, they both work!
Also, YMMV, but in my experience, oiling makes a significant difference in the appearance and shufflability of CC chips. I am in process of oiling my CPS chips and the difference in the colors is noticeable.
 
May as well post this here, since this thread was the inspiration for a video I made about chip cleaning and oiling. The video is cheesy, and I’m not Steven Spielberg when it comes to cinematography... but if you skip to the last couple minutes it details the oil/water trick, and has comparisons to the method of pressing in the oil by a rag... pretty much the same results. Enjoy (or get a good laugh).

Thank you @Trihonda! This was eye-opening. Definitely going for mineral oil+water. (y) :thumbsup:
 
And they were all wrong, too. :)

An adhesive label (often laminated) is just that -- a base material (paper or vinyl), sometimes covered with a protective plastic laminate, with an adhesive glue on the back, which adheres it to the chip surface (usually in a recessed area) when it is applied to the surface of the otherwise finished chip. It is essentially a sticker, and unless using a UV-cured adhesive, relatively easy to remove afterwards.

An inlay is different, in terms of how it is affixed to the chip. The base material (paper, linen, or vinyl) is also usually covered with a protective laminate, but the inlay itself is actually pressed into the chip during the compression manufacturing step, using extremely high pressure and heat. Depending on the specific compression mold being used, the finished inlay may be recessed, or it may be flush with the rest of the chip surface area. It also takes on the surface characteristics of the specific mold, meaning that it may end up with a linen or crosshatched surface finish, or it may end up with a smooth finish -- all dependent upon the mold, not the inlay itself (although matte finish vs glossy is usually a function of the protective laminate material). Because it is actually inlaid into the base chip material (hence the name), removing an inlay is usually extremely difficult, and will often end up destroying the base chip in the process unless done with extreme care.

To summarize:

All plastic chips (including china clays) with artwork have adhesive labels which are applied after the chip manufacturing process is completed (usually injection-molded).

All high-end compression molded chips have inlays which are pressed into the chip during the manufacturing process -- unless the chips are produced as blanks (which have no inlay, but can be later hot-stamped). Some blank high-end chips have a deep enough recess to take a thin label, but others do not -- it is all dependent on the mold characteristics.

And for reference, ceramic chips use a dye-sublimation method to apply ink directly onto/into the surface and rolling edge of a blank chip.

edit: typo
Great explanation! Can you explain the difference between an inland chip and an embossed chip?
 
Figured I would share my results using this method with spotted white THC chips. Color looks better obviously, but my main motivation to do this was how brittle this batch of chips felt after cleaning - very happy with how they turned out. (chips are in order from uncleaned, to cleaned, to cleaned and oiled)
IMG_7207.jpg
IMG_7208.jpg
 

Create an account or login to comment

You must be a member in order to leave a comment

Create account

Create an account and join our community. It's easy!

Log in

Already have an account? Log in here.

Back
Top Bottom