Zathras
Sitting Out
Hi all, first post here on PCF...
I'm getting ready to build a couple tables and am in the research and design mode.
I also have been thinking about a raised, lighted rail design, which is something I haven't done before. Here is a cross section I've been playing around with.
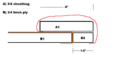
With my current tables, I use basically image 1 with the base and rail lip cut from a sheet of 3/4 high quality plywood ("B") Then I cut the rail from 3/4" sheathing ("A") and the rest of A is scrap. The vinyl wraps around A1 & B2 and the rail just sits on top of the base (B1). The rail is not attached to the table. Basic design and works great.
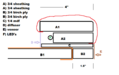
So I was trying to take that same design and expand it for decorative nails on the outside and a light/diffuser on the inside. I came up with image 2 which adds a spacer made from the scraps of A, and a piece of 1/4 (ply or mdf) at the bottom, to provide a larger surface to sit on the base and also to mount the light diffuser to. The top of the diffuser would be up against the underside of the top rail, where the vinyl wraps around, either attached with an L bracket every so often, or just freestanding.
Alternatively I could router a slot halfway thru C maybe just inside the edge, and have the diffuser sit in the slot. But then I have to finish off the front of C with some veneer or something.
Yet another option would be to punt the 1/4" on the bottom altogether and simply mount the diffuser from above using the L-brackets. Not sure if there would be any support issues with this but it would be great to avoid the 1/4" piece.
I've never played on or seen in person a table with a light/diffuser in the rail. However I have seen a number of pix online, and many seem to utilize a slot in the base, to hold the diffuser. Just wondering if anyone has used this technique on attaching the diffuser to the rail, and how that worked out. Any comments about the design in general are welcome.
Also wondering if anyone has used a CNC shop or lasercutting shop to cut their rails, and what the ballpark price was.
I'm getting ready to build a couple tables and am in the research and design mode.
I also have been thinking about a raised, lighted rail design, which is something I haven't done before. Here is a cross section I've been playing around with.
With my current tables, I use basically image 1 with the base and rail lip cut from a sheet of 3/4 high quality plywood ("B") Then I cut the rail from 3/4" sheathing ("A") and the rest of A is scrap. The vinyl wraps around A1 & B2 and the rail just sits on top of the base (B1). The rail is not attached to the table. Basic design and works great.
So I was trying to take that same design and expand it for decorative nails on the outside and a light/diffuser on the inside. I came up with image 2 which adds a spacer made from the scraps of A, and a piece of 1/4 (ply or mdf) at the bottom, to provide a larger surface to sit on the base and also to mount the light diffuser to. The top of the diffuser would be up against the underside of the top rail, where the vinyl wraps around, either attached with an L bracket every so often, or just freestanding.
Alternatively I could router a slot halfway thru C maybe just inside the edge, and have the diffuser sit in the slot. But then I have to finish off the front of C with some veneer or something.
Yet another option would be to punt the 1/4" on the bottom altogether and simply mount the diffuser from above using the L-brackets. Not sure if there would be any support issues with this but it would be great to avoid the 1/4" piece.
I've never played on or seen in person a table with a light/diffuser in the rail. However I have seen a number of pix online, and many seem to utilize a slot in the base, to hold the diffuser. Just wondering if anyone has used this technique on attaching the diffuser to the rail, and how that worked out. Any comments about the design in general are welcome.
Also wondering if anyone has used a CNC shop or lasercutting shop to cut their rails, and what the ballpark price was.