It's really happening - First Table Build (2 Viewers)

TheDirtMerchant

Two Pair
Joined
Mar 10, 2022
Messages
265
Reaction score
221
Location
NJ
It's been a while of being on this forum and saying I'm going to build a table.
Like 5 years on the forum and 3 years since I seriously wanted to build one.
I actually ordered playing surface foam and rail foam and suede 2.5 years ago.
Laziness, forgetfulness, tiredness and a flooded basement have also contributed to the delay...but...I finally started!

I cut the 4x8 sheet down to a 44" width. Going with 96" x 44"
20250518_172148.jpg
1000010483.jpg
1000010484.jpg


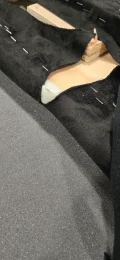
A little DIY for the half circle lines.
1000010486.jpg


Went with a jigsaw for the corner cuts. I think I'll order a Jasper Circle jig for my router and clean these up. If I can find some thin plywood in my garage, maybe I'll DIY
the circle jig.
20250518_191626.jpg


20250518_172148.jpg1000010483.jpg1000010484.jpg1000010486.jpg20250518_191626.jpg

Up against the wall, 2 sheets Oval-ed. I'll have to get back to this asap. And really hoping that its not a long time before I get back to it.
20250518_195643.jpg


Next chance I get, I'll have to get a 3rd sheet of plywood (I had to use the 3rd sheet for a shelving project a while ago and have yet to replace it).
Cut that into the oval for and use for the Top Rail.
And cut the 2nd sheet into the Bottom Rail, Inner Play Area and "Outer Play Area" to act as the holder for the frosted light diffuser.
I'm planning to go 2" Bottom Rail, 2" Outer Play Area and a 5" rail.

I'm basically follwing this plan/thread:
https://www.pokerchipforum.com/threads/custom-poker-table-blueprint.113372/

For the riser...I think I'm using 2x4 (I have plenty of scraps laying around that I can cut into the riser pieces).
I want cupholders in the rail...we'll see how I do with that. I have the corner pieces and this thread to follow:
https://www.pokerchipforum.com/threads/poker-table-build-with-cups-in-rail.103142/#post-2133564

(but that would mean getting another smaller circle jig).
Anyone know if the Jasper Circle Jigs fit on the Harbor Freight routers? I assume they do...but you never know.

Anyway...more to come.
 
And I just saw a comment that the rail should be 6" if there will be jumbo cupholders. So, going with a 6" rail.
If that's the case...I should make the bottom rail and Outer Play Area wider...yes?
 
Last edited:
Had a couple hours and some good weather (finally!).
Routered down the ugly edges on the base and what will be the bottom rail pieces.
What a difference with the circle jig + router compared to my free hand jig saw shakiness.
1000011563-1.JPG
1000011565-1.JPG
1000011564-1.JPG


Here is the base, the bottom rail, outer play and inner play area.
I drilled a hole at a starting point (intersection of straight and curve) to get the router bit down and cut the curve and then clamped a straight edge down and used a circular saw to cut the straights.

1000011567-1.JPG


I will take a sander or possibly route the outer edge of the inner play area and the inner edge of the outer play area. I don't want sharp edges to fray/cut the felt over time...? Is that necessary?

I have to buy another sheet of 3/4 plywood that will be the table rail.
I think I need to get a 1/2" half round router bit to soften up the outer edge of the table rail and the base.
I need T-nuts to put the rail together.
3M Adhesive for the foam and playing surface foam/felt.
 
I am planning to cut cupholders into the top rail, which I will be making a 6" rail.
I'm planning to use 2x4 chunks as the spacers between the top rail and the bottom rail.

Do I need to cut the cupholder "round" down into the bottom rail and outer play area?
DIY thread research upcoming...
 
OK...day 3 of work didn't go well at all.
I realized that I cut down my plywood to 44", but was doing a half circle as if it was 48" (thinking that the full table length is what mattered).

And because of my bad jigsaw skills and wanting to clean up edges I decided to "shorten" my circle. So I centered on 23 3/4" from the end and 22" from side to side, and used the jig to route at 47 1/2" (Base and Bottom Rail), 42 1/2" (Outer Play Area ring), 37 1/2" (Inner Play Area)...I believe that corresponds to 23 3/4", 21 1/4' and 18 3/4" from the "centered" nail. So...I think I have a slightly...not perfect half circle on the end? Not really sure this makes a bad issue...except when I'm giving measurements for thecustom felt...

Anyone good at geometry able to tell me wtf I'm doing?!?! And if this matters?

Basically, I have a larger HEAD than the shaft of my table! LMFAO.


THEN:
With an hour or two of sunlight and good weather and some free time, I decided to try to route out the cupholder rings (I don't have my 3rd sheet of plywood and I'm not sure what else I can do ). Didn't go well at all. I mounted the scrap piece, screwed down another piece of the corner cutoff scrap and tried to route a 4" circle. I think I set the bit too long and it was maybe a crappy bit because I got a lot of smoke and embers and burn marks. Got 1 circle done though. Tried to move 1/2" outward and 1/8 of the way around and the peg pulled out of the hole...not that it mattered because I had clearly put the peg in the wrong hole (*pause*)...and was WAY too close to the inner hole and the ring was basically mush...and burned.

Sigh.

Does anyone still sell those pre-made cupholder rings? Because my woodworking and geometry skills are not good.

1000011622.jpg
 
Last edited:
  • Wow
Reactions: Kam
3rd sheet of plywood ordered, expected delivery on Thursday.

Anyone want to weigh in on...The 2 pieces already cut are the expensive stuff. Cabinet grade birch 3/4", $80/sheet at HD.
This 3rd sheet, I "cheaped" out a bit and got AC plywood (1 side sanded smooth, other side not) and its pine.

Is it ok to use the pine as the Rail or the Base? Or is it really not advisable to use pine plywood for either part? I can switch to the expensive stuff still...
I'd use the pine for the rail, smooth side down.
 
OK...day 3 of work didn't go well at all.
I realized that I cut down my plywood to 44", but was doing a half circle as if it was 48" (thinking that the full table length is what mattered).

And because of my bad jigsaw skills and wanting to clean up edges I decided to "shorten" my circle. So I centered on 23 3/4" from the end and 22" from side to side, and used the jig to route at 47 1/2" (Base and Bottom Rail), 42 1/2" (Outer Play Area ring), 37 1/2" (Inner Play Area)...I believe that corresponds to 23 3/4", 21 1/4' and 18 3/4" from the "centered" nail. So...I think I have a slightly...not perfect half circle on the end? Not really sure this makes a bad issue...except when I'm giving measurements for thecustom felt...

Anyone good at geometry able to tell me wtf I'm doing?!?! And if this matters?

Basically, I have a larger HEAD than the shaft of my table! LMFAO.


THEN:
With an hour or two of sunlight and good weather and some free time, I decided to try to route out the cupholder rings (I don't have my 3rd sheet of plywood and I'm not sure what else I can do ). Didn't go well at all. I mounted the scrap piece, screwed down another piece of the corner cutoff scrap and tried to route a 4" circle. I think I set the bit too long and it was maybe a crappy bit because I got a lot of smoke and embers and burn marks. Got 1 circle done though. Tried to move 1/2" outward and 1/8 of the way around and the peg pulled out of the hole...not that it mattered because I had clearly put the peg in the wrong hole (*pause*)...and was WAY too close to the inner hole and the ring was basically mush...and burned.

Sigh.

Does anyone still sell those pre-made cupholder rings? Because my woodworking and geometry skills are not good.

View attachment 1518539
Either 3D printer of pvc pipe is another proven hack.
 
Bring your cupholder to the store. If it fits and catches your cupholder you got the right size. Cut them how you choose and glue them in place
 
Either 3D printer of pvc pipe is another proven hack.
I saw you? someone? mention that in another thread, but did not see the outcome.
4" PVC is the size?

And that would be better than 1/2" incremented hole saw to make a ring in plywood?
 
3rd sheet of plywood ordered, expected delivery on Thursday.

Anyone want to weigh in on...The 2 pieces already cut are the expensive stuff. Cabinet grade birch 3/4", $80/sheet at HD.
This 3rd sheet, I "cheaped" out a bit and got AC plywood (1 side sanded smooth, other side not) and its pine.

Is it ok to use the pine as the Rail or the Base? Or is it really not advisable to use pine plywood for either part? I can switch to the expensive stuff still...
Rule of thumb; if it’s covered it’s the cheap stuff.
 
I saw you? someone? mention that in another thread, but did not see the outcome.
4" PVC is the size?

And that would be better than 1/2" incremented hole saw to make a ring in plywood?
Depends on the cupholder. I’m a haul with guy. Jumbo is 4” I believe.

You know, two-way v. jumbo etc etc

Two-way bad. Jumbo is the correct move. But, you have to plan for the rail to handle the jumbo. 6” wide.
 
Depends on the cupholder. I’m a haul with guy. Jumbo is 4” I believe.

You know, two-way v. jumbo etc etc

Two-way bad. Jumbo is the correct move. But, you have to plan for the rail to handle the jumbo. 6” wide.
That’s why people stay away from jumbo. Requires the wider rail.
 
OK...3.5 months later...JUST HOLD THEM OFF FOR A FEW SECONDS...ALLLMOOSSTTT THERE...ITS AWAY...NEGATIVE NEGATIVE IT DIDN'T GO IN, JUST IMPACTED ON THE SURFACE

Cutout the cupholder spots and made some rail spacers.
20250824_190714.webp
20250824_194505.webp


Following one of the other build posts image for reference.
20250824_194901.webp
20250824_194522.webp


Gluing down and nailing the spacers to the rail
20250826_190419.webp
20250826_194315.webp


Clamping the pieces together so I can drill for the threaded inserts and connecting bolts.
20250829_184625.webp


Checking how the diffusor fits/looks (what a pain in the ass to cut the acrylic)
20250830_145650.webp


I cut a 4" PVC into roughly 3/4" thick rings for the cupholder supports
20250830_181856.webp
20250830_181904.webp


Glued and stapled down the custom felt to the playing surface / base
20250831_172244.webp
20250831_174929.webp


Laid out the foam, glued it down and cut out the cupholder spots (I laid the foam on top, cut out 1 cupholder at a time and sprayed the 3M glue on each local area and pressed, then moved to the next spot). Used whatever I had to hold the foam in place until it held.
20250901_105319.webp
20250901_113546.webp
20250901_113553.webp


Cut it out and wrapped it up!
20250901_122615.webp


I don't have any pictures of putting the suede on the rail (most likely because I was busy sweating my ass of and my fingers wouldn't work properly).
Bur Argos approves of the cushioning and suede as he rests his head while I work
20250901_230336.webp


My biggest SNAFU (and I'm not sure how to not do it in the future).
There were several spots along the curve or along the flat side right next to the curve where I apparently cut too the suede too close to the rail and left an opening when stapling. So the white foam is sticking out. I'm praying that the suede doesn't just tear and completely ruin the whole thing...I resorted to putting black duct tape (duck tape brand!) to hold those spots together and somewhat camo them. Really unhappy with this, but not unhappy enough to buy new suede and do it over. ANYONE...next time, do I just not cut as close to the rail and that won't happen?

20250901_232300.webp
20250901_232534.webp
 

Attachments

  • 20250901_232520.webp
    20250901_232520.webp
    126.8 KB · Views: 15
Last edited:
*EDIT* - Edited above post to put the pictures in context.


Trying to get this done in the next couple days.
I'm tired...but I'm really happy with how this is progressing and coming out (except the foam showing through the rail...damn it)
 
Last edited:
I got the table legs off of Craigslist for free. I took the legs and supports off and threw out the top.
When I screwed the legs on, boy was it wobbly. But once I got the metal stabilizer bar/supports on...it seems very solid.
Those table designer people know what they're doing.

Its got SNAFU's for sure, but...it's pretty damn good and I'm REALLY damn happy!

Thanks to Ray and others @T_Chan , who were all excellent and incredibly patient with me. Literally weeks of emailing back and forth... About the felt, the suede, cupholders... Every detail. And helpful, friendly and honest the whole way.

Also a big thanks to @Irish for answering random questions and having posted all those helpful table build tricks\tips, (which, even though I had to confirm what I read a thousand times and STILL messed up!, was absolutely what I needed to get this done well) and anyone on the various threads that answered my questions.

I'm so happy and proud to say THANK YOU and... So it is written, so it will be done.


1000014455.webp
1000014456.webp
1000014480.webp
1000014481.webp
1000014482.webp
1000014484.webp
1000014485.webp
 
Last edited:
Looks great - nice job :cool

I have a (faux) suede rail and this

5shK1GV.png


will become your best friend :)

(good for the cloth and chairs as well)
 
My biggest SNAFU (and I'm not sure how to not do it in the future).
You might be able to salvage this. Looking at the picture, it looks like you haven't compressed the foam on the inside of the rail at all. The foam should compress enough that the edge of the foam (closest to the center of the table) is right against the wood.

You might be able to remove the existing staples, stretch the suede outward (towards the center of the table), then upward, then pull it tight into the rail. You may just get enough movement so that the gaps in the suede are on the wood, not on the foam.

Might be too late though, now that you have cut the cup holder holes out.

Best of luck!
 
Question...what have people done to power the LED and not trip over the plug for the lights?
Those rubber floor power cord runners?
Is there a battery pack I can buy to connect to one of THESE ?

My table is close to a wall and outlet...but the cord will be a trip hazard/rip out of the table hazard etc...
 

Create an account or login to comment

You must be a member in order to leave a comment

Create account

Create an account and join our community. It's easy!

Log in

Already have an account? Log in here.

Back
Top Bottom
Cart