CUSTOM POKER TABLE BLUEPRINT (1 Viewer)

Joined
Jan 19, 2020
Messages
146
Reaction score
158
Location
ontario, canada
Hey Gang! I'm just about to dive into my first table build and thought it would be great to have the community "proof read" my design and get some feed back from the experts especially before I jump into getting a custom cloth made! My intention is to have a comfortable 9 player table. Cup holders will be swing out, undermount style, there will also be USB chargers at each spot which is why you'll see one extra layer in my design labeled "wiring spacers". I will be hiding/sandwiching all of the wiring between the playing field and the base to keep everything tucked away.

I could really use some solid advice on what is the best foam or combination of foams to use under a custom cloth for the playing field. I've been told the 1/4" closed cell high density foam makes for a bit of a hard playing field... any experience would be greatly appreciated! One idea that I've gone with to try to reduce the weight is to go with 5/8" material rather than 3/4" that seems to be the standard. If anyone thinks that's going to be a big mistake please let me know! haha All of my dimensions are labeled on the drawing but if I've missed anything or if anyone sees an issue please let me know!

Thanks so much in advance everyone, really excited to get started!

1702530104413.png
 
The sketch looks familiar ;)
5/8“ should be fine. I used this myself and the table is as sturdy as can be.
Consider that adding the wiring spacers beefs up the table quite a bit. Also, does the playfield then float except on the edges where it lies on the spacers?
Instead of using the spacers I would cut channels into the base to hide the wiring. If there are a lot of wires maybe go with 3/4“ for the base only.
Yes!! Your sketch was definitely the inspiration! There's no chance my table will look like yours though haha I don't have space in the house for a great set of legs like that! ;) haha This table will be in the garage. Okay, I was worried about going 5/8" but I thought the same regarding the strength considering my layers. The playing field would also have multiple spacer in the center as well to support the middle. Cutting channels was also a thought but now with the spacers, I'm looking at adding "pop-out" style cup holders as well given that extra layer and space.... maybe I'm going overboard for the first build? lol Now that you've had some time on your table, any recommendations on the playing field foam? too hard? just right? Also, do you remember roughly how long the design and delivery took for that stunning custom cloth from @T_Chan ? Really appreciate the input!
 
Are you installing cup holders in the rail, if so make the rail 6". I made my rail 5" and that was a mistake, as I have the cup holders in the racetrack, but I want to remove the racetrack, and move the cup holders into the rail. I will now have to redo the rail, foam and vinyl.
 
Are you installing cup holders in the rail, if so make the rail 6". I made my rail 5" and that was a mistake, as I have the cup holders in the racetrack, but I want to remove the racetrack, and move the cup holders into the rail. I will now have to redo the rail, foam and vinyl.
No race track or rail cup holders. I was looking at pop out holders based on an extra layer (wiring spacer layer in the diagram) I have in my design but now I'm actually going back to looking at a more dynamic system of undermount cupholders that are not in fixed positions so that seating can be more flexible. Still haven't found the best system for that yet.
 
Yes!! Your sketch was definitely the inspiration! There's no chance my table will look like yours though haha I don't have space in the house for a great set of legs like that! ;) haha This table will be in the garage. Okay, I was worried about going 5/8" but I thought the same regarding the strength considering my layers. The playing field would also have multiple spacer in the center as well to support the middle. Cutting channels was also a thought but now with the spacers, I'm looking at adding "pop-out" style cup holders as well given that extra layer and space.... maybe I'm going overboard for the first build? lol Now that you've had some time on your table, any recommendations on the playing field foam? too hard? just right? Also, do you remember roughly how long the design and delivery took for that stunning custom cloth from @T_Chan ? Really appreciate the input!
I used Ensolite for playfield padding. At least I think that I do because in Germany the product goes by a different name. It’s very firm in my opinion. I would have liked it just a tiny bit softer. But I didn’t want to use HD foam because I hated the idea of someone pressing down the foam and feeling the wood underneath. I don’t know if that makes sense. Card pickup and chip stacking works great though, so I’m still fine with my choice.

The design phase depends almost all on you and how good of an idea you have of what you want. Took @timinater and myself about 3 weeks of back and forth. Printing depends on Tony’s backlog I guess. Just ask him.
 
Progress Update:

This is my very first build and I'm going for the raised rail as it's always been my dream since seeing them in the early days of the WSOP on ESPN :love: I'm sure there's going to be lots of "shoulda, coulda, woulda" moments but I'm more than happy to spend time building another one already! Haha I've completed all the woodworking necessary to get to the upholstery stage, unfortunately due to the holidays, local suppliers are closed at the moment. I'm ready for foam, vinyl and felt! My design was inspired by @LeRoi 's stunning Ocean Club table, however, I don't have a permanent spot in the house for mine so I won't be building the same stunning set of legs .... yet... ;)

To start, I've already altered my original design (1st post) by building my table at 84" x 42" (7' x 3'-6") instead of the 94"x46" (7'-10" x 3'-10"). Yes this is a smaller size. I had to think about storage and weight as well as the typical "spare" room sizes we play in are around 10ft x 12ft so this size table would allow 8-9 comfortably with chairs in that size room. It's also built completely out of 5/8" one side sanded plywood. Firstly, I knew that I 100% wanted to install a custom felt from @T_Chan so I was looking to save costs where I could in order to spend on what was more important to me. Secondly, I wanted to see if I could achieve a reduced weight without compromising the strength. I figured that there will be plenty of strength with the full solid base under the playing field and a glued and nailed raised rail acting like a structural perimeter beam. I've also decided to forgo the "wiring spacers" level and the USB chargers for now...

So with that... on to the build..

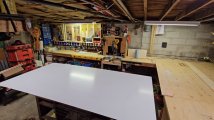
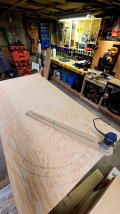
To start, I needed to cut down the full sheets to my rough finished dimension of 84"x42". With all 3 sheets together, I just used my circular saw and a straight edge to cut the length down. Don't worry, when I win the main event I'll scrape together some coin for a track saw but for now, my 4' level will do :sneaky:
1704242425582.jpeg
1704244445476.jpeg

Then I ripped the exact width on my table saw...
1704244550584.jpeg

Next, I have all 3 sheets fastened together in order to cut the perimeter profile as each layer has the same outside dimension to start. For all cuts going forward, I made a simple circle cutting jig for my trim router. Ideally, it would be better to use a full sized router as the motor is bigger and can handle more cutting but again I'll buy that when I'm making my WSOP trophy case ;). Even though I had my cutting jig, I still prefer and recommend to draw out all of your layout/cut lines right on the plywood before doing any cutting. Remember, cut first, measure last... or something like that...:unsure: haha But honestly, materials aren't cheap these days so it's worth grinding down some lead to make sure you have everything covered before you make your first cut!

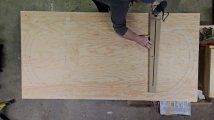
Make yourself a simple circle jig to help you draw it out by using a scrap piece that's at least 6" longer than your longest radius. Then drill a hole in the center of one end about 2" or 3" from the end. This is your pivot point where you will use a bolt or rod (I just use the same bolt clamp from my circle cutting jig) to insert into the plywood at your center points. Next, measure and mark each length of radius you need from the center of your drilled hole. Now drill holes at each of your radius measurements (making sure the hole is big enough for your preferred marking tool or pencil) Now you have a giant circle drawing tool!
1704246074484.jpeg
1704246323180.jpeg
1704246859896.jpeg

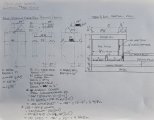
Your outside radius will be half the total width of your table. My table width is 3.5ft so the radius I need to layout is 1.75ft or 21". To start your layout, find the center of your circle by measuring from the end of the table inward the same distance as your radius, in my case 21". Then measure the same distance from the long edge of your table and wherever the 2 points meet, that's the center where all of your radius cuts will be laid out from. Once you have marked this point on both ends of the table, go ahead and drill a straight hole right through all 3 sheets the same diameter as your pivot bolt/rod, preferably no larger than 1/4". **Again, ensure your 3 sheets are flush and fastened together before you drill this hole.** Also, using your radius measurement, make a straight line across your sheet at each end, this will be your stopping point when cutting your half circles. You can also make a center line on your half circles to help you with bolt layout in later steps.
1704245752219.jpeg
1704245812741.jpeg

1704246937636.jpeg
1704246976048.jpeg

1704248332395.jpeg
1704248367255.jpeg

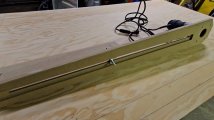
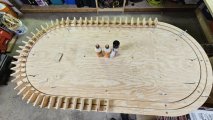
One catch while doing my layout was that I hadn't accounted for the 1/4" cut from my router bit between my 2" rings so I had to adjust my layout in order to compensate for that. The first, most outer ring is the base for the rail risers, the second ring is the support for the diffuser as the acrylic will be "pinched" between this ring and the playing field which is the inner most part of this layout. After cutting, each ring and between the playing field will have a 1/4" gap. Good catch but for this step we're just cutting the outside profile, cutting the interior rings will come afterwards. (All dimensions are posted in the "section view" in the plans from post #1)
1704247117763.jpeg
1704247177575.jpeg

Next, after laying out each of your radius lines, connect each one using a long straight edge.
1704247477734.jpeg
1704247456284.jpeg
 

Attachments

  • 1704249127356.jpeg
    1704249127356.jpeg
    85 KB · Views: 46
  • 1704249159999.jpeg
    1704249159999.jpeg
    85.8 KB · Views: 37
  • 1704249186692.jpeg
    1704249186692.jpeg
    131.7 KB · Views: 37
  • 1704249249154.jpeg
    1704249249154.jpeg
    83 KB · Views: 35
Now, we can move onto cutting the outside profile! This is where the router circle jig comes into play and I won't go crazy explaining how to build that but its very similar to the circle drawing jig with a few more steps. I'm more than happy to go into more details on the router jig if anyone has any questions at all! Now there's more than one way to cut a table, you can also freehand a jig saw for everything, use a combo of jig saw and circular saw or even a combo of all three! I chose this method because with a circle jig, I feel that I can get the cleanest most accurate cuts especially on the radius cuts. Also, I wanted exactly 1/4" gaps between my rings for perfect spacing for the acrylic diffuser. This can still be accomplished using other cutting methods and I'd be more than happy to help anyone with any questions if you don't have access to a router.

So! Using my trim router, a 1/4" upcut spiral bit and my circle jig, I got to cutting.... well some cutting... okay mostly burning... :cautious: 
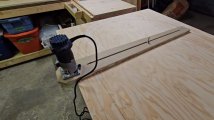
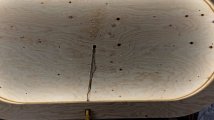
Here's the thing, I had this bit from a cheap set and needless to say please don't waste your money or time on cheap tools... more on that in a minute. To start my cuts, I set up the router to only cut a little less than a 1/4" deep at a time so I didn't put to much strain on this little guy. So smaller cuts, more passes. I placed my cutting jig into the pivot point hole and because I had already cut my width to the exact size on my table saw, I only had to adjust my jig until the bit just touched the edge of the plywood and then i could lock it in place. Next, with the jig locked in place at the right measurement, I double checked by flipping it to the other end of the cut to make sure I was going to end up on the right line... so far so good, lets cut!
1704250184397.jpeg
1704250204350.jpeg

1704250640339.jpeg
1704250665555.jpeg

Slowww and steady... I start up my shop vac and get to cutting... and then burning... :oops: damn cheap bits...
1704250824780.jpeg
1704250868347.jpeg

1704250906961.jpeg
1704250950556.jpeg

Well maybe lets burn... uhggg... After burning through 2 bits from the cheap set I decided to go and get a proper 1/4" straight cut bit and just like magic.. dust was flying!
1704251127818.jpeg
1704251162561.jpeg

1704251198490.jpeg
1704251251487.jpeg

Next, I removed the top sheet with the layout and the next sheet that would be the base of the table. With the remaining sheet on the bench, I laid out the players rail. My rail is designed at 5" in width. I chose not to install any cup holders in the rail or table top as I will have an undermount cup holder system instead. With that in mind, I didn't require the rail to be any wider. Since the outside of the rail is the original 3.5ft wide with a radius of 21", by subtracting the width of the rail (5") from that 21" radius I have my new inside radius measurement of 16". Make another radius hole in the layout jig and get to drawing! I also made sure to set up another square stop line where the circle cutting needs to stop and transition into the long straight cut and then connected the radius layout lines using the 4' level as my straight edge. Finally, because I don't have a plunge router, I drilled a 1/4" pilot hole at one end of each radius line for my 1/4" router bit to start the cut.
1704252374578.jpeg
1704252666797.jpeg

1704252707131.jpeg
1704252760363.jpeg

Next... cutting the rail! With the new high quality bit and no burning, everything is running much smoother! I set up the circle cutting jig by dropping the router into the pilot hole and clamping the jig. Still cutting a little less than a 1/4" deep at a time, this time, cutting was a breeze.
1704253274057.jpeg
1704253479594.jpeg

1704253499068.jpeg
1704253524689.jpeg
 
After cutting the players rail, the two pieces are put to the side and the plywood with the layout for the riser base ring, the diffuser support and the playing field are back on the bench ready to be cut. Basically the steps are exactly the same as cutting out the players rail. But first, I put the base sheet under the layout sheet and drilled for the connection bolts to make sure everything was properly aligned before cutting. For this, I used a 1/4" drill bit to drill through both sheets and a 3/4" forstner bit to countersink for the "T-nuts" that will be installed in the surface of both rings and the playing field to be able to lock everything down to the base.
1704254059575.jpeg
1704254737351.jpeg

1704254869368.jpeg
1704254917948.jpeg

1704255056396.jpeg
1704255075241.jpeg

After cutting the players rail, the rings and the playing field, the next step is to bolt everything back together to the base and create a mock up to figure out what riser height I wanted to go with.
1704255308456.jpeg
1704255326839.jpeg

1704255362855.jpeg
1704255391147.jpeg

There are a few things I wanted to consider when figuring out the rail height. Would the height be comfortable to peek at your hole cards? Does the height of the rail allow for a visually appealing LED light riser? and does the height give enough of an arena feeling that I was looking for? Keeping in mind that the playing field foam will be approximately 1/4" in height, I figured that I wanted something around a 1-1/2" to 2" exposed LED riser. I cut both 2" risers and 2-1/4" risers to test both heights. I eventually decided on the 2-1/4" riser. (The long exposed bolts in the playing field are just temporary until the short bolts come in)
1704256190753.jpeg
1704256212379.jpeg

1704256381993.jpeg
1704256492317.jpeg

Now I had to double check the exact length for the risers considering both the inside and outside of the riser piece will be covered by a 1/8" plywood. The outside needs to end up flush and the inside needs to end up 1-1/8" inside the face of the players rail. It's clear based on the math how long they need to be but it's always good to double check as sometimes physical materials aren't as exact as math. So I cut based on my math and used a piece of the 1/8" plywood as a spacer to double check.
1704257183367.jpeg
1704257201463.jpeg

1704257415954.jpeg
1704257457693.jpeg
 

Attachments

  • 1704256289741.jpeg
    1704256289741.jpeg
    86.7 KB · Views: 43
  • 1704257692083.jpeg
    1704257692083.jpeg
    131.7 KB · Views: 33
Last edited:
Now time to glue! For the glue up, I used both miter bond for clamping and gorilla glue for strength. With all parts bolted in place, I glued the risers to the riser/player rail base using the height of the riser as a spacer between each piece and a piece of that 1/8" plywood to make sure I had proper spacing on the outside of the rail.
1704258276422.jpeg
1704258411263.jpeg

I clamped the players rail on top of the risers and let the glue cure overnight before installing the 1/8" plywood.
1704259078672.jpeg

The next day I used gorilla glue and brad nails to install both the inner 1/8" plywood that the COB LED strip mounts to and the outer 1/8" that closes the gaps in the rail.
1704259203226.jpeg
1704259222580.jpeg

1704259274071.jpeg
1704259287548.jpeg

Once the 1/8" plywood was installed, I lightly sanded all edges to remove any burrs or sharp edges. I also put the players rail back up and used a 1/8" round over bit in my router to clean up the top edges of the players rail so that there are no sharp edges digging into the foam causing it to breakdown faster.
1704259388065.jpeg
1704259546703.jpeg

Once that was complete it was onto lighting! After reading many threads on here, it was pretty obvious that if you don't want "spotting" or dark spots with your lighting and you want a professional finish, there are 2 crucial ingredients... COB LED light strips and a proper diffuser! At first I only chose one of those and immediately regretted it... Firstly we'll talk about the lights! I was debating going with a colored light stringer but after reading a few threads about how most of the time the color was never used and that the white light looked the best and also the cost savings, I ended up just going with the natural light 4000K COB LED lights. The COB LED lights produce a rope light effect and I must say they are absolutely excellent! However, I may have to add in a dimmer as the 4000K are as bright as hangover sunshine! No Joke! There were a few considerations that went into choosing the voltage as well. I read on a lighting blog that the 12V had more voltage drop in longer strings of light which would effect the color or brightness and also had the potential to heat up more. Reading that, I decided to go with the 24V set. Now they all seem to run DC current so you'll also likely need to get a transformer for the power. If they don't come together, just make sure that the transformer is for the same voltage as the lights you buy. (12V vs. 24V) Also, see my blueprint in the 1st post to see how to calculate the length of light you'll need.
1704260339376.jpeg
1704260360378.jpeg

1704260408469.jpeg
1704260488127.jpeg

1704260456189.jpeg
1704260551929.jpeg

In order to keep the cords and transformer out of the way, I drilled a hole in the center of the base layer of the table so I could attach the transformer out of the way below the table and run the wiring up into the players rail where it connects to the light stringer. To make that connection, I used my router to create a channel in the base plywood to hide the cable underneath the playing field.
1704260825280.jpeg
1704260876492.jpeg

1704260921641.jpeg
1704261042614.jpeg
 

Attachments

  • 1704261007783.jpeg
    1704261007783.jpeg
    76.6 KB · Views: 28
The second key ingredient to lighting is the diffuser... I thought I was sooo smart finding a broken $300 piece of clear acrylic at Home Depot and negotiating it down to $40... no returns... :( 
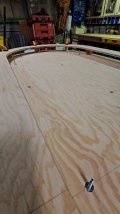
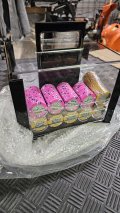
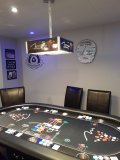
Turns out I just scammed myself by thinking I could just use spray on window frosting to make this work as a pro diffuser... lol Well, after wasting $60, I learned that I am not smart... haha I tried everything, I sprayed multiple coats, I sprayed both sides with multiple coats, I sanded it (both sides), I sprayed it after sanding it on both sides... absolutely nothing I did could get that clear acrylic to diffuse that blinding death ray of a light. Interestingly enough, in my desperate attempt not to "lose" I found some packing foam and tested different thicknesses that seamed to work really nicely at diffusing the light! Maybe a future product! So anyway, I came back here to the forum and looked for more details on the diffuser and definitely got my answers! Turns out that no mater what, if you want a professional look, at minimum you'll need to be using sign grade white acrylic material to diffuse your COB LED's. I was shocked that I was able to get a response during the holidays from a shop that was about 45 mins away from me so when they said they were open I told them my dimensions and they gave me a price but they couldn't cut it that day so I asked how much for a full 4'x8' sheet and it was a no brainer! I took the whole sheet with me, switched out to a fine finishing blade on my table saw and very carefully, cut what I needed. The results are night and day!

1704263561942.jpeg
1704263600122.jpeg
1704263637739.jpeg
1704263669075.jpeg

1704263698622.jpeg
1704263845026.jpeg

1704263893493.jpeg
1704263972455.jpeg

1704264029122.jpeg

Now that all the details are figured out, I will glue and nail the top ring of the Player rail to the risers and then wait for the material shops to open and move onto what seems to be everyone's nightmare... upholstery.... dun dun dunnnnnnn.... Haven't started my design yet on the custom felt, I will be working on that this week.
 

Attachments

  • 1704263748036.jpeg
    1704263748036.jpeg
    112.4 KB · Views: 25
Hey Gang! I'm just about to dive into my first table build and thought it would be great to have the community "proof read" my design and get some feed back from the experts especially before I jump into getting a custom cloth made! My intention is to have a comfortable 9 player table. Cup holders will be swing out, undermount style, there will also be USB chargers at each spot which is why you'll see one extra layer in my design labeled "wiring spacers". I will be hiding/sandwiching all of the wiring between the playing field and the base to keep everything tucked away.

I could really use some solid advice on what is the best foam or combination of foams to use under a custom cloth for the playing field. I've been told the 1/4" closed cell high density foam makes for a bit of a hard playing field... any experience would be greatly appreciated! One idea that I've gone with to try to reduce the weight is to go with 5/8" material rather than 3/4" that seems to be the standard. If anyone thinks that's going to be a big mistake please let me know! haha All of my dimensions are labeled on the drawing but if I've missed anything or if anyone sees an issue please let me know!

Thanks so much in advance everyone, really excited to get started!

View attachment 1239926
I will upload the updated drawings with measurements shortly.
 
Rail is completely glued and nailed and the correct bolts for the playing surface came in... now to find all the right materials for foam, vinyl and felt!

Any suggestions of the foam would be great!!
20240103_161654.jpg
20240103_152246.jpg
20240103_152150.jpg
 
Rail is completely glued and nailed and the correct bolts for the playing surface came in... now to find all the right materials for foam, vinyl and felt!

Any suggestions of the foam would be great!!

Still looking for advice on the rail foam and if anyone has experimented with a combination of playing surface foams?
 
Here's the type of acrylic that I'm using on my current table project. They call it "sign" white from the place where I got it. I purchased a whole 4x8 sheet and just cut it on my table saw with a fine blade. In the 2nd picture, you can see how well this material diffused the COB LED stringer. You'll see the actual colour code below as "WT-7328" hopefully this helps anyone looking to find something from a plastics seller close to you!
1704393083370.jpeg
 
Still looking for advice on the rail foam and if anyone has experimented with a combination of playing surface foams?
I got my rail foam from Straight Poker Supplies in Toronto. The rail foam comes 110"x12" , so I ordered 2, and joined them together with 3M Super 77 spray glue, so that the seam was near perfect. When I installed the stretch vinyl over the foam no seam was noticeable. It's 1.5" thick, so the plywood rail cannot be felt, no matter how hard one leans on the rail.
The foam is the perfect consistency for a rail.
Appreciate it! I would have thought that the seam in the foam would be noticeable. Did you also get the playing field foam from them?
 
Appreciate it! I would have thought that the seam in the foam would be noticeable. Did you also get the playing field foam from them?
The 3M spray will bond that foam together quite nicely. I also use that 3M for any auto carpet work I do as well. I purchased a 1/8" thick standard foam from a local Fabric business. I wish that I had used the 1/4" standard foam instead from Straight Poker Supplies. The standard foam has give to it, so with only 1/8", wen the chips are thrown on the table, they tend to bounce more than they should. I think the 1/4" stuff would prevent that.
I have purchased most of my poker supplies from them, including the cup holders.
I love following your build. Great job on everything Cant wait to see the finished product.
Your project has me thinking of redoing my table with some of your ideas.
Really appreciate your insight on that! I bought my chip set and 2 cases from them as well and they were excellent to deal with! I'm thinking about adding their folding legs in with my order of that foam... hopefully the legs are quality too!
 

Attachments

  • 20231210_180639.jpg
    20231210_180639.jpg
    341.8 KB · Views: 65
  • 20231214_181639.jpg
    20231214_181639.jpg
    173.7 KB · Views: 64
I have a dedicated room for my poker games so I have solid pedestals to hold my table.
I have a buddy with folding legs, and his table is not that sturdy...but to be fair, his table is not as solidly built as your table. I'm certain your table will have some weight to it. He only used one 8 x 12 sheet of 3/4 plywood so it's light as a feather, so that's why it is a shaker lol.
 
Really appreciate your insight on that! I bought my chip set and 2 cases from them as well and they were excellent to deal with! I'm thinking about adding their folding legs in with my order of that foam... hopefully the legs are quality too!
I purchased the exact same poker chips from them, but then I found this site and went down the rabbit hole...I sold my Cash Club Chips locally to a buddy, and purchased some of the monthly group buy chips from Justin Carrothers.
The cash club chips are good chips and my players liked them as well.
 
I purchased the exact same poker chips from them, but then I found this site and went down the rabbit hole...I sold my Cash Club Chips locally to a buddy, and purchased some of the monthly group buy chips from Justin Carrothers.
The cash club chips are good chips and my players liked them as well.
Hahaha ohh I'm slowly chasing that carrot too haha I just wanted to get a full time game going before investing more! Haha
 
Hahaha ohh I'm slowly chasing that carrot too haha I just wanted to get a full time game going before investing more! Haha
I hear ya...I have some casino chips but I'm not prepared to make a set of those. The no mold textured chips from Justin fit the bill...for now..lol
The guys I play with would use shirt buttons, so nice looking expendive chip do nothing for them.
I'll likely keep my Mirage replica Chips for a long time.
Do you have any pics of your chips so I can start dreaming? Haha
 
We only play low stakes cash games, more just socializing once or twice a month.
$20 buy in, top ups to another stack when down to $5 in 4.5 hour games, then cash outs.
We used to play tournament style, but guys would be out early so we decided cash games were much better to have a few drinks, laugh and just talk stupid for 4 plus hours.
 

Attachments

  • 20230825_075757.jpg
    20230825_075757.jpg
    76.6 KB · Views: 71
  • 20230904_153127.jpg
    20230904_153127.jpg
    112.1 KB · Views: 72

Create an account or login to comment

You must be a member in order to leave a comment

Create account

Create an account and join our community. It's easy!

Log in

Already have an account? Log in here.

Back
Top Bottom