First Poker Table Build, Tips Welcome! (2 Viewers)

elisbam

Sitting Out
Joined
Jun 7, 2025
Messages
16
Reaction score
27
Location
Los Angeles
After a lot of research and going back and forth on whether to build or buy, I finally decided to build. I am the type of person who likes to do things the right way if I am going to take the time to do them, so I spent a while gathering what I think are good quality materials. Here is what I have picked up so far:

Your Auto Trim Store
Premium 47 lb HD rail foam
VTP Volara 1/4 inch closed cell foam
Whisper Neo Plus black vinyl

Casino Supply
Stainless steel slide under drink holders
Heavy duty folding poker table legs, 31 inch wide

Lowes
Wood
All the miscellaneous supplies

TBD
Speed cloth, still finalizing the custom design

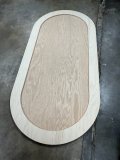
The table will be 88 inches by 42 inches with 5 inch rails.

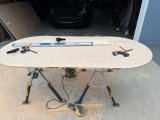
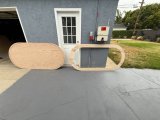
I got started today and managed to fit in as much as I could, but of course forgot to take many pictures. I will probably be working on it about once a week since work tends to get in the way. So far I am pretty impressed with myself. I nailed all the measurements and cuts to this point. Fingers crossed I can keep that going through the rest of the build.

This is my first time building a table, so if anyone has any advice or tips, I would love to hear them. Always appreciate learning from people who have done this before. Appreciate any advice from the veterans here. This has been a fun project so far and I will post more updates as the build comes together. Hoping it turns out great.
 

Attachments

  • IMG_1230.jpg
    IMG_1230.jpg
    149.1 KB · Views: 130
  • IMG_1229.jpg
    IMG_1229.jpg
    161.7 KB · Views: 112
  • IMG_1231.jpg
    IMG_1231.jpg
    151 KB · Views: 115
  • IMG_1232.jpg
    IMG_1232.jpg
    113.3 KB · Views: 123
Having a second person when putting the vinyl on the rail can be a big help.
Thank you!!!
I am surprising my group with the table so the next best option is my wife. I will owe her big time after that. Also I only own a manual stapler. Was planning on muscling through it, is that a mistake?
 
Thank you!!!
I am surprising my group with the table so the next best option is my wife. I will owe her big time after that. Also I only own a manual stapler. Was planning on muscling through it, is that a mistake?
Power stapler would be much easier. You're probably looking at a minimum of 1200 staples.
 
Air compressor stapler will help a lot with fatigue also if you can wear gloves while stretching material like a speed cloth mine took the skin off my knuckles some how while stretching it so hard. Sometimes you're gonna put staples in while stretching and need to remove them to straighten things so there's no ugly wrinkles. Put a couple staples in and make sure its looking good before putting more. Cutting the wood is fun and a science the upholstering is a pain and more of an art take your time and don't cut away slack material until you're happy with the end result.
 
All great info!!!

My mouth just dropped at 1,200 staples. I think it might be worth the investment.

Any thoughts on electric stapler? Does it not have enough power for the job?
 
Update: Almost Finished — Just Waiting on the Felt

I said I probably would not work on it much, but once I got going I could not stop. Got everything done up to the felt, which is on order from Chanman. Going custom with that so it might be a little while before I get to the final install.

Big thanks to those who suggested using a pneumatic stapler. I borrowed one from a friend and I am really glad I did. The rail was no joke — it took a ton of staples and would have been brutal without it.

I also have to say, I am pretty impressed with how it all came together. Measurements were solid, cuts were clean, and things actually fit the way they were supposed to. Felt good seeing it start to look like a real table.

This time I remembered to take a bunch of photos along the way, from cutting and shaping all the way through to foam and vinyl.

Next plans:
  • Adding hooks so I can hang the table on the wall when it is not in use
  • Attaching kickstands to protect the rail while folded up
  • Making a soft cover
  • Then finally installing the felt once it arrives
Appreciate all the help so far would love to hear what you think and open to any suggestions for the final touches.
1750224351992.jpeg

Used a jigsaw and sander to shape the rail curves to give them a bit more height

1750224408848.jpeg

Laying everything out to make sure it all lines up before committing to glue

1750224445488.jpeg

1750224462442.jpeg

Went with heavy duty legs from Casino Supply, solid and easy to mount.

1750224498014.jpeg

Gluing down the rail foam with spray adhesive. Temporary weights are DeWalt-approved.
1750224546856.jpeg

Shaped and ready for vinyl. Feels like it is finally coming together at this point.

1750224577111.jpeg

First set of stapled done. Stretching is a pain!


1750224597067.jpeg

So many staples. Could not have done this without the pneumatic gun.

1750224713729.jpeg

This is not the felt yet, just the 1/2 inch foam base that will sit underneath it. Waiting on the custom cloth from Chanman to finish it off.
 
Thank you! I put some pkay speed cloth on it from Amazon and had our first game last weekend. Quite the upgrade from our previous setup. I’ll post some more pics once I get the permanent cloth installed.
 
The table is officially done and I could not be happier with how it turned out. The custom felt from Chanman arrived and was everything I hoped for. Huge shout out to @Bloo_Design for the help! The design is definitely not a traditional poker layout, but it has a lot of sentimental value to our group and fits the energy of our game perfectly. Got it installed cleanly and now the build is complete.

Really appreciate all the advice and encouragement along the way. The pneumatic stapler tip was a lifesaver and everything from materials to techniques helped make this a success. I learned a ton and already looking forward to the first game night on it.

A few finishing touches:
  • Mounted wall hooks to store the table vertically when not in use
  • My wife sewed a custom cover to keep it protected (huge thanks to her — I cannot take credit for that one)
Here is the final felt design — themed with our custom logo and the name of our home game, Symphony of Ace. Super happy with how it printed and how it brings the whole table together.

Thanks again to everyone who followed along or offered advice during the build. This was my first one, and I genuinely enjoyed every part of it.
 
Great job! Getting a nice smooth even rail is always the hardest part and it looks like you nailed it.
 

Create an account or login to comment

You must be a member in order to leave a comment

Create account

Create an account and join our community. It's easy!

Log in

Already have an account? Log in here.

Back
Top Bottom
Cart