Thorn
High Hand
First off, thanks to all that have posted their table builds and links. I'm not going to post my full build since there are so many other threads that explain the process better than I can. I do want to share an approach I came up with for adjustable, swing-out cup holders though. I was inspired by @Jake14mw post but I didn't have magnets or metal on hand and wanted to see if I could come up with something with what I had laying around the garage. I wouldn't be surprised if someone has done this already, but I couldn't find any examples.
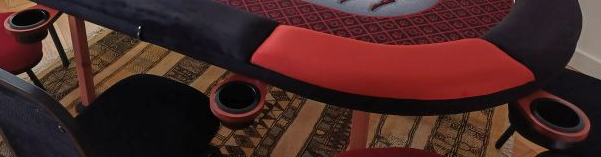
I have an old octagon that I wanted to replace with a round since I never have exactly 8 players. I also didn't want fixed position cup holders and I'm not a fan of the slide under holders.
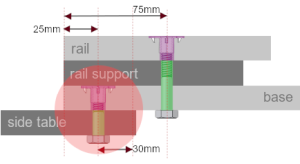
I followed the basic process of using a router and circle jig to cut two circles. One for the top rail and another for the sub-rail and playing surface. The wrinkle I added is that after making the cut to separate the sub-rail from the playing surface base, I switched to a 3/4" bit and cut a 1/4" deep groove in the underside of the top rail piece (keeping the circle jig set at the same radius). This effectively creates a T-slot when you assemble the rail and attach to the playing surface.

The cup holder pieces are then attached to the table using a 1/4" carriage bolt inserted into the T-slot and secured with a wing nut allowing them to be positioned anywhere and also to swing in or out.
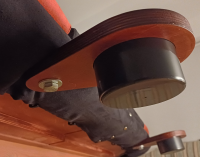
Underside of rail assembly showing groove for carriage bolt head.

Underside of table showing access hole to insert bolts.


I have an old octagon that I wanted to replace with a round since I never have exactly 8 players. I also didn't want fixed position cup holders and I'm not a fan of the slide under holders.
I followed the basic process of using a router and circle jig to cut two circles. One for the top rail and another for the sub-rail and playing surface. The wrinkle I added is that after making the cut to separate the sub-rail from the playing surface base, I switched to a 3/4" bit and cut a 1/4" deep groove in the underside of the top rail piece (keeping the circle jig set at the same radius). This effectively creates a T-slot when you assemble the rail and attach to the playing surface.
The cup holder pieces are then attached to the table using a 1/4" carriage bolt inserted into the T-slot and secured with a wing nut allowing them to be positioned anywhere and also to swing in or out.
Underside of rail assembly showing groove for carriage bolt head.
Underside of table showing access hole to insert bolts.
Last edited:

")