jamesjkim
Full House
I recently took advantage of the Amazon deal for $265 and just couldn't stand the blue "felt" that it came with (look and feel), so I decided to venture off into the land of re-felting. Needed a portable table since I don't have a dedicated space for it and the Barrington fit the bill nicely. I built a very basic table over 15 years ago and have some carpentry experience so this wasn't completely new to me.
First, I looked at @rjdev7 toppers. Really amazing stuff and he made a great theme design for me. Ultimately though, I didn't want to necessarily have to carry around a topper + the table. I already have a neoprene topper that has been in use for years on my dining table.
Next, I tapped @T_Chan since I became aware of gaming suede. However, it was hard for me to justify the price for a sub-$300 table. When I get a full custom table, definitely hitting up chan man!
So finally, after some searching on PCF, I came across people using faux suede/micro suede from fabric retailers like Joann - picked this one while looking in-store. Only needed two yards as the material comes in 54" width and could cover the table length-wise.
I know there are many posts related to this for Barringtons but thought I'd share my experience as the table has been slightly updated with new vinyl rails. Here it is new, straight out of the box:

Tools needed:
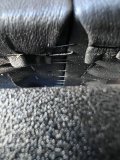
First step, taking the two halves apart. This was pretty straight forward. Unscrew three hinges down the middle. Then take the tension cable off - I only did this on one side (took a pic to reference when reassembling).

Now that the halves are split and put one half on the sawhorse.

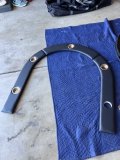
Now it was time to take the railing off. This posed to be more challenging than what I had read here from other posts. Removed all the screws (some while it was upside down and the last few once on the sawhorse) and tried pulling the rail off - no luck. I took a small flat head screwdriver and wedged it in and could slowly lift the rail using more than expected force. Made enough room for my crowbar and lifted it a bit more but there was still lots of tension. First thing I noticed is that there were brad nails shot into the rail from underneath holding both pieces - I snipped these with wire cutters and hammered down any ends sticking up after getting the rail off. Second thing was the glue from the cupholders were gooped onto the bottom surface and was really what was holding the rail down (and I mean I would have broken the rail or table or both if I used more force) - this is where the heat gun came in and loosened up the glue very nicely. Note of caution (and was mentioned here elsewhere): don't heat more than 20-30 seconds at a time, wait a minute or so for the glue to cool and harden slightly because it will be super messy! String cheese that doesn't break messy!
The last thing I noticed and was quite surprised is that the three pieces to make the half rail are stapled together. I didn't expect this as I was pulling the rail off. But this actually made reassembly much easier as I didn't have to squeeze individual pieces back together or notate which piece goes where.


Note: 3 cupholders were loose straight out of the box and were fully out by the time I took the rail off. Doesn't really need repair right now as it fits back in fairly snug.
Finally, onto the felting! The faux suede I chose was actually a bit thicker than I was expecting and compared to others - I like it. Since the table was brand new and the original felt didn't have any issues, I just put the new material directly on top. Clamped one side down first then pulled and started stapling - I only have a manual staple gun but it worked fine aside from the occasional jam. Staple pattern similar to how you fasten a tire wheel - star-ish pattern and working my way around and between staples. It's probably possible to do this without clamps by just stapling one side first then pulling and stapling the other. After stapling was done, I took a hobby knife and trimmed the fabric up to the staples.

Material thickness and backside:


Now it was time to test fit the rail. Looked and felt great.

For reassembly, I just worked my way backwards and again, fairly straight forward. All you really need is a screw driver. One half of the table done! As I noted above, I didn't feel the need to label everything as I was working one half at a time and it was one full rail and just screws. Reassembly was smooth with the exception of extra gap from the heated glue drying thicker due to pulling it and causing a small mound. Took out a flat head and scraped it off along with a utility knife to cut as necessary. I screwed the inside part of the rail first so it sits flush with the suede then went back around the end of the rail. Now it's just repeating this for the second half.
With both pieces complete, I was only needing to join the table and put back the tension cable. One point of contention was getting the hinges back on with the thicker fabric in the way. I used clamps to pull the two halves tight as possible and the hinge holes lined up fine - definitely got slightly worried.
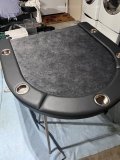
Table is now put back together and ready for play. Unfortunately, that probably won't be for a while as I'm expecting my second kid next week (or sooner!). Overall, this was not a difficult process and could be done with some patience in less than half a day. A couple notes - I would consider removing the old felt+pad completely next time. You can kind of see in the pictures but where the suede meets the rail has a bit of a bulge. I imagine this would cause some unstable stacks if chips are pressed right up against the rail. Second note is try to use a torque screwdriver set low if using power or just do it by hand manually. As also mentioned here elsewhere, it is very, very easy to strip the screw by over tightening. I definitely made a couple spinners. This is more of an issue with the hinges.
All in all, very satisfied with the result and can't wait to break it in! Hope this helps the next guy on these next gen Barrington tables. Now off to contemplating what I might want to do to this next. Cheers!


First, I looked at @rjdev7 toppers. Really amazing stuff and he made a great theme design for me. Ultimately though, I didn't want to necessarily have to carry around a topper + the table. I already have a neoprene topper that has been in use for years on my dining table.
Next, I tapped @T_Chan since I became aware of gaming suede. However, it was hard for me to justify the price for a sub-$300 table. When I get a full custom table, definitely hitting up chan man!
So finally, after some searching on PCF, I came across people using faux suede/micro suede from fabric retailers like Joann - picked this one while looking in-store. Only needed two yards as the material comes in 54" width and could cover the table length-wise.
I know there are many posts related to this for Barringtons but thought I'd share my experience as the table has been slightly updated with new vinyl rails. Here it is new, straight out of the box:
Tools needed:
- Scissors
- Hobby/utility knife
- Crowbar (or larger flat head screwdriver)
- Staple gun + staples
- Philips screwdriver
- Heat gun (or hair dryer)
- Sawhorse (or some platform to work on)
- Clamps (may not be critical)
First step, taking the two halves apart. This was pretty straight forward. Unscrew three hinges down the middle. Then take the tension cable off - I only did this on one side (took a pic to reference when reassembling).
Now that the halves are split and put one half on the sawhorse.
Now it was time to take the railing off. This posed to be more challenging than what I had read here from other posts. Removed all the screws (some while it was upside down and the last few once on the sawhorse) and tried pulling the rail off - no luck. I took a small flat head screwdriver and wedged it in and could slowly lift the rail using more than expected force. Made enough room for my crowbar and lifted it a bit more but there was still lots of tension. First thing I noticed is that there were brad nails shot into the rail from underneath holding both pieces - I snipped these with wire cutters and hammered down any ends sticking up after getting the rail off. Second thing was the glue from the cupholders were gooped onto the bottom surface and was really what was holding the rail down (and I mean I would have broken the rail or table or both if I used more force) - this is where the heat gun came in and loosened up the glue very nicely. Note of caution (and was mentioned here elsewhere): don't heat more than 20-30 seconds at a time, wait a minute or so for the glue to cool and harden slightly because it will be super messy! String cheese that doesn't break messy!
The last thing I noticed and was quite surprised is that the three pieces to make the half rail are stapled together. I didn't expect this as I was pulling the rail off. But this actually made reassembly much easier as I didn't have to squeeze individual pieces back together or notate which piece goes where.
Note: 3 cupholders were loose straight out of the box and were fully out by the time I took the rail off. Doesn't really need repair right now as it fits back in fairly snug.
Finally, onto the felting! The faux suede I chose was actually a bit thicker than I was expecting and compared to others - I like it. Since the table was brand new and the original felt didn't have any issues, I just put the new material directly on top. Clamped one side down first then pulled and started stapling - I only have a manual staple gun but it worked fine aside from the occasional jam. Staple pattern similar to how you fasten a tire wheel - star-ish pattern and working my way around and between staples. It's probably possible to do this without clamps by just stapling one side first then pulling and stapling the other. After stapling was done, I took a hobby knife and trimmed the fabric up to the staples.
Material thickness and backside:
Now it was time to test fit the rail. Looked and felt great.
For reassembly, I just worked my way backwards and again, fairly straight forward. All you really need is a screw driver. One half of the table done! As I noted above, I didn't feel the need to label everything as I was working one half at a time and it was one full rail and just screws. Reassembly was smooth with the exception of extra gap from the heated glue drying thicker due to pulling it and causing a small mound. Took out a flat head and scraped it off along with a utility knife to cut as necessary. I screwed the inside part of the rail first so it sits flush with the suede then went back around the end of the rail. Now it's just repeating this for the second half.
With both pieces complete, I was only needing to join the table and put back the tension cable. One point of contention was getting the hinges back on with the thicker fabric in the way. I used clamps to pull the two halves tight as possible and the hinge holes lined up fine - definitely got slightly worried.
Table is now put back together and ready for play. Unfortunately, that probably won't be for a while as I'm expecting my second kid next week (or sooner!). Overall, this was not a difficult process and could be done with some patience in less than half a day. A couple notes - I would consider removing the old felt+pad completely next time. You can kind of see in the pictures but where the suede meets the rail has a bit of a bulge. I imagine this would cause some unstable stacks if chips are pressed right up against the rail. Second note is try to use a torque screwdriver set low if using power or just do it by hand manually. As also mentioned here elsewhere, it is very, very easy to strip the screw by over tightening. I definitely made a couple spinners. This is more of an issue with the hinges.
All in all, very satisfied with the result and can't wait to break it in! Hope this helps the next guy on these next gen Barrington tables. Now off to contemplating what I might want to do to this next. Cheers!