Where do I order? Also want to pick up one of those cool stack-straightening tools.I think it will be about $7 for the frame and a 21-chip insert, plus shipping.
-
PCF is an eBay Partner. If you make a purchase through one of our links, we may earn a commission at no extra cost to you. Thank you for your support!
You are using an out of date browser. It may not display this or other websites correctly.
You should upgrade or use an alternative browser.
You should upgrade or use an alternative browser.
Flattening Warped Chips (4 Viewers)
- Thread starter ski_ex5
- Start date
One Eyed Dollar
Flush
I can add it to the store soon. The model is ready to go, and I just wanted to get some feedback on potential changes to the design before I shared it and added it to the store. Looks like people like it as designed, so this one is a go. Thanks for the interest!Where do I order? Also want to pick up one of those cool stack-straightening tools.
asian bino
Two Pair
What are some other options for flattening hotstamped chips if your oven temperature won't go that low? I have some hotstamped quarters that have a fair amount of spinners.
Potential heating devices: hair dryer, infrared space heater, old toaster oven that supposedly heats as low as 150F.
Apparently, some ovens have a special mode where you can set the oven LOWER than the 'minimum' temperature
that the buttons seem to allow you to.
This was discovered by (brace yourself) my brother's CAT. The cat jumped up onto the stove's control panel (bad kitty!)
and apparently hit the series of buttons that set the oven to 120 degrees, even though you seemingly could not SET the oven to that temperature. My brother got out his manual and, sure enough, by hitting some funky combo of buttons simultaneously, 120 was possible. Thanks Kitty!
Yeah I'm an idiot and forgot to mention I discovered my over had a "pre heat" button so 170 was no problem. I'm sure mines not the only one.
BSteck
Full House
I started my first flattening project today.

Sure wish I had one of those new-fangled 3d flattening trays because getting the barrels lined up and clamped was probably the most challenging part of the process.
Just a quick pre-heat of the oven then turned it off was all it took. Left the oven light on and then opened the door sporadically to maintain 125-130. Easy peesy. Started conservative for my first run cooking them for 20 minutes and then cooling them for 60 minutes. No extra tightening after baking.

Here are the results. Before: almost a full chip worth of warping (I did this first test with my worst barrel).

After: I’m very happy with the improvement. You can still see some problem chips in the barrel - but WAY better than they were. Nearly level with my control blurple barrel. I’m going to run them through again at the same time and temp to see if that will completely fix em. Wahoo! It works!

Sure wish I had one of those new-fangled 3d flattening trays because getting the barrels lined up and clamped was probably the most challenging part of the process.
Just a quick pre-heat of the oven then turned it off was all it took. Left the oven light on and then opened the door sporadically to maintain 125-130. Easy peesy. Started conservative for my first run cooking them for 20 minutes and then cooling them for 60 minutes. No extra tightening after baking.
Here are the results. Before: almost a full chip worth of warping (I did this first test with my worst barrel).
After: I’m very happy with the improvement. You can still see some problem chips in the barrel - but WAY better than they were. Nearly level with my control blurple barrel. I’m going to run them through again at the same time and temp to see if that will completely fix em. Wahoo! It works!
Last edited:
BirdCage
Flush
As an alternative to the oven & clamp method, I present the hot water & vise method. While I do have an oven, I don't have a wooden hand-screw clamp - but I do have a bench vise.
After giving this a bit of thought, I figured that the heat source shouldn't matter as much as just raising the temperature of the chips. The hot water measured just under 150 degrees Fahrenheit from the tap. Here's what I tried:
Requirements: hot water, vise, two small pieces of flat wood, blank/white ceramic chips (optional)
Step 1: Fill small container with hot water from tap
Step 2: Place up to 10 chips in the container
Step 3: Wait 5 minutes
Step 4: Dry chips
Step 5: Stack chips with one ceramic chip on each end
Step 6: Place stack between two small pieces of flat boards (i.e., 3" x 4" x 1/2" sections)
Step 7: Align as perfectly as possible in a bench vise and tighten with nearly all your might
Step 8: Wait 12 hours (less or more is OK, too)
It worked - no spinning, no warps.
Not using any ceramic chips on the ends would also work, but I believe that placing a ceramic chip between each chip would be ideal. (I only had two white ceramic chips on hand and didn't want any color transfer). I just positioned chips so that they were warp to warp to encourage flattening.
Any slight warps/spinning can be fixed with a second go. Chips have remained flat after several days. Seems to work.
tabletalker7
Full House
If hot water for a little while and a clamp overnight is all people need, does someone with an ultrasonic want to try? Might be able to clean and flatten in one stepAs an alternative to the oven & clamp method, I present the hot water & vise method. While I do have an oven, I don't have a wooden hand-screw clamp - but I do have a bench vise.
After giving this a bit of thought, I figured that the heat source shouldn't matter as much as just raising the temperature of the chips. The hot water measured just under 150 degrees Fahrenheit from the tap. Here's what I tried:
Requirements: hot water, vise, two small pieces of flat wood, blank/white ceramic chips (optional)
Step 1: Fill small container with hot water from tap
Step 2: Place up to 10 chips in the container
Step 3: Wait 5 minutes
Step 4: Dry chips
Step 5: Stack chips with one ceramic chip on each end
Step 6: Place stack between two small pieces of flat boards (i.e., 3" x 4" x 1/2" sections)
Step 7: Align as perfectly as possible in a bench vise and tighten with nearly all your might
Step 8: Wait 12 hours (less or more is OK, too)
It worked - no spinning, no warps.
Not using any ceramic chips on the ends would also work, but I believe that placing a ceramic chip between each chip would be ideal. (I only had two white ceramic chips on hand and didn't want any color transfer). I just positioned chips so that they were warp to warp to encourage flattening.
Any slight warps/spinning can be fixed with a second go. Chips have remained flat after several days. Seems to work.
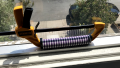
I recently flattened some starbursts. I decided I could risk losing a barrel, so I only put ceramics on each end, not in between chips, and I used the clamps I already owned:

I turned the oven as low as it would go (170), stuck a remote thermometer in there, and shut it off when it hit 120. Once it was settled, I put the chips in for 25 minutes, opening and closing the door as necessary to maintain 120-130, then straight to the freezer for another 20. It worked pretty well, but a couple were still a little warped. I decided to go for round 2, and did 3 barrels this time. I set the oven the same way, but this time I got distracted and forgot to monitor it. By the time I remembered to check on them (about 20 minutes), the temp had creeped up to 168! Since there was no turning back, I threw them in the freezer for 20 minutes and then checked. Other than a couple being very mildy stuck together, once I separated them they were all perfectly flat and there is no visible damage - all cross-hatching is still intact. Phew!
I turned the oven as low as it would go (170), stuck a remote thermometer in there, and shut it off when it hit 120. Once it was settled, I put the chips in for 25 minutes, opening and closing the door as necessary to maintain 120-130, then straight to the freezer for another 20. It worked pretty well, but a couple were still a little warped. I decided to go for round 2, and did 3 barrels this time. I set the oven the same way, but this time I got distracted and forgot to monitor it. By the time I remembered to check on them (about 20 minutes), the temp had creeped up to 168! Since there was no turning back, I threw them in the freezer for 20 minutes and then checked. Other than a couple being very mildy stuck together, once I separated them they were all perfectly flat and there is no visible damage - all cross-hatching is still intact. Phew!
Until I purchase that cool 3rd printed clamp rack, what method do you guys use to get the barrel of chips and ceramics aligned perfectly in the clamp itself?
Until I purchase that cool 3rd printed clamp rack, what method do you guys use to get the barrel of chips and ceramics aligned perfectly in the clamp itself?
mostly patience and diligence. i get them somewhat tight, then use a ceramic chip horizontally to firmly push down sections and pop the outliers into place. with my clamp i can do this from multiple angles so it isn't too bad to get them all lined up perfect.
Last edited:
Send a PM to @ABC Gifts and Awards.Does anyone have a current link for blank ceramics to use as spacers? The ones earlier in the thread seem to be down.
RainmanTrail
Royal Flush
Until I purchase that cool 3rd printed clamp rack, what method do you guys use to get the barrel of chips and ceramics aligned perfectly in the clamp itself?
Anything parallel. Even two pencils would work.
Out of curiosity, could you use ABC dye sub ceramics (like Nevada Jack's), but just put a piece of parchment paper in between them to prevent color transfer?
Whelp, it worked!!! Here's the list of things you need for ghetto chip flattening:
- Warped chips (I used some Joker's Wild 25c hot stamps)
- Irwin Quick Grip
- Nevada Jack Skulls (or other existing ceramic set that is able to break blenders)
- The hot-as-fuck NJ sun (others suns might work as well, even that evil sun from Mario 2)
- Parchment paper
Had a few more warpers... This'll learn 'em!

I ordered some blank ceramics from @BR Pro Poker and went with the trigger clamp solution. I gave them 3 days in the window with occasional rotation (checked in after 1 day and still really warped). It worked amazingly well on these leaded THCs -- on to the next batch.
Attachments
I ordered some blank ceramics from @BR Pro Poker and went with the trigger clamp solution. I gave them 3 days in the window with occasional rotation (checked in after 1 day and still really warped). It worked amazingly well on these leaded THCs -- on to the next batch.
3 days! I'd be worried about fading from the sun with that length of time. I suppose the UV protection from the window prevents that?
Mine were good in direct sun after about an hour.
I ordered some blank ceramics from @BR Pro Poker and went with the trigger clamp solution. I gave them 3 days in the window with occasional rotation (checked in after 1 day and still really warped). It worked amazingly well on these leaded THCs -- on to the next batch.
If putting them in direct sunlight, cover with a dark cloth. Will still absorb heat, but not UV rays.3 days! I'd be worried about fading from the sun with that length of time. I suppose the UV protection from the window prevents that?
Mine were good in direct sun after about an hour.
3 days! I'd be worried about fading from the sun with that length of time. I suppose the UV protection from the window prevents that?
Mine were good in direct sun after about an hour.
Good advice, I didn't even think about color fading. Fortunately no noticeable color damage on the first batch.If putting them in direct sunlight, cover with a dark cloth. Will still absorb heat, but not UV rays.
My attic in the summer gets 110ish. I've clamped chips in a Bessey and left them 24 hours and had good results. Had to slightly tighten the clamp once.
flattening chips is like good BBQ. Low and slow for best
results.
flattening chips is like good BBQ. Low and slow for best
results.
@Windwalker I think people in this thread can help
GenghisKhan
Full House
- Joined
- Nov 7, 2014
- Messages
- 2,898
- Reaction score
- 4,723
- Rewards
- 0
Until I purchase that cool 3rd printed clamp rack, what method do you guys use to get the barrel of chips and ceramics aligned perfectly in the clamp itself?
I also plan to order a 3D printed chip flattening rack from @One Eyed Dollar . But in the meantime, anyone in a rush can use a baking cooling rack.
I've used it before based on comments in a separate flattening thread.
While the wider grooves on the left one make the barrel sturdier, they also make the barrel drop down further between metal wires which gives this result when grabbing them with the clamp:
The narrower rack on the right is a bit trickier to use but keeps the barrel more level with the center of the clamp.
You can adjust the position after either way.
I have some flattening to do later. Hopefully the wife was not planning any baking. Although, I just got her a new Kitchenaid stand mixer and could go for some cookies.


GenghisKhan
Full House
- Joined
- Nov 7, 2014
- Messages
- 2,898
- Reaction score
- 4,723
- Rewards
- 0
FYI, for me the amount of time I kept the chips in the clamp after the oven made a world of difference.
After testing different times, 24 hours had amazing results.
1 hour = no change, still same amount of warping.
6 hours = tiny difference but still lots of warping.
12 hours = half & half. Half flat, half still a little warped.
24 hours = 95% flattened?
Middle row was my worst barrel of chips out of 2 racks. After removing from oven and keeping clamped for 24 hours, it's now my best barrel. Left and right barrels were unclamped much earlier and you see the difference.

What I did:
Preheat to 170f.
Open door til goes down to 130f.
Add extension cord/ light socket / light bulb in there.
Bake for 30 mins.
Remove and set aside 24 hours.
I did not retighten.
Wife reminded me to shut off oven.
Disclaimer: 20 mins for me was not enough. I went 25, then 30, then 30 mins again and adding the light bulb made a big difference to my results. As everyone says, for your own chips and oven start low, then gradually work your way up. Assuming your oven is the same and jumping directly to 30 mins may not have the same results. And may result in damage.
After testing different times, 24 hours had amazing results.
1 hour = no change, still same amount of warping.
6 hours = tiny difference but still lots of warping.
12 hours = half & half. Half flat, half still a little warped.
24 hours = 95% flattened?
Middle row was my worst barrel of chips out of 2 racks. After removing from oven and keeping clamped for 24 hours, it's now my best barrel. Left and right barrels were unclamped much earlier and you see the difference.
What I did:
Preheat to 170f.
Open door til goes down to 130f.
Add extension cord/ light socket / light bulb in there.
Bake for 30 mins.
Remove and set aside 24 hours.
I did not retighten.
Wife reminded me to shut off oven.
Disclaimer: 20 mins for me was not enough. I went 25, then 30, then 30 mins again and adding the light bulb made a big difference to my results. As everyone says, for your own chips and oven start low, then gradually work your way up. Assuming your oven is the same and jumping directly to 30 mins may not have the same results. And may result in damage.
I did not retighten.
I had read that as the chips cool they might shrink (could be total nonesense), but I did notice that I was able to get a little bit more tightening down as they cooled.
Poker Zombie
Royal Flush
Expansion during heating is a thing. I don't know how much the clay expanded, but your wooden clamps should have measurable expansion.I had read that as the chips cool they might shrink (could be total nonesense), but I did notice that I was able to get a little bit more tightening down as they cooled.
Last edited:
During the summer, I started to feel out the process of flattening some chips that i have, and like most people, I've tried out different methods posted here. I finally settled on what seems to work best for me to get consistent and lasting results. Some of the info is repeating the OP and others who've posted here:
DISCLAIMER: I've only used this method on Paulson THC hot stamp chips only so far. Everyone's oven will be different - some will heat up quicker and hold the heat longer.


Example results:


NOTES and observations/opinions
DISCLAIMER: I've only used this method on Paulson THC hot stamp chips only so far. Everyone's oven will be different - some will heat up quicker and hold the heat longer.
- Chip & Clamp setup used for 20x chips (one barrel total):
- 12" POWERTEC Handscrew Clamp (These work just as fine as the Bessey and are one of the more affordable options at the moment; 2x @ $42. I also have a 12" Bessey but prices on those have spiked recently).
- 22x 43mm Blank Ceramic spacers (available from @BR Pro Poker)
- I prefer the 12" clamp and the 43mm blanks setup for a couple of reasons:
- It allows for clearance all around the chip/spacers (see pic #3 & #4), and the clamps lay flat on the oven racks without having the chips or spacers touch the metal, which makes me more comfortable.
- You're able to get more torque and even pressure when tightening (don't need to kill it though) and the 12" clamps tend to stay in place better than the 10" or less versions (all sizes of clamps will need tightening directly after baking and periodically while cooling imo, you'll need to tighten the clamp less often when using a 12").
- Note: This set up and the placement of the chips/spacers will not work with a 10" clamp using the 43mm spacers, you'll only be able to fit one row (10x chips) in between the tightening screws.
- Temperature and time (I've been using a standard, non-convection Hotpoint brand oven - means there's no fan inside the oven):
- I don't use my oven's temperature settings. I use a Polder thermometer probe and suspend the probe inside my oven (similar to @BSteck's setup), making sure the probe doesn't touch anything to get a more accurate temperature inside my oven.
- Target range is 130F to ~160F with a goal of keeping it ~140F for at least 45-60 minutes (w/o opening the oven door constantly).
- I use a temperature range, because it's nearly impossible for me to maintain an exact temperature for an extended period of time with my oven (as with most of our ovens). Instead, I do the following:
- I pre-heat my oven until the probe temp hits 143F then shut it off; the temperature will continue to rise to ~155-160F after I shut off my oven and then steadily decrease thereafter.
- Depending on the ambient temperature in my kitchen, it takes about 15 minutes for the internal oven temp to reach 130F on the probe - at this time, I'll turn on my oven again until the temp hits 143F again, shut it off and repeat this step 2 more times.
- Don't freak out if you accidently allow the temperature to go above this range. You can always open the door to release some heat and bring down the temperature quicker.
- I know some may think my temperature settings/recommendations are too high, but please see below for my reasoning.
- As mentioned above, I keep the internal temperature of my oven between 130F and 160F. I've done this for +1,000 chips so far with no damage to any of my chips. I've hit an oven temp as high as 170F for some batches with no ill effects; however, I don't recommend going over 160F. I think it's not necessary to heat the chips at that high of a temperature.
- I'm comfortable between 130F to 160F with a goal of keeping it around 140F, because even though the oven temp might seem high, the estimated outside temperature of the chips is still within the ~120F-130F range. The internal temp of the chips/spacers might be a bit higher than this range, but again, I have not had a problem so far. I've used this process on very used chips to Near Mint chips. The snapshots below were taken as soon as i opened the oven door at two different points during my heating process:
- Cooling:
- Right after taking the clamps from the oven, I tighten them down. No need to kill it or tighten the clams as much as possible - I just tighten them until i feel there's pressure on the chips again. Everything expands a bit in the oven, and the clamps tend to loosen slightly.
- As the chips continue to cool, I continue to tighten the clamps slightly - especially every 3-5 minutes for the first ~20 minutes after removing them from the heat. After this ~20 minute period, i tighten the clamp periodically just in case, but most of the time it's not necessary, especially after an hour of cooling.
- I let the chips completely cool to room temperature before removing from the clamps - usually takes ~3-5 hours, depending on the ambient temperature in my kitchen.
- I have tried speeding up this process by using a small fan and more tightening of the clamps in a shorter period of time, but I felt I got better results by letting them cool down naturally.
- I haven't seen too much of a difference between cooling to room temp and leaving them in the clamp for hours more; however, it doesn't hurt to keep them in the clamp for as long as you'd like. My heating process is longer than most, so the cooling time is already extended, but with that said, i have kept chips to cool for 24+ hours with the same or similar results as cooling to room temp.
Example results:
- Before heating/clamping next to a Mint barrel
- After the process next to the same Mint barrel, and then next to another pre-flattened barrel
NOTES and observations/opinions
- For my oven, heating at 120F for 20-30 minutes did not yield lasting results IMO. After cooling at room temp, some chips had flattened but there were a few that refused to flatten. Even running the same barrel again with the same process, I yielded the same results.
- For me, the process that i described above has yielded nearly all flat chips after the first pass; however, there are still the outlier chips that will need a second run.
- Keeping constant pressure and tightening the clamps while cooling is important.
- The first batch of 400 chips that i tested this process on, were all very used and very warped chips. Of the first 400 chips, nearly all needed a second run. A month after the second run, I notice that some chips reverted back to being slightly warped again - these were probably the ones that had the most extreme bends; however, 3 months later, the vast majority of this batch remains flat and stack really well.
- After utilizing this process on many chips afterwards, I noticed that regardless if the chip is very casino used or Near Mint - if the chip has extreme warping, it's possible to get them completely flat, but most likely there's a chance that they will eventually show some slight warpage as time goes on. From my experience, when these chips do revert back a bit, they haven't returned to the extreme warped state that they were previously in.
- This has happened in as short of a period of 24-48 hours after removing them from the clamp. Some have taken a week or longer to show signs of warping.
- The clamping times for these batch were the same as mentioned above - a minimum of 3-5 hours (cooled to room temp) and as long as 24+ hours. FWIW, the few chips that showed signs of warping again after 24-48 were NM and clamped for 24+ hours.
- Highly recommend cleaning beforehand, especially if you use an ultrasonic cleaner. I haven't seen consistent proof of this, but the one batch I did flatten first, then cleaned with an u/s cleaner, i noticed that the warping had returned to quite a few chips after a pre-soak and bath in the u/s.
Last edited:
^^^ this post... This is why I joined PCF. (And maybe the poker chips too). Wow, what a well written post @juankay20
Thanks man! Now, I hope it's helpful to someone else and not just redundant^^^ this post... This is why I joined PCF. (And maybe the poker chips too). Wow, what a well written post @juankay20

The step-by-step instructions with pictures is perfect for helping out even a n00b! I bookmarked it and I plan to give it a shot on some warped jokers wilds that I just got.Thanks man! Now, I hope it's helpful to someone else and not just redundant
Similar threads
- Replies
- 4
- Views
- 341
- Replies
- 6
- Views
- 558
- Replies
- 15
- Views
- 620
- Replies
- 29
- Views
- 2K