Hey all,
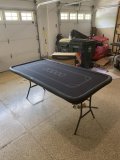
I thought I'd share my weekends project. I got a tournament coming up and I realized I'm going to need more tables/seats. There was nothing under $500 on facebook marketplace, so I figured I'd just try and improve the roll out mat I already had. The biggest problem was the mat obviously doesn't have any rail, and I didn't have a table that really fit its size perfectly anyways. I didn't want to spend the time on making a legit padded rail, so I looked online for some other options and came across this: https://www.buypokerchips.com/Articles.asp?ID=330.
So I ordered some of this perfect padded rail and it came within a few days. Then I went to Menards, somehow found a really flat piece of pine plywood, and I grabbed a scrap piece of Spillmaster carpet padding that they had in the scrap bin, the purple foam kind ((https://www.menards.com/main/floori...et-pad/ult270st/p-3289655538307008-c-6539.htm).
Supplies:
- 3/4" pine plywood - $40
- Scrap carpet pad - $10
- Poker mat from Amazon - $35
- Perfect Padded Rail - $90
- Staplegun Staples - $5
It came out better than I had hoped for just throwing some random stuff together. I used scrap wood/screws that I had to build a frame around a LifeTime folding table and it sits really solidly on there. All I'd say is thank goodness I had an electric stapler. Between stapling down the mat and then the padded rail, I must have used about 500 staples.

