DIY Milling with router (1 Viewer)

Jambine

Full House
Joined
Jan 23, 2016
Messages
3,095
Reaction score
3,484
Location
Three Creek Ranch, CO
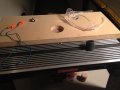
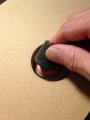
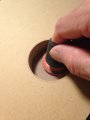
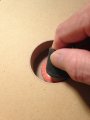
Finally finished the router jig. Been working on old Paulson roulettes.
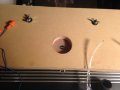
Took a while to get the exact diameter using a 1/2" self cleaning bit. I want to hide the transition from label to chip, so I went all the way out to the inner ring on the chip.
That's about 1-3/16" so it accommodates a 1-1/8" label nicely.
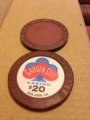
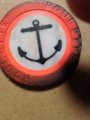
Sample label shown from @Gear (these will definitely get his labels).

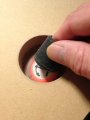
I've done a few hundred, and it's taking about 35-40 minutes per hundred.
 

Attachments

  • IMG_0509.JPG
    IMG_0509.JPG
    120.6 KB · Views: 538
  • IMG_0507.JPG
    IMG_0507.JPG
    112.9 KB · Views: 464
  • IMG_0508.JPG
    IMG_0508.JPG
    97.6 KB · Views: 434
Nice result, Ben.

I've been thinking about these jigs... I was thinking a deep recess to hold the chip with a shallow and slightly wider recess for the bit to ride on (slightly larger to accommodate the size of the bit with the result being a smaller diameter area being cut back) to prevent milling too deep or too big of a recess... All you'd need to do is make sure the center of those two circles are identical, then your milled recess would always be dead nuts center.

How are you controlling depth and diameter of the recess?

One the jig is made, the diameter is right on. I used 3/4" HD particle board so nothing will change there. That is sitting on 1/4" pressed board.
Centering the jig is tricky. I use a 1" steel rule that comes almost (not quite) to center.
Hardest thing to keep set is depth. It's not a high-end router, but it's not cheap. I had to adjust that after about 200 chips, maybe 1-1/2 hours.
 
Only if every chip you mill has exactly the same diameter. (Which they don't.)

That is why I went with a router instead of a drill press. I'm using a rubber stub to turn the chip and revolve around the inside of the jig. My milled area is always centered in the chip, although it may NOT be the same milled diameter (but it's close). I've had a few off as much as 1/64" in diameter which is a lot for such a small area
 
One the jig is made, the diameter is right on. I used 3/4" HD particle board so nothing will change there. That is sitting on 1/4" pressed board.
Centering the jig is tricky. I use a 1" steel rule that comes almost (not quite) to center.
Hardest thing to keep set is depth. It's not a high-end router, but it's not cheap. I had to adjust that after about 200 chips, maybe 1-1/2 hours.

Pics of the process, please.
 
I'm using a rubber floor protector for a chair leg on my finger. Just enough friction to keep the chip from spinning and keep it on the floor of the jig.
Rotating clockwise against the bit rotation. 3 or 4 orbits around the inside of the jig to be sure everything gets to a perfect circle.
I used that very dirty orange chip to better show the milled area. You can see it's not very deep and barely touches the inlay. On a hot stamp it's just enough to remove the foil.
 

Attachments

  • IMG_0510.JPG
    IMG_0510.JPG
    88.5 KB · Views: 342
  • IMG_0512.JPG
    IMG_0512.JPG
    99 KB · Views: 344
  • IMG_0513.JPG
    IMG_0513.JPG
    89.2 KB · Views: 312
  • IMG_0514.JPG
    IMG_0514.JPG
    109.3 KB · Views: 344
  • IMG_0515.JPG
    IMG_0515.JPG
    73.1 KB · Views: 289
Be very carefull, as a minor slip in the Holder will screw up alot of chips before ya notice it. (Off-Center).
 
If Ya screw up a 7/8" milled chip, it can still be milled to 1" or larger.
 
Also if shavings build up on the walls of the jig, it will make the milled area a little bit smaller than expected. I'm hoping there's a powerful vacuum under the table! Well done Jambine (y) :thumbsup:
 
Also if shavings build up on the walls of the jig, it will make the milled area a little bit smaller than expected. I'm hoping there's a powerful vacuum under the table! Well done Jambine (y) :thumbsup:

Yes. Bottom cleaning bit with the vacuum going. Still need to blow it out occasionally
 
That's a pretty cool idea. I don't have any roulette chips myself. If I did I would highly consider doing this.
 

Create an account or login to comment

You must be a member in order to leave a comment

Create account

Create an account and join our community. It's easy!

Log in

Already have an account? Log in here.

Back
Top Bottom