Adding hardware to step up our slot machine game! (5 Viewers)

dennis63

Flush
Site Vendor
Supporter
Joined
Mar 26, 2013
Messages
1,480
Reaction score
3,756
Location
Wilmington, DE
Key West Resort & Casino Project Report:

ADDING HARDWARE TO STEP UP OUR SLOT MACHINE GAME!

Background:

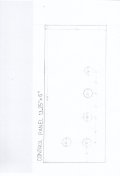
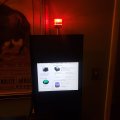
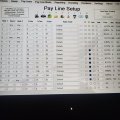
Since 2021, I've been running slot machine software on a touchscreen laptop and mirroring it onto a large touchscreen monitor. The software, from AllJ Slots, puts three slot reel images on your screen and allows you to customize the screen background and even the images on the reels. Multiple control panels allow you to add or subtract reel images and stops to tweak the payout percentages and win rates, which it also records and reports. In short, you can turn it on, close the laptop and play by touching the on-screen buttons on the big monitor. It runs like a real slot machine. On a 24-inch touchscreen mounted in "portrait" mode, it looks like this: (Custom slot reel images are shown below.)

Slot Machine A.png


Key West Logo JPG.jpg
Lucky 7 JPG.jpg
Bell JPG.jpg
Coconuts JPG.jpg
Limes JPG.jpg
Lemons JPG.jpg
Bar JPG.jpg
Wild Card JPG.jpg

THIS PROJECT:

Right now, the "slot" is running using images of IGT buttons on the screen. Touch them and the slot reels react accordingly. But the software is compatible with an array of real slot machine hardware -- real IGT buttons, lights, beacons, and even cash out receipt printers, coin and bill acceptors and hoppers. My goal, over time, is to add peripheral hardware to create an even more realistic player experience by adding new things and sharing the results -- successes, failures, challenges and what I learn -- here.

Here's a list of what is here or ordered right now. I'm still waiting for most of it to arrive. That will happen in the next couple of weeks:

IGT Buttons 2.png
Controller Board 2.png
Delcom Beacon.jpg
Epson TMT20.jpg
speaker.png
Four port.png

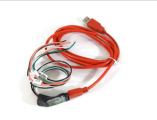
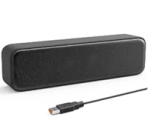
LEFT TO RIGHT: A: The IGT buttons; B: IGT button control module; C: Slot machine beacon light; D: Cash out voucher printer; E: Speaker; F: 4-port USB hub. (Lots of things connect through USB cables) Total cost for the above items: $405.

and, of course, my "pie-in-the-sky" TITO (Ticket-in / Ticket Out) system, ordered just today. I found this refurbished one at a casino equipment supplier for $110. A new one is normally $650. AllJ says the program will send the voucher to any printer we program into the the laptop. I'm not sure it will work with the software or if we can eventually make it work, but it's worth a hundred bucks to find out.

Transact 950 1.png

The ultimate goal, of course, is to build all of this stuff into an awesome slot machine cabinet (and maybe make a video along the way) I'll keep it in my office, use at casino night parties and loan out.

Q: So why not just buy a slot machine?

A: Real, full-sized slot machines are too big, too heavy (400 pounds and up) and can get really expensive to buy and maintain. If I build a working machine, I'll learn a lot and have a better understanding of how it works and how to fix it when it stops working. And the best reason of all: For the hell of it.

What are the challenges:

Cost
: Obviously, if you want, and you have the cash, you can buy a real slot machine. I know a couple of people who have the real McCoy, complete with TITO systems.

The same goes for a project like this. I'll be limited by the affordability of the add-ons. Example: A bill acceptor that takes real money can cost around $1,200, so I won't be adding one of those. Slot machine arms? There's one online right now for $400, so that's a "no." (It's a simple USB keystroke emulator programmed to say "spacebar," so I could probably have one made for less.)

My budget on this is $1,500 to $2,000.

To date, I've spent $399 for the software and $265 for the touchscreen monitor, both in 2021. (I have two spare laptops, so that cost is $0. All the above items together cost another $515, this year, but one of the printers will be returned or sold for around $100. So total to date would be $1,069... or the price of a new cell phone.

Time: These days, it takes days or weeks to get stuff, or to find someone working in tech or customer service. I expect this project to take a year or more and be done in several phases: 1) Obtaining and testing hardware; 2) Resolving compatibility and tech issues; 3) Designing a nice slot cabinet; 4) Building the cabinet; 5) Installing the hardware. My estimated time to complete this project is 4 to 6 months.

Me: I'm not the "guy from IT." I don't write code or work in the tech industry. So if I can do this, I'm sure you can, too.
 

Attachments

  • Controller Board 2.png
    Controller Board 2.png
    76.8 KB · Views: 31
  • speaker.png
    speaker.png
    16.7 KB · Views: 34
  • Wild Girl JPG.jpg
    Wild Girl JPG.jpg
    13.7 KB · Views: 29
  • Bar JPG.jpg
    Bar JPG.jpg
    11 KB · Views: 51
Last edited:
LATEST UPDATE: Wednesday, 01/03/23

So far:

  • Jeff at AllJ Slots has the TransAct 950 TITO printer and will be checking into potential integration with his software soon.
  • IGT buttons were fitted into a translucent acrylic control panel. Wiring is complete. All buttons light up and perform the correct functions when pressed, including cashing out and automatically sending a cashout voucher to a backup thermal POS receipt printer. The panel has the option to add player credits by pressing the service button, or easily unplug this feature. A frame for the panel is almost finished. It will drop into the front of the machine body.
  • The beacon, speaker, IGT buttons and printer all work perfectly!
The printer question:

I'm a bit stunned that I'm over a month into this project and still don't know which printer will get installed in the machine. TransAct's Epic 950 TITO printer is my dream for this machine, but may not work out. As a backup, a simple thermal receipt printer is in the works.

Cabinet design...

I have a cabinet design sketched out (Post # 28, below.) Final exact dimensions may change a bit. (I'm essentially building this "around" the monitor, the sides may adjust in or out.) The finished cabinet will be just a bit thinner and smaller than I first imaged. That's fine, because it will weigh less and be easier to transport.

... and why the cabinet design is not a concern:

If all the components work together, changing cabinets to something bigger later won't be an issue if I decide to add a slot arm or even a coin hopper or bill acceptor.

The next step:

Building a cabinet for all the components. The wood and accessories have been purchased. I just need to find time and good weather.
 
Last edited:
Another quick update:

I traded emails with Jeff at AllJ Slots a few minutes ago. He's interested in the TITO printer and the potential to add it to the devices compatible with the software. He's looking into that now.

Emails have gone out to the retailer and the manufacturer to answer Jeff's print driver questions. We should know on Thursday if it's even possible for the TITO printer and the slot software to work together.
 
Last edited:
UPDATING THE BACKGROUND IMAGE:

Issue: The background image on the 24" monitor is BIG. That means if you start with a small image and blow it up, it can get a little blurry. My original "Southernmost slots" image was also a little darker than I'd like.

I changed the original images to brighter, more pastel colors. The top acts as a "marquee" for the slot machine. On the bottom, we can plug in a pay table later. I put the finished image into an online vectorizer and the enlarged image is much clearer and sharper on the screen.

Southernmost Slots D Portrait.png
Southernmost Slots Potrait Touch.png

Before and after: A lighter image above and below
the slot reels. The vectorizer site makes the image
cleaner and clearer on the large 24" screen.
 
UPDATE: Testing the Delcom Products slot machine beacon:

The slot machine beacon arrived today from Delcom Products. I couldn't wait to test it out.

20231130_200504.jpg

The Delcom Products slot beacon.
I was afraid the light would be gigantic, based on the advertising photo. It's not. It's 2 inches wide and 2.5 inches tall -- the perfect size for a smaller machine. Cost: Around $100, so pricey, but it's super-easy to use and does a lot.

USB function: The light plugs in via USB to your computer. The AllJ slot software recognizes it immediately. Depending on how you want to mount it, you can get models with the power cord coming out the side or the bottom.

Testing:

Click on a tiny, unobtrusive key in the top right of the screen and it opens a control panel with lots of tabs. Click "hardware," and you can program how you want the light to blink -- white, red, blue or green, and lots of different patterns and color combinations. Set it for how many seconds you want it to blink -- any time from one second to a minute --and you can click "test."


Beacon Light Control.png
20231130_200552.jpg
20231130_200549.jpg

Clearly, it worked!​

Light Action Profile:

This control panel is also where you select the light action profile you want. Several are programmed in, offering a variety of colors and patterns with names like "the fuzz," (red and blue alternating) or "frog in a blender," (green and red). When a jackpot hits, the light will run through the pattern.

Next, you tell the software when you want the beacon to light up. Click on "Pay Line Setup" and you'll see all the combinations that pay out, and their prize amounts. Just click the "B" ("Beacon") box on the lines where you want the beacon to react. (I picked 5 seconds for any win of 20 credits or higher.) You can also turn on sound effects that come with the program, or load sound effects you make yourself or buy online from sites like Pond5.

20231130_200706.jpg

The blue click boxes show when the beacon lights up.

Next, the light base threads into a pole you can get from Delcom or from the local hardware store. The light base is threaded to receive a standard M14 bolt, which will make things easy when we finally build a cabinet. I'll attach it to the monitor stand with a rubber band for now, just to hold it in position above the screen for an idea how it looks.


20231130_200803.jpg
20231130_212947 - Copy.jpg

Left: Attaching the light to the pole. Right: Attaching the pole to the
monitor stand for now until the cabinet is built.


Red Slot Win.jpg
Green slot win.jpg

The end result. I can adjust the height when we build the cabinet.
(As you can see from the reels, this is not a hit. The beacon briefly
runs through your light pattern when you start the program - a
perfect time to take photos..
 

Attachments

  • 20231130_201126.jpg
    20231130_201126.jpg
    76.8 KB · Views: 43
  • 20231130_200706.jpg
    20231130_200706.jpg
    233.2 KB · Views: 49
Last edited:
UPDATE: Hit a snag tonight.

I ordered five IGT buttons that appeared (in the eBay ad) to be fully assembled, labeled and ready to wire. What arrived was a bag of disassembled parts.

WhatIordered.jpg
20231201_194808.jpg

Left: What I ordered. Right: What I got.
It took awhile (and one video online), but I figured out how to put each button together and get the label under the cap. Also reached out to Dave at USBButtons for some help / instruction on how to wire the controller board. I don't want to fry it.
 
UPDATE: Hit a snag tonight.

I ordered five IGT buttons that appeared (in the eBay ad) to be fully assembled, labeled and ready to wire. What arrived was a bag of disassembled parts.

View attachment 1233284 View attachment 1233286
Left: What I ordered. Right: What I got.
It took awhile (and one video online), but I figured out how to put each button together and get the label under the cap. Also reached out to Dave at USBButtons for some help / instruction on how to wire the controller board. I don't want to fry it.
This is really a diy project!
 
UPDATE: The "cardboard box test"

Spent part of this morning putting IGT buttons together over coffee. I won't wire the buttons until I'm ready to install them in a control panel. Wiring will be a challenge. I may need an expert for that.

Coffee.jpg
Button Front.jpg
Button Back.jpg

Left: Started the morning with coffee and a bag of button parts. You pop out the fronts to put the decals on the faces.
Middle and right: The first assembled button, front and back. The two prongs in black power the light. The three blue
activate the button. (The third is an extra in case you want to make two buttons that do the same thing.) Slowly learning.

Placing the buttons onto a cardboard box gives us an idea of the spacing and order so I'll know how big the control panel needs to be. Since we have an on-screen set of IGT button images, I want to keep the real-world buttons in the same order. When the real IGT buttons are installed, both sets should work, so the player will have the choice: Touch the screen of press the button.

On Screen IGTs.jpg

Cardboard Box.jpg

Top: The on-screen IGT buttons. Bottom: How the buttons
will be arranged on the eventual control panel.

Next, it will be time to head to the casino for a little research on control panel height. And martinis...
 
Update on printers:

A rep from TransAct Technologies emailed this afternoon to say they believe they can develop a driver that will enable the AllJ Slots software to use the Transact 950 TITO printer, shown below.

Transact TITO Printer.jpg
Transact 950 A.jpg

Given the secure nature of the casino business, I had my doubts they would even answer me. (I guess we're all use to being ghosted by GPI.) I can only imagine what a toll it would take on the casino industry if too much information about bill acceptors and TITO printers got out. (They need signed non-disclosure agreements before they can even talk about how their printer is programmed.)

I should know within a few days if the software can work with this printer.
 
First sketch of potential cabinet designs as I think about how to build this all together.

Side view of internal stuff. This is a very rough, but it gives me some idea of where I might end up putting things and how much material I'll need.

Red dotted lines are data or data and power. Black are power. As it turns out, before this is done, there will be a lot of wires.

The laptop will be inside behind a door and pull out on drawer hardware. I may switch to put the laptop higher (over the printer). If the TITO printer doesn't work out, I'll need to change the design.

I'll likely do a full-size cardboard mock up of the exterior shell. This will be a cheap and easy way to tell:

1. how things fit inside and where I need to make the space bigger or smaller;
2. the best places to run and secure wiring inside without crossing access doors;
3. How big to make access doors and where to put them.

Posted the sketch in three pieces to give a clearer image as they are screenshots.

Top.png

Middle.png

Bottom.png

 
Last edited:
BUTTON TEST:

This evening I used two sets of alligator clips to connect one IGT button to the controller board, carefully following instructions from Dave at The Garage. (He built the controller for AllJ.) It was actually easier than I thought -- just 4 connects.

I plugged it in to do a quick button test. The button lit up and when I pressed it, it worked.

Play Max Lit Up.jpg

If only getting the printer to work with the software would be this easy. Now it's time to look into building a nice control panel for the final build.
 
The probabilities are calculated based on thousands of spins. The actuals are what really came out since the last reset. Much smaller numbers of spins.

In theory, as the numbers of spins increases, the actual will approach the probability.

The software generates random numbers. Part of each random number represents a stop on a reel. It then (very quickly) compares the images to the payout table.

When you add or take away images, stops or blanks or change the payout amounts for hits, you can run a simulation to see the predicted hit rates (the percentage of spins that won something) and payout percentages. It will even classify the result, telling you if the slot machine is "tight" or "loose" with qualifiers like "moderately" or "extremely."

I use the slot machine at "Fun night" casino parties, so I set the parameters to hit about 25 - 30 percent of the spins and pay out 135 percent of "bet."

Unrealistic, but play is for free points, and people have fun with it.
 
Last edited:
. The probabilities are calculated based on thousands of spins. The actuals are what really came out since the last reset. Much smaller numbers of spins.

In theory, as the numbers of spins increases, the actual will approach the probability.

The software generates random numbers. Part of each random number represents a stop on a reel. It then (very quickly) compares the images to the payout table.

When you add or take away images, stops or blanks or change the payout amounts for hits, you can run a simulation to see the predicted hit rates (the percentage of spins that won something) and payout percentages. It will even classify the result, telling you if the slot machine is "tight" or "loose" with qualifiers like "moderately" or "extremely."
Appreciate the bit of insight…. I’ve always curious how it worked. Not exactly what I had in mind, but better, assuming of course that the random number is really random (I’ve read stories of how some generators aren’t truly random).
 
Appreciate the bit of insight…. I’ve always curious how it worked. Not exactly what I had in mind, but better, assuming of course that the random number is really random (I’ve read stories of how some generators aren’t truly random).

So the capability exists to cheat, of course. This software runs as described in "random" mode. But the same software also has "fixed sequence" mode, where you simply list the results you want on a table. (Fair, since you don't know who's walking up to the machine next, but certainly not random.)

And then there's this little gadget -- a $40 wireless remote that allows you to send a "next spin jackpot" command. Hit the button and the next spin is the max jackpot. (The software company's clients are trade show sales people, so all of these little tricks would be useful at a trade show, where you're using the machine to attract clients and give away prizes and maybe one big prize.)

Remote.png

The remote that can trigger a jackpot on the
next spin. (No, I don't have one.)


If the machine is in "fixed sequence" mode, the remote also allows you to change sequences. The software can store lots of sequences. In theory, you could have a high-paying sequence to use when your top clients are hovering around your table. Some crappy customers start lurking? Tap a key on the remote to change to a lower-paying sequence that doesn't include your big jackpot prize. I have no need of this, and better use for my USB ports.

How "real life" works at the casino

When I worked in the (real) casino, I got to chat with floor managers, pit bosses and even the occasional Gaming Commission officer when I was dealing at a dead table. By state law, casino gambling is only legal if it's truly "random," and the gaming officials are there to check on slots and watch table games to ensure play is truly random.

I also learned that a casino manager had the ability to make the slots "tighter" or "looser" by changing the stops on a slot machine remotely from a cell phone any time they wanted. (Some states, notably Nevada, require that a machine be idle for 15 minutes before a casino official changes the odds on it.) The state didn't care about that. Make it looser? The player wins and has to pay taxes. Make it tighter? The casino wins and has to pay taxes.
 
Last edited:
High-speed simulations

If you'd like to make your machine tighter or looser, you do so by changing the reels -- adding or subtracting symbols or "stops" on the reels, and "blanks,' those spaces where the reels stop between symbols and you don't win. You can also increase or decrease the amounts paid out for the various winning combinations.

When you make your changes, the software can run a high-speed simulation, silently going through spins at high speed and showing the results in real time. It will do 3,000 spins in about 5 minutes. You need to run simulations for 3,000 to 5,000 spins to get a real idea what your win rate and payout percentages are. Here's what you see on the screen during a simulation:

Sim.png
 
Status update: Holding.

Holding.jpg


I'm standing by to resolve printer issues.

The next step would be to build the cabinet. I'm still waiting to hear from AllJ Slots as they work with TransTech on integrating a TITO printer. Both sides are confident it will work, but which printer gets into the finished machine will decide where the printer shelf goes. And there are an incredibly high number of issues to resolve with each printer.

The Epson TM-T20 printer is supposed to be simple, but getting it to work is inexplicably difficult, Even Epson can't seem to figure it out, so it has gone out to some IT pros, along with the laptop that runs the slot software. (Darn!)

The TransAct TITO printer is from a company that has phenomenal customer service. They're bending over backwards to help us get set up, but it will still take some time and effort. It may be a few weeks before we know if a TITO printer will be part of this slot machine.

In the meantime, I'll be working on designing and building a control panel and wiring the IGT buttons into it. TAP Plastics will be making an acrylic outer cover to make the finished control panel look professional. If all goes well (and I measure correctly), the control panel will drop in perfectly to the finished cabinet.
 
Last edited:
Long term plan?

Two slot machines running the slot software. Target date: Open. (We have most of the stuff for a second machine already. The second machine will be a bargain after working out the details on the first one.

There is an incredible amount of technical detail that goes into building a slot machine.
 
Plan to use the "Service" button

Service.jpg
Switch.jpg


The IGT Button Set came came with a service button. It's not really needed to control the slot machine's features. You already have "bet one,' "spin reels," "bet max" (which spins automatically when you press it) and "cash out."

The slot button control has a wire labelled "C," which is the command to add credit to the player's total. Each time you press "C" on the computer keyboard, it adds one credit. The light inside the button is wired separately using a power supply wire and a ground wire.

There may be situations where you want your players to add credits to their total, and times when you wouldn't.

My plan is to power the button (so it lights up), then lace an "on / off" switch between the last button's power wire and the "service" button. The "on / off" switch will be concealed somewhere in the cabinet.

When the switch is "ON," the service button will be lit up, and hitting the button will add one credit to the player total.

When the switch is "OFF," the service button will be lit up, but pressing the button will do nothing, kinda like at a real casino.
 
You’re a serious professional and I love it. Me, I’d have the “service” button do something funny- a Price is Right womp womp or an animated something on the screen indicating that they were silly for thinking they would actually get service. ;)
 
You’re a serious professional and I love it. Me, I’d have the “service” button do something funny- a Price is Right womp womp or an animated something on the screen indicating that they were silly for thinking they would actually get service. ;)

I was actually thinking of rigging it to a recording of Seth McFarlane (as "Brian" from "Family Guy") saying "Whose leg do I have to hump to get a drink around here?"

Brian.jpg
 
Control panel design colors and ideas:

Got samples of opaque acrylic panels today in three colors. I'm considering one of these three colors for the exterior of the control panel. It's strong, and it's thin enough to install the buttons with no problem. They can cut the holes at the factory.

(It's also sharp at the edges, so some edge trim or a frame will be needed.

The light and dark blue can be lit up. The black is sleek, but light doesn't show through. With either of the blue colors, there is the potential to put LEDs under the panel to light it up, or at least part of it.

Panel Colors.png

And a simplified concept sketch of the finished cabinet:

Concept Sketch 1.png
'
THE PLAN:

This sketch of the machine shows the control panel with IGT buttons Top left to right: Service, Cash out, Bet one credit, Spin reels, Bet Max & Spin.

PRINTER: The drawing shows a cashout voucher coming from the printer onto the panel. (The TITO printer extends 11" back behind the monitor. The front face of it is only 5"x 2", with a 4-inch slot for the vouchers to go in and out.) If the TITO printer doesn't work out, I can install a POS receipt printer in the same spot.

SOUND: There's 7" wide black soundbar at the center just under the monitor.

BELLY LIGHT: Considering a "belly light" below the control panel if I can get the Key West palm tree on a small translucent glass or plexiglass panel.

MARQUEE LIGHT: I don't think one is needed, as we have a beautiful image on the monitor above the reels.

SLOT HANDLE? Not considering one at this point. (It's a $400 add and would likely be too big for this machine.)

FINAL DIMENSIONS: Not gigantic. The whole thing will probably end up around 20" wide, 24" front to back, and 37" high. Weight is a factor, and I want to be able to carry this thing myself.

CONCERNS: I'm not a professional cabinetmaker. Lots to learn before final cuts are made on the cabinet. Plus I like the idea of keeping all ten of my fingers.


Last edited:
Sketched out a basic cabinet design today. It's crude, and may change. The next step will be to scale it up to 100 percent on cardboard and see what fits where.

Front view.jpg
Front view.png

Left Side (1).jpg
Side enhanced.png


Control Panel Top.jpg
Control Panel Final.png


Attachments

  • Control Panel Top.jpg
    Control Panel Top.jpg
    44.5 KB · Views: 24
  • Control Panel Top.jpg
    Control Panel Top.jpg
    44.2 KB · Views: 28
Last edited:
Update: More printer woes causing delays

The plan:
The "backup" receipt printer (EOM-POS 200) was scheduled to arrive today. (It's intended to replace the Epson TM-T20 receipt printer that would not work.) I was planning to install it and print a "cashout voucher" from the slot software today.

What happened? The box showed up on my doorstep before 8 a,m, I picked it up and heard parts rattling around inside. Never a good sound. When I opened the box, pieces fell out, including two bolts and a roller. There was another bolt or screw rattling around inside the sealed portion of the printer body. I put the pieces back in the box. slapped the return label on it, and sent it back..

Maybe they should have marked it "fra-jee-lay."

I ordered a replacement POS thermal printer.

This will delay the project for about five days.

oh-fudge-ralphie.gif

... only I didn't say 'fudge' either.​
 
The control panel top, where the player's hand will rest, will be a piece of custom-cut sky blue acrylic, 1/8 inch thick. The holes for the IGT buttons were cut at the factory. The acrylic panel cover arrived today.

It needs to be tweaked a bit.
  • The 7/8" holes for the IGT buttons need to be widened just a tiny bit, which can be done with a razor. (Two are done in the photo below.)
  • I'll need to drill four x 1/16" holes for pegs built into the backs of the two larger buttons. (The pegs keep the larger rectangular buttons from spinning in place.)
I'll keep the adhesive cover on until all the cutting and drilling is done, as this makes it easier and neater. Waiting for a special drill bit to do the work without cracking the acrylic. When the two remaining larger buttons are installed, the buttons to bet one, spin reels and bet max and spin will appear closer together.

I wanted to try translucent acrylic for this, as it gives me the opportunity to actually put lights into the panel to light up all or part of it.

20231226_134815.jpg
Button Panel Crop A.jpg
Sky Blue with Button.png

The panel arrived with the holes cut for the IGT buttons but they were just a hair to small. Also need to add
four small holes at 3 and 9 o'clock on the two holes to the right. Tiny pegs inside the larger rectangular IGT
buttons go into those holes to keep the buttons from spinning. The acrylic will be the blue shown at right,​
 
Last edited:

Create an account or login to comment

You must be a member in order to leave a comment

Create account

Create an account and join our community. It's easy!

Log in

Already have an account? Log in here.

Back
Top Bottom