Proposed build - Large(ish) dismantleable topper with raised rail and leds (1 Viewer)

Nymor

Two Pair
Joined
Aug 14, 2022
Messages
437
Reaction score
1,035
Location
Brighton, UK
Hi all,

I built a desk last year - thread on another forum with pics - and really enjoyed the process and result so want to try for a poker table this year.

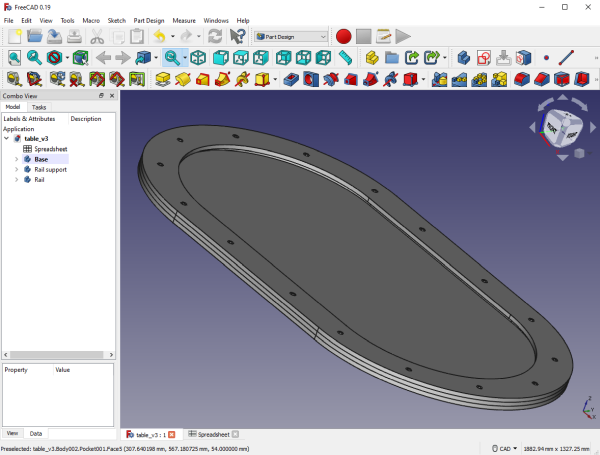
The main parts of the table will be CNCed so I can specify everything from the dimensions to corners and roundovers etc. My experience above has given me a lot of confidence as everything there came out to the mm and is gorgeous :)

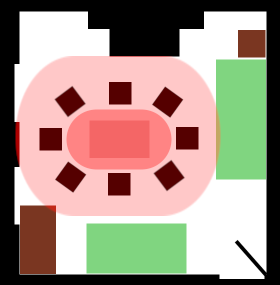
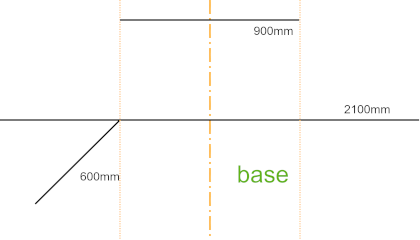
I live in a flat so space is restricted and the table needs to be "put away" when not in use but I don't mind if the table takes me 20mins to put together each time. I also want it to have as much room for each of the (8max) players. Going with outside rail 2100x1200mm (~83"x47") looks to be about spot on - a ~1800x900mm (~71"x36") playing surface, 150mm (6") rail raised 18mm (3/4") and allows a meter clearance around.

VSpLvZF.png


The design/build falls into 4 broad categories- the base, the playing surface, the rails and the lights - and I've got questions/decisions still to make on all of them.

The Base

2LF8lec.png


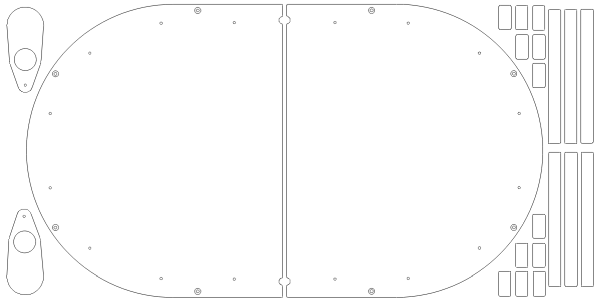
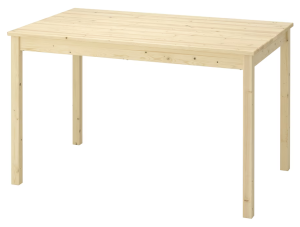
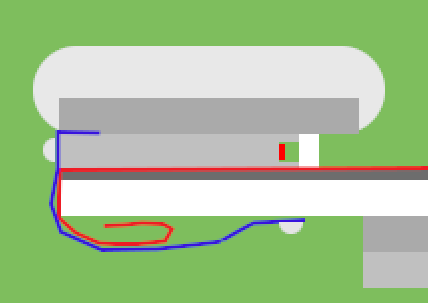
The base (in 2 parts) will be attached to an simple but sturdy IKEA dining table (1200mm x 750mm)


xZmJ8Rc.png


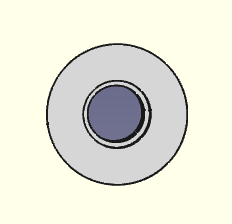
by way of strengthening supports on the base


Y3l9eIk.png


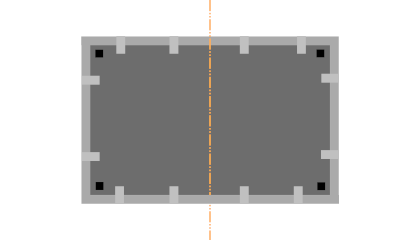
and wooden latches - these give an idea of that


ZwnMukY.png


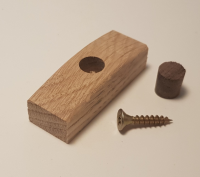
Details of that may change but that's the general idea. It will be made to be very solid yet simple to put together - the base being in 2 pieces for storage. Once the rail and rail support are added the ~400mm overhang should be fine but I can drop an extra leg each end if worst comes to the worst.

Currently looking at 18mm (3/4") plywood for the base but may go to 24mm (1").
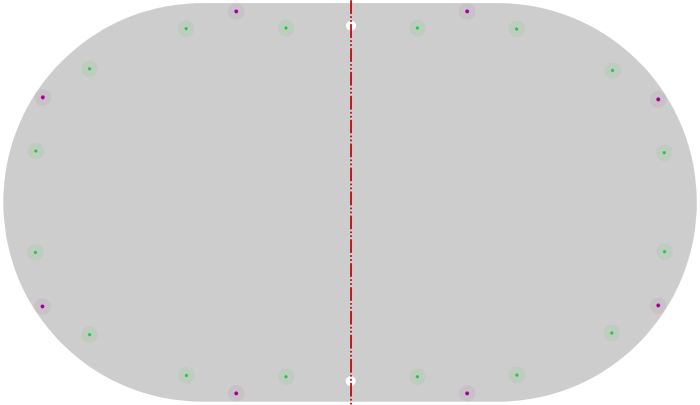


The Playing Surface

While the base is in 2 bits the playing surface can't be - I don't want a split in the middle. My first thoughts many moons ago was to buy a foldable - we use them at my pub league games and they're fine - but fancied something a bit better and for whatever I end up with to not look like a foldable but a proper table. Seeing all the stunning examples on PCF has closed the door on that route anyway now :)

The surface can't be permanently attached to base so either has to roll out or be unfurled in some way - the rail assembly will hold the surface in place. I think I have 3 options at the moment:-

1. Neoprene
A custom printed neoprene surface may be a good route but how/where to get that in the UK isn't completely clear to me. The french guys? the lithuanian company?

2. Foam and Speed Cloth
This is where I was going initially. Possibly have the (5mm closed cell) foam stuck to the base and just unfurl the speed cloth over each time I set up. No betting line with this but that's ok ... maybe? and some friends have said they find SSC a bit rough but it is fairly durable. Of the speed cloths I've seen I like the 2 colour red one the best but sourcing in the UK seems an issue.

... and then I saw Chanmans cloths ...

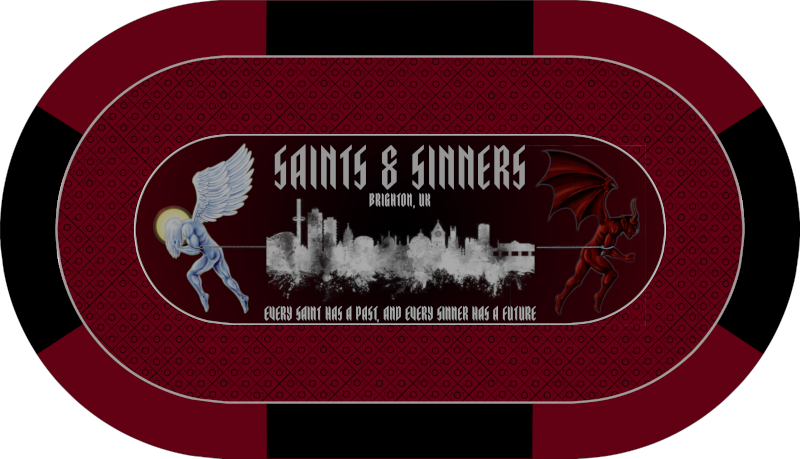
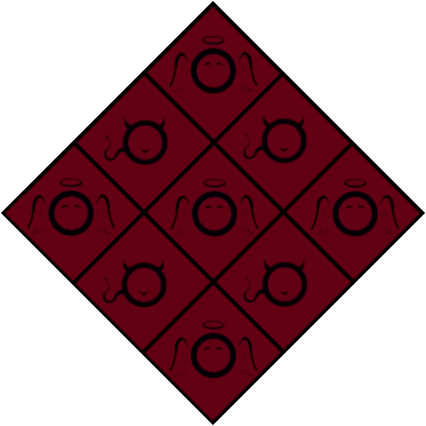
3. Chanman custom Cloth
If I can make this work it would become my preferred route - pushing the budget but they're lovely. If a cloth could be stuck to foam sheet and very loosely rolled without coming away that would work (specific foam and adhesive?) - or if, again, the foam was stuck to the base and I just unfurl, position and clamp the cloth in place with the rail (no adhesive) then I'd be good with that also.

For both 2 & 3 I could cut to fit or have some extra over the edge to help with tensioning/positioning prior to rail attachment and also have accomodation for the bolts coming through to attach rail and rail suppport. As I say I don't mind if it takes me 20mins to setup - it'll probably be only once or twice a month.
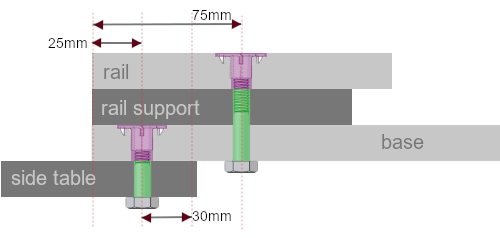
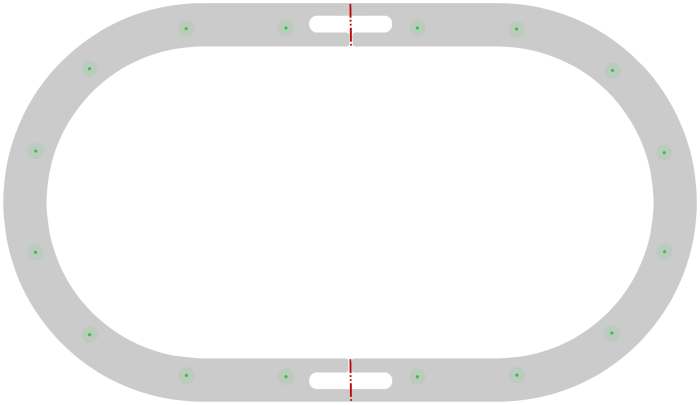
OLUNnlf.png


The Rail

QrWZrDK.png


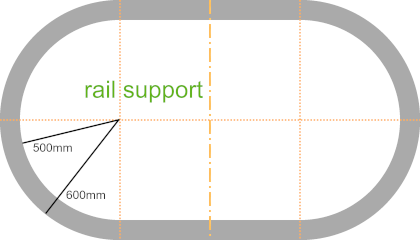
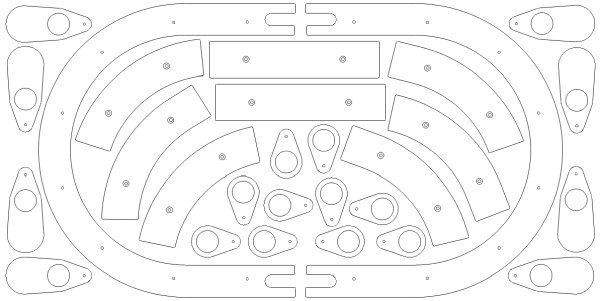
The 18mm (3/4") rail support would be between 10 & 12cm wide, sit on the cloth, house the lights and raise the rail. Hoping I can fix this in place with the same bolts that will fix the rail (with threaded inserts) but if I need to fix it separately then so be it. This will be in at least 2 pieces maybe 4 - the fewer the better as far as connecting the lights is concerned but not so they're flimsy when stored.

5ECYPme.png


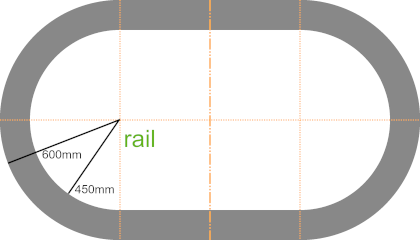
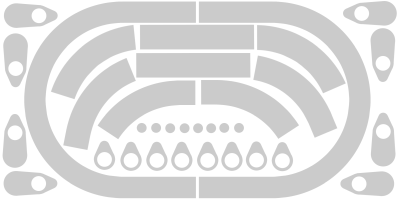
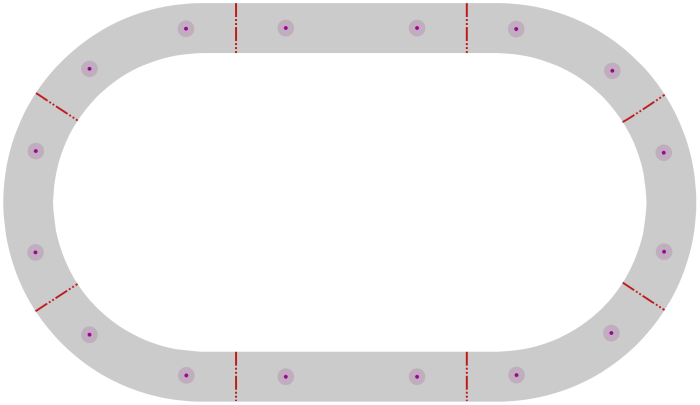
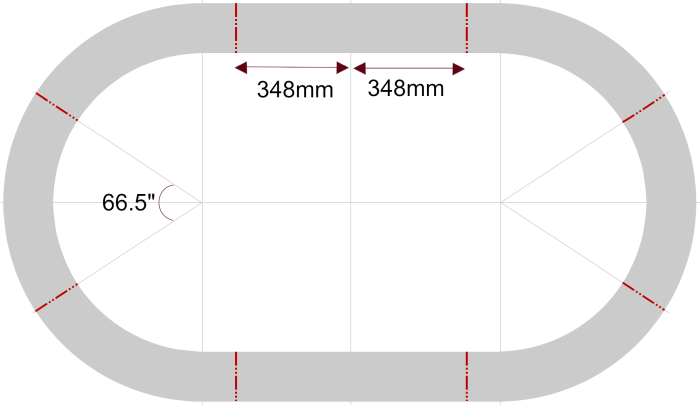
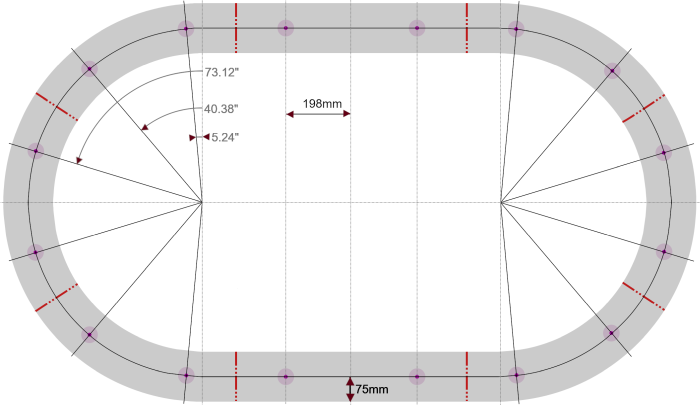
The rail itself is 15cm (6") width and also needs to be several sections. My favoured option at the momemt is to not try to hide the breaks and to not have any on the midline as that makes it look too much like a fold-up. Having 8 sections allows easier building and clearly defines the seating so everyone has plenty of room (~70cm/28") and no one is crowded (a pet hate of mine). I'm confident that with some upholstery tricks I can make the "ends" square and butt them against each other tightly enough they're nearly be as good as a full single rail.

kxKzm3c.png


These will have 1" rail foam and faux suede. Getting black faux suede is easy - the dark burgundy, my current second colour, is proving tricky. The 2 colour scheme will work well if I can get a suitable dark colour to go with the black but if that fails I'll just do black all round.

I plan to fix each of the 8 sections, along with the rail support, to the base with 2 bolts from underneath the base and into threaded inserts in the rail. Hopefully 2 strong bolts per section should be plenty.


The Lights

To begin with I'm just going to have a dimmable warm white (3000k) string broken into however many parts the rail support config dictates. They'll sit in a routed lane on the inside edge of the rail support.

kK7pDQs.png


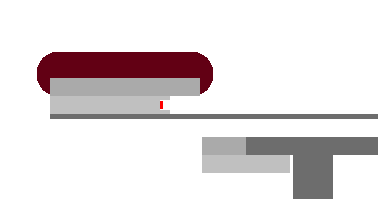
While looking for methods to diffuse the light that would be simple I came across EVA foam - used by cosplayers to make armour, for example, and to diffuse leds built into their costumes. It works well, looks good, is cheap/replaceable and if I oversize the height slightly I could wedge 1 or 2cm thick strips between the cloth and the underside of the rail infront of the leds. I'm going for more of a glow than a light if that makes sense. Once in place they'll be quite firm and be easy to take apart. (If that's a terrible idea then I can look at frosted perspex strips instead).


That's where I'm up to - I'm glad I've got all that off my chest :)

First order of business for me is to get a sanity check if possible on the overall plan and to decide on the playing surface as whatever that turns out to be may effect other details.

If you got this far thanks ... and opinions/recommendations etc very welcome :)
 
With reference to the playing surface questions I have I pm'ed @T_Chan and asked him ...

Basically comes down to this .... do you know whether your cloths can be fixed to a flexible surface - foam/rubber etc - and loosely rolled/hung up for storage or will they come away and look rubbish?

and, with his permission and my thanks, this is his reply ...

Yes, our cloths can be glued to foam and rolled away. However, it depends on the type of glue, type of foam, and how tightly you roll it up. You can end up with wrinkles in the fabric.
Here's what I suggest:

A) Add another layer of plywood to your build. It can be very thin, but make the playing surface a single sheet of plywood, glue the foam and felt to that. This would become an insert that you would put into the table when you assemble it all. The playing surface wouldn't be as large as the entire table, but the problem is that yes, you still have to store it away somewhere and it's a little big. But, it's very flat, so it could slide behind a couch, under a bed, in a closet, etc.
B) Add velcro to the edges of the felt. Sew in some pieces of velcro along the edge, not all the way around, but just in some spots. Then when you take the table apart, just peel off the felt. When you put it together, pull it tight and stick the velcro to the table and it should stretch it out for a nice tight and flat playing surface. You might be able to do this with the foam installed on the felt as well. So even if you develop wrinkles in the foam with felt, when you pull it tight on the table with the velcro, they may stretch out as long as you dont' have too much glue, and you use open cell foam (closed cell doesn't stretch).

Good to know it's possible.

I'll be looking at option B I think as a single, albeit thin, extra piece of plywood is still slightly cumbersome.

I now have to decide whether I fix to the foam and risk wrinkles or not fix and maybe(?) risk the surface not feeling it's properly stuck down (because it won't be). Fixing it would be preferable and I hoping if that doesn't work out - ie wrinkles after being stored v loosely rolled - then I can just peel it off, give it a wash and try the other way with fresh foam. I reserve the right to change my mind often on this before I need to commit one way or the other :)

I'm happy that either way I'll be able to tension it all ok - be that with velcro or some other method. I only need to tension it prior to adding the rail (& support) as once those are in place the cloth is clamped tight the whole way around.

Got a stack of foam samples on the way - open cell soft, medium and firm + some other for the rail - and now that I know the playing surface will work the way I need it to I can get on and order the plywood and CNCing.

Onwards and upwards.
 
Last edited:
Slowly getting this together.

First spend just delivered - 8 jumbo black plastic cup holders and they look great. I went with plastic because I figure they'll be slightly quieter than aluminium and 8 for £24 is a small attempt to keep the ever expanding budget in check :)

I got these first as I want to confirm their diameter - 90mm - before I order my CNCed wood. The problem (well not really a problem but a thing) with CNCing is that I have to get everything spot on at design time so I'm working backwards from the cup holders.

I'm going to have 2 types of side table available (to be attached to the base) - a cup only one and a cup with little table.

yCslyqq.png
ZozlHgI.png


chug chug ...
 
How about wrapping the rail like this (rough paint mock up):
kK7pDQs.png

this way you don't have a huge stack of wood as your rail when you look at it from the other end of the room.
 
How about wrapping the rail like this (rough paint mock up):
View attachment 985731
this way you don't have a huge stack of wood as your rail when you look at it from the other end of the room.

I'm thinking along the same lines - wanting to cover the wood - but am looking at a slightly different approach. I have been accused of over-thinking it but this is where I am currently.

ZGD1ebA.png


The red is the cloth and will have extra that is used to tension it - either with velcro or eyelets and weights/bungie cord - and that extra needs to be hidden away once the rail is attached.

The blue is some faux leather fabric that will hide the rail support wood and also hide the cloth. I can have studs on the rail support and snap fasteners to attach it to the underside of the base. (It will be tight - the loose look in the image is just for display purposes). I think it will look quite tidy and everything will be nice and clean if anyone looks under the table and it will also hide all the bolts.. I'll have to ensure I deal with the excess around the curves properly but I think this way has potential.
 
Also been playing with some ideas for a cloth design along the same theme as my custom chips. Before Saints & Sinners came along I was going to do something with my home cities skyline and maybe I could still include it if I went along these lines....

3Vl68yU.png


with the outer cloth detail being

7WkNIWM.png


(Quote is Oscar Wilde)
 
(more from my stream of consciousness ... :) )

2 decisions I need to make now so I can get my wood ordered - both of which I hope I can pass by those more in the know than me. My only real diy has been the desk I linked in the opening post and while all that worked out awesomely it's still only a single experience.

I'm going for a WISA spruce plywood this time as opposed to Baltic Birch as none of the wood is going to be visible - well the side-tables will be but they'll be dyed and will look fine I'm sure, and the cost difference is not insignificant.

I'm not sure, however, whether to go for 3/4" or 1" (18/24mm) - or even a mix as the base will be one sheet and the rest will come out of another ....

Yqka5fs.png


1" for the base just seems right but could well be overkill. I'd like it to feel solid and but also want it to not be overly heavy.

Doing the rail & support in 1" would add an extra 1/2" to the height of the rail. I still think it would be within bounds and not be too tall and I've already resigned myself to the possibility of having to shorten the table legs so overall height I can deal with.

The second thing I need to decide now is the number and position of the bolts that will hold everything together - I'm having my bolt holes put in as part of the CNCing. I'll be using M10 (10mm) bolts and t-nuts and really want to be able to get away with just 2 bolts per rail section - so 16 bolts in all - if possible. When the side-tables are used that will be 24 bolts in all each time I put the table up (and take it down). If I had to use 4 per section that would be 40 in total which would be a bit of a chore.

Are 2 bolts per ~70x15cm section enough? (3 layers - clamping/tensile forces - no shear).

Any advice on either of those gratefully received.
 
Decided to go with 18mm (3/4") and am making it Baltic Birch instead of a cheaper option even though nothing, except the sidetable edges, is going to be visible. BB is stronger, more layers, and more stable and worth the (not minor) cost increase. This table is going to be put together and then taken apart again fairly regularly and the BB is really tough.

Going to have all the bolt holes put in as well so I had to get all that worked out before sending for a quote from the CNC guy but that's just been sent so I now await the reply. I know what my desk cost and it's going to be around the same I suspect ... yikes.

3 layers, red lines are the section breaks, purple for m10 T-Nuts and green for m10 holes + some cutouts for light fixtures.

Profile
BDeCdFt.png


Base
hKbWrZ6.png


Rail Support
L7EAYGZ.png


Rail
rH1liQE.png


The rail needed some sums - I hope my maths is right.
(Equal distance along the outer edge for the 8 sections and 2 bolts 15cm from each end along the center line)

QnskGSi.png


Q76LT7V.png


Phew...
 
Bit of a setback - the CNC guy replied ...

For such a project we could look at 2d dxf / dwg cutting files, but they will need to be ready to cut or close to ready to cut

:(. For my previous project he converted images to cut files - for a fee - but can't do that this time.


Before I risk disappointment on Fiverr is there anyone on PCF who can do this - take detailed images and convert them to ready to cut dxf/dwg files? Where would be the right place to ask. Any other ideas?

... pass it on .... thanks.
 
you would probably want to have someone that can draw in AutoCAD or Solidworks. They can export their files as DXF for the CNC guys.
 
you would probably want to have someone that can draw in AutoCAD or Solidworks. They can export their files as DXF for the CNC guys.

And that guy is going to be me ... youTube taking a heavy hit serving me up FreeCad tutorials :)

Got it all in - the three layers and all bolt holes and recesses etc.

hqw4vOQ.png


Looking down the bolt holes that went through all 3 layers and seeing daylight was a relief.

r4giPUz.png


Now to learn how to chop it all up and lay it out for cutting ...
 
Woot woot! Awesome job. That’s how I started to learn SolidWorks :) it can be addictive for sure. Can’t wait to see a finished product.
 
I've been meaning to use FreeCad in anger for a while as I've got a 3D printer that's been sitting idle since the initial enthusiasm for printing shiny objects from Thingiverse wore off. I've done a few Hero Forge miniatures for a friend which was interesting - especially using zenithal priming - but nothing from scratch.

Fairly steep learning curve on FreeCad but having even basic level skills opens up a ton of new possibilities.

Now just crossing my fingers that I can get it cut and don't have to wait months. Tried another company a few days ago and they were too busy to take on any new work "for the forseeable future". Don't want to have to go too far from home as shipping then starts to cost an arm and a leg.
 
I wish I had the skills .... and a workshop. Leaving as much to the professionals as possible. The CNCing is going to accurate to ~0.1mm so while it initially looks relatively expensive I think it probably works out the same as buying the wood and hiring a carpenter - probably cheaper all told - with the advantage that it is going to be absolutely spot on. Not to mention 76 perfectly drilled holes.

Also pleased that it's forced me up a learning curve in FreeCad that opens a whole new area I can mess about in.

Foam and fabric next - my upholstery experience is zero so that will be fun. I know I've got a few questions on the foam side of things so need to get those in order.

A ChanMan cloth is rising fast up the project list as well :)
K I gotta ask and it may not be an issue, but did you account for how the cutting is going to happen and allow for either inside or outside cuts or on the line? I'm sure the CNC guys will know and will ask how big the holes are etc. When I was laser cutting and CNC'ing I always had to be careful with the kerf of the laser and the size of the router bits I was using.. Just a heads up... The nesting of everything looks great! Not much waste
 
K I gotta ask and it may not be an issue, but did you account for how the cutting is going to happen and allow for either inside or outside cuts or on the line? I'm sure the CNC guys will know and will ask how big the holes are etc. When I was laser cutting and CNC'ing I always had to be careful with the kerf of the laser and the size of the router bits I was using.. Just a heads up... The nesting of everything looks great! Not much waste

Funny you should ask - I literally just sent an email to the CNC guy checking on that.

In my previous project all the parts were just basic shapes and he put the files together from images and that was all cut "outside" - this time I've got the cutouts and holes as well. The DXF files were in separate layers - main, cutouts, 10mm (10.1) holes (bolts), 12mm holes (t-nuts) and pockets (25x2mm recess for flush t-nuts) - so everything is there - and I'd sent a small sample file at the beginning to check my output was ok for CNC.

Logic says that these are the shapes I want to end up with as I have no idea what machine he uses, software and routing/drilling bits etc - but just confirming that makes sense .

I was quite pleased with the nesting :)
 
About your scheme to fix a cloth to the foam with adhesive and roll it up for storage: Why not just try it with some cheapo speedcloth from Amazon first? If it doesn't work, you didn't mess up an expensive, nice Chanman cloth in the process. If it does work, you spent a little more than necessary (relatively small, though, right?) and will have a backup upon completion of the nicer one. You could try it with or without (or both) the velcro addition.

I am hopelessly unqualified to discuss the design, cutting, construction aspects.
 
I'm going to try first with sticking the foam to the base and spreading the cloth each time - ie not sticking the cloth to the foam. (Building something into the print to help with quick alignment is on the list also). It may also be that I don't stick the foam either as that way I can keep it in one piece - I would have to cut it in two if gluing and there would then be a danger, maybe?, of a center line showing - although I can minimise that by taking my time and doing a good job. I'll see how I feel when I have all the materials in front of me.

The rail will secure the cloth taut so my only concern, at the moment, is whether the cloth would feel like it's not stuck down. I've gone for Baltic Birch, even though it will be covered, because of it's stability and flatness so hopefully I won't get issues where there is even the slightly gap between cloth and foam anywhere on the surface.

Thanks for the idea but one problem I see with trying speedcloth first is that it's a very different material and so will behave differently. Speed cloth is relatively stiff when to compared to Chanman cloths I believe. I suspect speedcloth would be more difficult to work with if gluing and rolling - but that's just me guessing :cautious:

I don't think I'll have to tension the cloth that much prior to it being clamped firmly in place by the rail - watching the Chanman video where he replaces a cloth shows he only gives it a tiny tug before stapling in place - so I'm hoping strong handclamps would be enough to keep it tensioned while the rail goes on. If that isn't enough then I'll try the velcro or eyelets route but obviously I'd much prefer the simpler option so will try that first and go from there.

If I find I do have to stick the cloth to the foam then I'll have to have a bit of a further think. Even then I don't intend to roll it up as such but more hang it over a big curve.

The cloth is a very important part - if not the most important - and I want the playing surface to as good as, or at least as close as possible to, a fixed cloth. It was this that pushed me into this build instead of going for a simple foldable - a smooth single no fold playing surface .

I am also completely unqualified for any of this :whistle: :whistling:
 
Can't stress my cave man comparison from earlier enough but I have documented my table build right here.

Bullenrunde table build

Maybe you can avoid some mistakes by reading about mine.

For example:
Avoid having to build the rail foam from different pieces. You can always feel the seams through the vinyl.

Your table's great - the cloth especially :cool

My rail is in 8 pieces so each section will be upholstered separately anyway. The trick I've got to get down is getting square edges on the ends of each section. I'll have a curved surface on the inside and outside but flat at the ends. I'll be experimenting but I'm thinking I'll have the foam a tiny bit long so when 2 sections are pushed together they'll support each other nicely. I'll only have fabric over the ends - no foam there - and have built in a 1mm gap between them for that fabric (with folds and staples) which I think will be about right but can also sand off a little bit more if needed. I'm sure it would all go together fine without a gap but why not :)

I hoping I don't get the wrinkle problem you had when you didn't glue the speed cloth down if I choose to forgo the glue but as I'll be restretching every time I should be able to avoid them.

I was also on "threaded inserts" initially but have moved to "t-nuts", the "Einschlagmuttern" you mention in your thread, as everything I read pointed to that being the better way - especially for plywood and even more so as I would be taking it apart and reassembling every time. I'm a lot more confident they will hold up over time.
 
Does this mean that the cloth would be interchangeable as well if the non glueing method works?
 
Does this mean that the cloth would be interchangeable as well if the non glueing method works?

Yes :D

... and also would be if I stick the cloth to the foam (but not to the base) ... what's £15/20 on another foam sheet if so.
 
Thanks for the idea but one problem I see with trying speedcloth first is that it's a very different material and so will behave differently. Speed cloth is relatively stiff when to compared to Chanman cloths I believe. I suspect speedcloth would be more difficult to work with if gluing and rolling - but that's just me guessing :cautious:
I have no actual experience, but I suspect you're right. But that strikes me as a reason to try it. If it works with speedcloth, it's even more likely to work with the Chanman cloth, right? The distinction between the two cloths only really matters if speedcloth fails, but you're still tempted to try the Chanman.
 

Create an account or login to comment

You must be a member in order to leave a comment

Create account

Create an account and join our community. It's easy!

Log in

Already have an account? Log in here.

Back
Top Bottom