Inlay removal by milling with a drill press (5 Viewers)

Eloe2000

Straight Flush
Joined
Jun 23, 2019
Messages
8,376
Reaction score
27,578
Location
Casa Mango, FL
I had not been able to find much info on milling out Paulson inlays previously, and what little info I did indicated it was not possible. I have bought some junk chips to try traditional murdering with a razor and NPR etc and it was a nightmare. There is zero chance I would proceed with even murdering a single rack for fracs etc let alone building an entire set by murdering via manual inlay removal. I have also gotten somewhat adept at milling hotstamps which I find incredibly fast and easy once you build a working setup and good jig.

Using a Harbor Freight 8 In. 5 Speed Bench Drill Press and several different size bottom cleaning bits from Amazon I decided to give milling inlaid chips a shot. Overall it is much easier to gauge the appropriate depth to drill compared to milling hotstamps since you can observe the pulling up and stop pressing as soon as the white paper/acrylic material pulls up. It creates much less mess as well since milling solids throws crap everywhere and the inlays come out largely in just several large pieces. I tried milling on several different THC, RHC, and house mold chips and found the end results potentially workable for THCs or other 7/8" house mold chips. The inlays pull right out and leave the same undersurface as you find when manually murdering. The only issue I see is the edge and how the inlay can “pull and tear” and run out of the chip on some of these chips (see the Paris 1). This occurred on only some of the chips and not others. I haven’t seen the raw results of murdered chips so this could happen from that method as well. But it can leave somewhat of a ragged edge when the top layer of the inlay laminate tears out. But it seems to clean up well with something like a file, manually applying a grinding bit by hand, or even a magic eraser.

I am unable to find a bottom planning bit at 1-1/16 which is the exact size needed for RHC chips unfortunately so the results were a mess with 1" bit or too much with a 1-1/8" bit.

I can mill solids at about 30min per rack. I would expect this would take me just slightly longer to mill (40min per rack) with some minor additional clean up time for some of the chips.

I wanted to open a thread to document my results and see if anyone else has tried this and what the results were. Maybe this does not produce desired results or milling isn’t for you, but if you were curious this is what happens when you mill out an inlay with a press. Are there additional downsides that I am not thinking of?

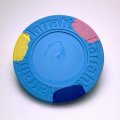
THC/house chips milled with 7/8” bottom cleaning bit – immediately after milling

Photo Jan 06, 11 06 58.jpg


Photo Jan 06, 11 08 35.jpg


THC/house chips milled with 7/8” bottom cleaning bit – with sample 7/8” Gear labels

Photo Jan 06, 19 37 23.jpg

Photo Jan 06, 19 29 32.jpg

Photo Jan 06, 19 36 38.jpg

Photo Jan 06, 19 32 11.jpg

Photo Jan 06, 19 30 16.jpg


THC/house chip milled with 1” bottom cleaning bit – with 1” Gear label


Photo Jan 06, 19 31 49.jpg


RHC chips milled with 1-1/4” bottom cleaning bit: – with Gear label


Photo Jan 06, 19 30 35.jpg


Photo Jan 06, 19 31 05.jpg


RHC chips milled with 1” bottom cleaning bit - don't do this because RHC inlays are larger at 1-1/16":

Photo Jan 06, 11 09 25.jpg
 

Attachments

  • Photo Jan 06, 19 29 49.jpg
    Photo Jan 06, 19 29 49.jpg
    156.2 KB · Views: 185
Last edited:
Wow- thanks for sharing. I have had a similar milling journey but haven’t attempted milling inlays because I was told it’s a complete mess. This looks to be pretty good results. Might have to give it a shot.
 
Nice write up. Great work, my eyes are the greatest but from the chip pictures it looks like the clay wasn't even touched by the bit.

A few questions;

Did you experiment with different drill speeds? or used the same as on solids? i assume low speed.
Curious in what your rig looks like, could you show a picture. I have seen the HF drill press vise used with hole cut out of a piece of wood and a pcv pipe contraption to hold chips in place.
SO i gather you didn't have a set depth, you went by visual guidance (seeing white paper). Curious to know if the depth would be the same for solids and inlays.

Thanks


Thanks. THC and these house mold chips are all 7/8" and there are plenty of 7/8" bits available which are perfect. Unfortunately there are no 1-1/16" bits which you would need for RHC so this would not work very well.

I plan to get a couple barrels of junk THC chips specifically to try some different things. I was just milling some hotstamp fracs and had been wanting to try this. I only had a couple junk chips to sacrifice.

I didn't try different drill speeds. You have to manually change the drive belt to change speeds on this press, so it is not quick. But I would try a slower speed next time.

Setting up some type of guide for bit depth seems like it would be incredibly impractical to me. I eyeball it an dont have any problems since the travel is pretty conservative relative to the handle spin.
 
I’m intrigued by this and have a few thoughts:
- what happens on off centered inlays?
- how does this work on older paper inlays vs the newer vinyl ones (the old ones take fooooorever to scrape out)
- what happens on shaped inlays?
 
- what happens on off centered inlays?

There is a little bit of play in one of my jigs where I can push the chip slightly towards the rear of the insert. This allows me to compensate for uncentered hotstamps which I already do. Same would apply to inlays.

- how does this work on older paper inlays vs the newer vinyl ones (the old ones take fooooorever to scrape out)

Yeah exactly. I tried one of those the old fashion way and immediately realized that was not for me. It would blow through the paper and this doesnt seem like a concern for me. But I would like to try it when I find some cheap ones.

- what happens on shaped inlays?

This same question actually applies to textured and other inlays where the acrylic or vinyl inlay top layer extends all the way out to the edge of the THC ring. The house mold chips and THC chips I milled here had the isolated inner inlay. But on some of those textured inlays that extend all the way out to the 1" diameter edge I dont know what would happen. But I don't know what happens when people murder those the traditional way either. I assume the result would be similar?
 
Great write up! Thanks for sharing... Do you mind sharing what drill bit from Amazon that you ended up going with for the 1" Th&C chips? Thanks!
 
Wow, great job! By the looks of all the debris on the floor you’ve milled a ton of chips.
 
Wow, great job! By the looks of all the debris on the floor you’ve milled a ton of chips.

haha, that debris was only from about 140 chips! I was just trying a barrel from each one of my colors for my tournament set to see how each different hotstamp milled. But keeping the press in a large cardboard box really helps contain all of the debris.
 
1. OSHA approved technique of letting the drill run while you flip the chip.

2. I thought that was a cardboard box... Which is a great idea.

1. Yeah, I have done a fair bit of milling with this setup now and am confident in short stints leaving it running. But yeah in my original post with that video I recommended not doing this.

2. For full appreciation of the ghetto-fabulousnous of this rig I should have zoomed out so you could see how I duct tapped the cardboard box together around the drill press for maximum debris containment :)
 
does a forstner bit not work at all? i wouldn't think so but could get the 1-1/16 size.
 
does a forstner bit not work at all? i wouldn't think so but could get the 1-1/16 size.

I have not tried but I would not think so either because you would leave a center guide hole that would probably go all the way through the chip. I mean, I guess you could but although it would get covered by the label it may compromise the integrity of the chip.

Honestly, you may be able to find a 1-1/16 surface planing/bottom- cleaning bit out there somewhere. I dont intend to use RHC chips myself and didn't do much googling.
 
If you could find a 27mm I don’t see why that wouldn’t work. I’m not going to bother looking though since I really just intend to do this with THC. But if I found a 27mm bit I would try it.
 
Had to give it a shot after this and goddamn this is a game changer for THC chips. Thank you sir!

View attachment 395056View attachment 395057View attachment 395058

Awesome. Yeah, I tried traditional muted ring and there is no way I am willing to do that for rack upon rack. But this is a different story altogether. I just milled a barrel of VLVs at the end of last week and the inlay seemed a hair wider than the others I had milled. So I needed to have everything absolutely perfectly aligned to not leave that sliver of plastic. But like you said that comes out easily. Even in those instances it is still better than traditional inlay removal.
 
So your bit doesn't get all gunked up from old epoxy? How often do you have to stop and clean it?

I'm still going to use the undermount router method, whenever I can get my ass in gear.
 
I was only experimenting with the various chips above and since this post have just done a single barrel of VLVs (I don’t currently have any projects requiring inlay removal). That is just a tiny amount of chips, but I didn’t see any build up and I can’t really think fo where the buildup might come from. From the child I milled here this created less mess than simple solids milling.
 
Wow, Nice work!

I never thought it was possible to remove 7/8" inlay without using a bigger bit to be sure to remove all the inlay, due to centering variations.

Well done!
 
what is the blue material underneath to keep the chip from spinning?

It is a sheet of silicone. I got it from amazon but later I saw sheets similar to this in the dollar store in the cooking section.

it’s amazing how different chips have such different diameters. I am half way through milling an 800 chip CPC blanks set and the silicone worked perfectly alone. These VLVs are slightly smaller and with the inlayed chips I like to be a little more gentle bringing down the press so I worry more about the chip spinning and therefore I use a little bit of pressure from a second chip like in this video.
 
Last edited:

Create an account or login to comment

You must be a member in order to leave a comment

Create account

Create an account and join our community. It's easy!

Log in

Already have an account? Log in here.

Back
Top Bottom