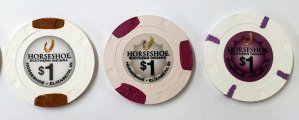
First. I don't like brown colors on chips. I just... don't. It's my own personal preference. I have nothing against anyone who does.
So that's problem one with Jack Cincy 1s.
The next is: why are they THC when the rest of the set is RHC? I thought it might be because they thought the 1s would wear out and went with THC because it's more robust and durable. But then why not 5s, arguably more used in the casinos than 1s.
These problems made me motivated enough to do something about it. So here's what I did.
First: Find a suitable white RHC chip.
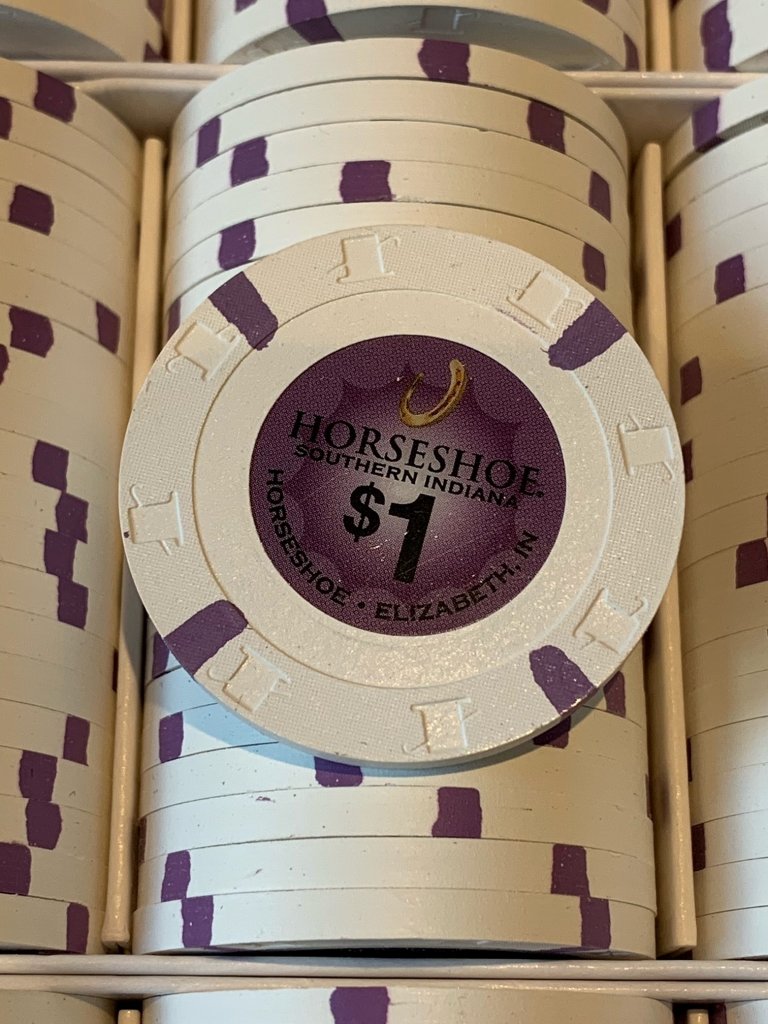
I decided on HSI 1a. They are readily available, and not that expensive. I like the purple color stripe. Also, they have a THC sized inlay on an RHC chip, so they are begging to be modified. Just look at all that extra space around the inlay!
(Pic by @BillyBluff)
Next, get the inlays. This, as some of you know, this can be a long process. So I decided to go independent, and went with a sticker printing company (and not Sticker Mule.)
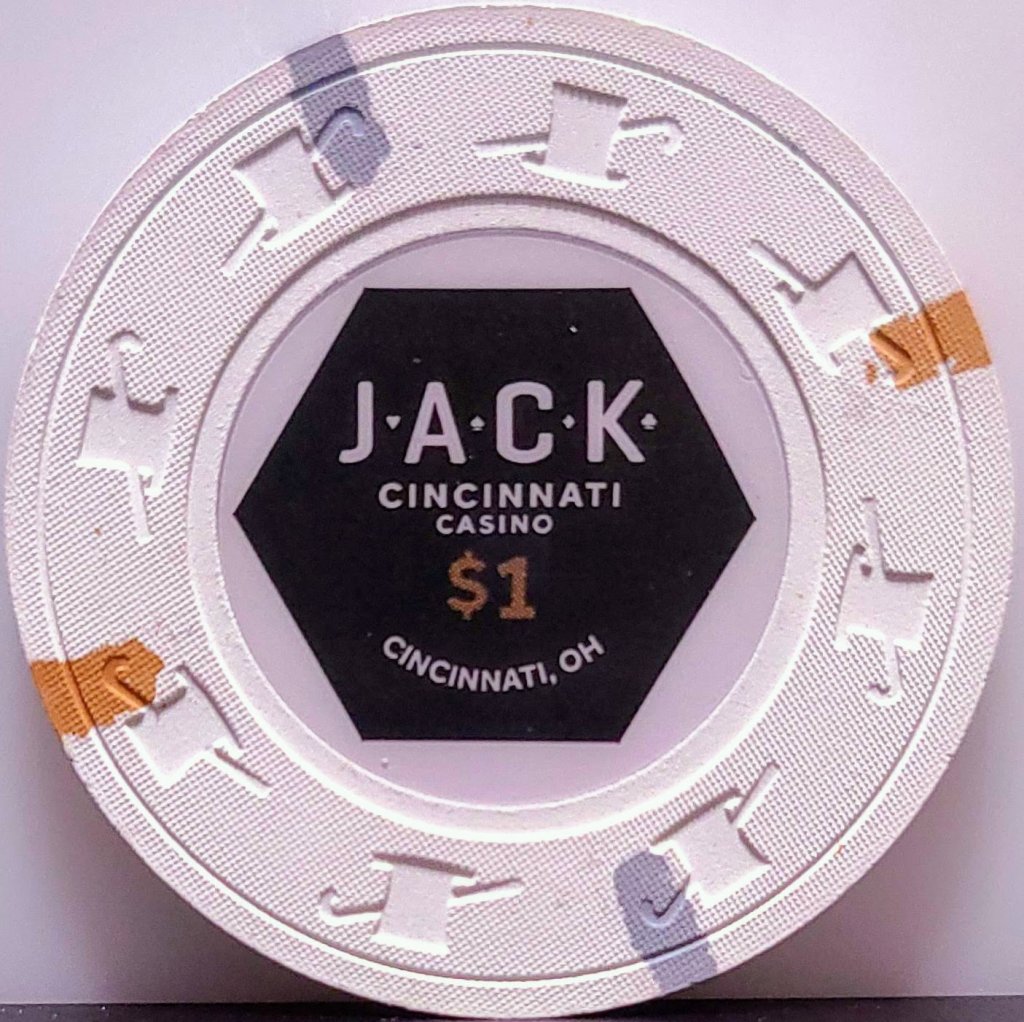
I asked @TheOffalo if they had a Jack Cincy template. He asked what I was up to, so I told him about the HSI 1a and redoing the Jack 1s. He immediately sent the vector file with the hexagon faux inlay, and even changed the $1 denomination color, from brown (barf) to the purple of the HSI chips.
My goal was to get RHC sized inlays, and mil the chips to the proper RHC inlay size.
I never milled before, but I thought if Josh Kifer can do it, so can I.") (Yes, this is a joke. I knew milling is extremely challenging and not everyone can do it. And you also need the right equipment.)
(Yes, this is a joke. I knew milling is extremely challenging and not everyone can do it. And you also need the right equipment.)
Big problem with milling RHC number 1: there's no RCH sized milling "bits" anywhere. Oh, I could find the correct bits for THC size at every website I looked at for milling stuff. But RHC size? It just doesn't exist.
So I had to get a bit the next size up, and mill the bit down to the correct size for RHC. And holy shit is that difficult. The very small difference in sizes is huge, and milling hardened steel is grueling. I never actually had to use calipers before, but for this project... making a custom sized milling bit? Yes I did.
Big problem with milling RHC number 2: I've never milled before. So this happens:

Remember the part about HSI 1a being readily available and not very expensive? Yeah, I took full advantage of that while learning to mill. I think I ruined about 1 and ½ racks of chips learning. I don't know why I didn't get cheaper chips to practice on... but oh well.
Then I had the sticker printing company make the vector file from TheOffalo into RHC sized inlays (stickers).
Due to someone dropping the ball, they printed out in a hexagon shape, instead of a circle with a faux hexagon inlay.
So they had to be redone.
While waiting for the new inlays to be printed by the sticker company, I tried using the Hexagon shaped inlays as an overlabel.
And, I really like the results.

Now, I have actual shaped inlay over labels. And I think they look great! They use the entire inside surface of the chips, and just barely cover up the THC sized HSI inlay underneath.
So as turns out, a mistake (hexagon shaped stickers) not only looks better, but is actually less work because I don't have to mill them!
Let me know what you think.
....
Don't worry about all that time I spent making an RHC sized milling bit being a waste. I'll use it when I make my DiamondJacks 25¢ fracs (coming soon).
So that's problem one with Jack Cincy 1s.
The next is: why are they THC when the rest of the set is RHC? I thought it might be because they thought the 1s would wear out and went with THC because it's more robust and durable. But then why not 5s, arguably more used in the casinos than 1s.
These problems made me motivated enough to do something about it. So here's what I did.
First: Find a suitable white RHC chip.
I decided on HSI 1a. They are readily available, and not that expensive. I like the purple color stripe. Also, they have a THC sized inlay on an RHC chip, so they are begging to be modified. Just look at all that extra space around the inlay!
(Pic by @BillyBluff)
Next, get the inlays. This, as some of you know, this can be a long process. So I decided to go independent, and went with a sticker printing company (and not Sticker Mule.)
I asked @TheOffalo if they had a Jack Cincy template. He asked what I was up to, so I told him about the HSI 1a and redoing the Jack 1s. He immediately sent the vector file with the hexagon faux inlay, and even changed the $1 denomination color, from brown (barf) to the purple of the HSI chips.
My goal was to get RHC sized inlays, and mil the chips to the proper RHC inlay size.
I never milled before, but I thought if Josh Kifer can do it, so can I.
(Yes, this is a joke. I knew milling is extremely challenging and not everyone can do it. And you also need the right equipment.)Big problem with milling RHC number 1: there's no RCH sized milling "bits" anywhere. Oh, I could find the correct bits for THC size at every website I looked at for milling stuff. But RHC size? It just doesn't exist.
So I had to get a bit the next size up, and mill the bit down to the correct size for RHC. And holy shit is that difficult. The very small difference in sizes is huge, and milling hardened steel is grueling. I never actually had to use calipers before, but for this project... making a custom sized milling bit? Yes I did.
Big problem with milling RHC number 2: I've never milled before. So this happens:
Remember the part about HSI 1a being readily available and not very expensive? Yeah, I took full advantage of that while learning to mill. I think I ruined about 1 and ½ racks of chips learning. I don't know why I didn't get cheaper chips to practice on... but oh well.
Then I had the sticker printing company make the vector file from TheOffalo into RHC sized inlays (stickers).
Due to someone dropping the ball, they printed out in a hexagon shape, instead of a circle with a faux hexagon inlay.
So they had to be redone.
While waiting for the new inlays to be printed by the sticker company, I tried using the Hexagon shaped inlays as an overlabel.
And, I really like the results.
Now, I have actual shaped inlay over labels. And I think they look great! They use the entire inside surface of the chips, and just barely cover up the THC sized HSI inlay underneath.
So as turns out, a mistake (hexagon shaped stickers) not only looks better, but is actually less work because I don't have to mill them!
Let me know what you think.
....
Don't worry about all that time I spent making an RHC sized milling bit being a waste. I'll use it when I make my DiamondJacks 25¢ fracs (coming soon).