First table build thread (1 Viewer)

TheWhiteJZ

Two Pair
Joined
Jun 18, 2019
Messages
324
Reaction score
250
Location
Larchmont, New York
EDIT: FOLDING TABLE TOPPER BUILD
to go on top of a costco lifetime folding plastic table we have.

Im going to post some things here - please let me know if you have any good tips or tricks based on what I'm doing.
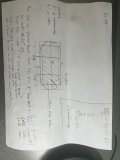
FYI, I am not handy and have never built anything. I had dreamed of doing this table just over two years ago, then covid hit and while this would have been a great project with nothing else to do, for some reason I never did. Then my neighbor mentioned he just bought a circular saw, and for some reason that made me go out and get this going. I literally pulled out the drawings I stashed in 2020 to review.

First, im inspired by this thread: https://www.pokerchipforum.com/threads/table-topper-size-for-36-inch-table.28762/
I am building a topper to go on the exact same table

and also using this as a guide: https://www.pokerchipforum.com/threads/folding-topper-with-rail.14256/
(amazingly helpful @atomiktoaster !!)

Materials so far:
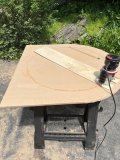
Today I went to Home Depot and picked up 1/4" plywood for the table surface and 3/4" MDF for the rail (they did not have 3/4 plywood)
Plus saw horses, clamps, and countersink drill bits bc i dont have many tools :)

From YAT:
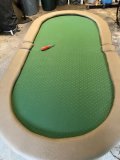
green suited speed cloth (3 yards)
brown whisper vinyl (i bought 2 yards, but i should have gotten three. Original plan was a 4 piece rail, but moved to two-piece, ended up having to buy 2 more yards)
HD foam 3/10" (3 yards)
Sheet of rail foam (bought half sheet, it was just enough. any larger a table and i would have needed a full sheet)

From my basement:
scrap wood and some wood screws to use as the guides that secure the topper on top of the table.

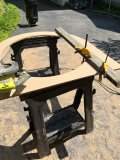
On sunday my friend is going to bring over his saw, and im going to pull out the router my father-in-law gave me 12 years ago, and we gonna get started!

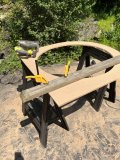
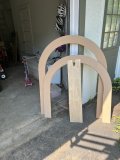
I plan to build my own temporary jig with scrap plywood to cut the curves, and do straight cuts with the circular saw.
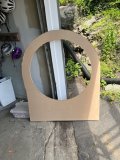
I plan to cut the full surface at ~84 x 40 and see exactly how well it covers the table. Might make it smaller if I can. I dont need a huge table (my room is not too big) but i want to completely cover the table under it.

Then Im going to cut the pieces for the gorilla tape hinges. Probably do two hinges a shown in my original plans, but also considering just as single fold. I wont be moving it far. just need to put it in a closet, which is rather generously sized.

make the hinges

Put some wood blocks on the bottom to make sure it wont slide
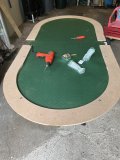
Then Foam and SSC

Rail will be next time ... although i do want to cut the rail pieces this weekend
 
Last edited:
My plans from 2019
 

Attachments

  • D57B2C35-D79C-4204-9F4E-B54F38FE581F.jpeg
    D57B2C35-D79C-4204-9F4E-B54F38FE581F.jpeg
    96.1 KB · Views: 125
1/4" upspiral bit for the router. 1/4" roundover bit for exposed wood and wood under the padding on outside/inside upper side. 1/4" ply seems really thin, but I've never done a topper. Carful with MDF, you don't want to ever get it wet.
 
If you're using 1/4" plywood for the playing surface, be careful of the length of staples you use when you install your felt. You don't want staples poking through, and 1/4" is about the shortest staples you'll be able to find.

Happy building.
 
Time got squeezed bc people stayed late for my sons bday party in the afternoon and my wife insisted we take him out for dinner at 6 sharp, but we got the top cut.

Had some issues figuring out the homemade jig for the router but since realized my mistake. As a result I kinda dinged my router case, but the cuts came out OK - not perfect :)

My straight cuts weren’t so great as I hadn’t used a circular saw since about 1995.

Due to a brain fart I went 82 length instead of 84.

Lol. I’ll do better next time. That’s what I say after a tough poker session, too!

4680E060-499C-4C3B-B343-3A1C7E11D99F.jpeg


Next I cut the hinges. Buddy left his circular saw - I’ll maybe do this week on my own. Thinking I’ll just do one fold. Maybe use another peice as the middle/joint to add back in a half inch. Going to lay this on the table to see how it fits when I have a chance.

I’m ok with the delay as my spray adhesive did not show up on time, so I could not have finished anyway.. Grr, Amazon
 
Now Im just using this to keep my notes ...

Perhaps I will try and make the rail permanent and do something like what @ekricket and @T_Chan did here:
https://www.pokerchipforum.com/thre...with-no-middle-crease-is-this-possible.66562/
That would likely require ~3 inch center hinge piece (still using the gorilla hinge design), to allow for the rail when folded.
But then the rail would need to come out ~1.5 inches when folded and stored. I would have to store on it's side, but I think that's ok.
Bonus is that I won't have to attach the rails each time and it'll all store in one piece, no bolts to keep track of.
Maybe using a toggle latch to keep it tight when in use
 
Last edited:
Sanded edges and cut a 4.25” hinge piece during lunch. Without this piece it didn’t fully cover the table. Rail will add three more inches, but I’m hoping to get a bit more play surface.

The piece is .25” too long so I’ve got it set to shave that off and then I’ll
CA30E994-D31B-43C3-9F42-D3C3A3D02F77.jpeg
do the gorilla tape hinges once I get through the next 2 hrs of phone calls for work. Another Update coming later :)
 
So i think gluing the broken piece of wood worked. looks good for now. May consider how to reinforce for the future. Have the idea that these will double as feet during storage. Had to sand down the two spacers bc i think it was too tight, and that caused the crack. A better fit now.

Woke up this AM with the realization that we NEED cupholders. in the rail. I read many opinions. No brainer for me. After much consideration and judging the alternatives, i have decided to go the simplest route possible, which will be these shallow holders
https://www.amazon.com/gp/product/B...title_srh_2?ie=UTF8&psc=1&smid=A2WODLD1HH6K3T
simply nestled into the 1" foam with an oring if needed to make up for the remaining .08 inches (but i assume that's the lip)
https://www.pokerchipforum.com/threads/rail-cup-holder-trick.68154/

May also include some magnets glued to the bottom to help keep them from falling out. Or just glue them in directly
Would love to route out a hole in the rail to keep from sliding around, but i think that is asking too much of myself. Debating getting a hole saw and using leftover 1/4 plywood to create a small ring and glue that in, to help with cupholder sliding.

Before that, now that I know I don't have to replace that spacer, I can add the felt.
 
Felted

5CD3ED69-DA7E-482F-A0D2-F63572A48623.jpeg


I was really nervous about getting it on tight enough. I pulled and stretched and pulled as much as I could. I think I did it.

Started from the middle as recommended somewhere. I went back and forth opposite sides, up one way then back to the middle and down the other. As you can see, lots of wrinkles on the curve. I may have put staples too far in, but I figured that game me the ability to rip it out and try again if needed.

I did not need to cut at the hinges to allow a fold. May or may not do that later. I Will trim more extra felt as a finish at the end.

EFF2CDC9-B97B-4414-914F-F6AC08B648EA.jpeg
 
A doodle of my future rail, created in the back of the notebook I use during my meetings at work. Will use this as I cut. Won’t be for a while as I have trips planned the next two weekends

529240C5-D085-4D42-B89E-9AC246FA10BB.jpeg
 
Looking great! I just saw your thread on this. I didn’t go for cups in the rail in the folding topper I made because I make little drink carts with the leftover wood, but I’m interested to see how yours turn out.

One thing I thought about this morning is that this topper would be great sitting on top of my dining room table. Were it not for those little blocks of wood that I screwed on to keep it from sliding on a Lifetime table. I kinda wish now I had used tee-nuts for those pieces so I could take them off and have it sit flat on my table. I dunno… I maaay pull the playing surface and put the tee nuts in there and just re-attach the speedcloth. I have enough left over foam for another modular rail, but then I’d have to go buy more 3/4 ply, 1/4 ply, texsuade, playing surface, etc, etc. :ROFL: :ROFLMAO:
that is a good idea: t nuts so the block is removable. file that away for next time (and whoever reads this)
 
Since you’re planning to cut the rail straightaways with a circular saw, did you figure out how to handle the inside cut? Maybe others have posted about this technique. Do you finish it with a jigsaw or something so that the circular saw doesn’t cut into the rail at the end of the straightaway?
 
Since you’re planning to cut the rail straightaways with a circular saw, did you figure out how to handle the inside cut? Maybe others have posted about this technique. Do you finish it with a jigsaw or something so that the circular saw doesn’t cut into the rail at the end of the straightaway?
Thought about this a little. Going to have my handy friend, who owns the circular saw and is gonna help me make the cuts, give me his thoughts. However, Im thinking I could round the corner a little, bringing the inside curve back in a bit, and just cut it 1/4" or so wider (so the straightaway ends as the curve comes back in). OR we could use the router for the inside straight cuts. They will be relatively short, and i could make a guide with a 2x4 and clamps. Just requires more time, i would guess.

Def open to suggestions
 
I’m wondering if you may have to cut the beginning and ending parts of the straight side with a router, or a jigsaw.
 
I’m wondering if you may have to cut the beginning and ending parts of the straight side with a router, or a jigsaw.
Ill be cutting it in several pieces. So the start of the straightaway will not be a problem, it'll just be the end ... but there will be four, so that does not really help me. IOW, I'l pretty much cut it in half before i do the inside cuts. not sure if thats clear. My plan:

FIrst, i will do the outside curves (at 22") with router, using an exitsing long outside edge and going exactly 180 degrees (this is something i didnt do perfect on the surface and I had to fix with a sander)
Then I will straight cut the other long outside edge with the circular saw
Then I will cut in half, across the width/the short way, with circular (length will not matter at this point).

Then i will do the inside curves (at 17") with router
THEN, i will cut the inside straight cuts.
(joining the cuts from these two steps is where you suggest i might have trouble - if i do any of the straight cuts with a router, i might as well do the whole thing, tbh)

Then i will place it on the topper and decide where/how to cut the length down to get the perfect length (as well as place the tnuts, etc).
 
Last edited:
Got the rails cut. It was brutally hot and there was a shocking amount of sweat and sawdust. Got the main rail pieces rough cut and began to lay them out and plan the tnuts and cup holders.

I am now considering scrapping the in-rail cup holders and going with slide-unders. Just too difficult to get the cup holders in the rail. my choice was 1" deep which ive decided is not secure enough, or the next shortest was 2.17" and I'm a bit nervous it will stick out a bit, plus cutting the rail piece and then the vinyl - too many things could go wrong.
 

Attachments

  • 747758A1-926D-477E-8595-7562502F34A4.jpeg
    747758A1-926D-477E-8595-7562502F34A4.jpeg
    245.2 KB · Views: 93
  • C82DBC07-7221-425B-A7B0-885AC08991EF.jpeg
    C82DBC07-7221-425B-A7B0-885AC08991EF.jpeg
    225.7 KB · Views: 92
  • 4A780B1C-6D49-4D01-825C-00F1503BA4E8.jpeg
    4A780B1C-6D49-4D01-825C-00F1503BA4E8.jpeg
    292.3 KB · Views: 86
  • 949A7982-4358-4177-B7FD-A5F2641A43B7.jpeg
    949A7982-4358-4177-B7FD-A5F2641A43B7.jpeg
    170.7 KB · Views: 84
  • AA9598D0-8FA0-4C8D-8BCC-9365C01A984C.jpeg
    AA9598D0-8FA0-4C8D-8BCC-9365C01A984C.jpeg
    229.4 KB · Views: 86
So I put in the t - nuts this AM.

I had bought 1" screws bc I have 1/2" rail + 1/4" foam (which i assume will compress) and 1/4" plywood base. But I could not get them to attach and pull the t nut into the wood. I had to buy one screw that was 1.5" long, pull the t nut in, and then replace it with the 1" screw (which is the perfect size).

Since a) I'm no longer doing the in-rail cupholders b) the hardware store only had 10 tnuts and 9 screws, I had to change my plans. I put in 4 tnuts per 1/2 rail. Turns out that seems to be plenty (my original plan was 8 per). Hopefully, that holds up after i upholster, etc. (ill be returning for one more 1" screw when they restock, but no hurry as it'll be part of the center pieces I am doing later).

First I drilled holes into the rail, then I clamped it onto the playing surface and drilled holes through the felt/foam/plywood/felt on the underside. I was really nervous about catching the felt and ripping it with the drill, so i poked a hole in the felt to try and prevent that. I did have an issue with one, where i saw it pull. I just stopped the drill, had to unplug it, remove the bit and carefully remove it to start over. It does not appear to be an issue (fingers crossed emoji). I plan to put some glue on the felt to protect against future runs/rips. not sure if that's a true worry, but it would be a bummer.

I marked the MDF for the center pieces so they would fill the space, but Im going to work on those after i get the main rail pieces done. Might need to have 1/4" space between to allow folding. I left about 1/4" between the end of the rail and fold. So itll be 1/2" total. I hope that the foam will fill that space. But this will be determined in the end.

Speaking of foam, i only bought a half sheet of rail foam - id recommend just getting the full thing. On top of that I cut a piece off before thinking it through, so Im not going to have a perfect piece of foam - its another flaw Im going to have to try and cover-up. Learning a lot in this process!!
0AECBE0D-3E4C-4A54-97FA-435BBEA8E1AB.jpeg
 

Attachments

  • EC4EFCEF-D78A-4A6E-84ED-4EC0C63CA3D4.jpeg
    EC4EFCEF-D78A-4A6E-84ED-4EC0C63CA3D4.jpeg
    187.9 KB · Views: 69
Ok, so i glued on the padding and upholstered one half-rail. Because i was originally planning to do 4 pieces, i bought only 2 yards of whisper vinyl. Now that my sections are larger, i had to order two more yards. I wasted $50 trying to save $25. classic story. Ive updated my original post to reflect and help others avoid this mistake.

I had also ordered too little rail foam, but since the seams won't show i just hacked it as you see below. I think you might be able to tell if you know to look, but im hoping my players are not too bothered by it. but of course a seam like that would not work with the top layer.

I think the one i did came out well. The other half-rail will happen sometime next week. And then finally I will put these rails on and build the small, center pieces to fill the space as best I can. I did not close the ends yet, will do that as part of making the smaller pieces.

SO CLOSE to finished!


E96A81EC-D348-41FC-96AA-D8200234C481.jpeg


074A3274-F96A-4CCD-BB26-693E6355B0E2.jpeg
 
Ok, so i glued on the padding and upholstered one half-rail. Because i was originally planning to do 4 pieces, i bought only 2 yards of whisper vinyl. Now that my sections are larger, i had to order two more yards. I wasted $50 trying to save $25. classic story. Ive updated my original post to reflect and help others avoid this mistake.

I had also ordered too little rail foam, but since the seams won't show i just hacked it as you see below. I think you might be able to tell if you know to look, but im hoping my players are not too bothered by it. but of course a seam like that would not work with the top layer.

I think the one i did came out well. The other half-rail will happen sometime next week. And then finally I will put these rails on and build the small, center pieces to fill the space as best I can. I did not close the ends yet, will do that as part of making the smaller pieces.

SO CLOSE to finished!


View attachment 918213

View attachment 918214
A heat gun is your friend.
 
Looks like it’s coming along!

Is that vinyl for the rail covering or a suede of some kind? It kind of has that matte appearance of suede.
 
It’s whisper vinyl. Faux leather. From yourautotrim.

Here is a pic before I redid the middle peices. I used my wife’s hair dryer (bc I didn’t want to buy a heat gun), which helped. They are also in the wrong side on this pic.

Basically, I have to remove those to fold up the table bc I could not get it to fold with them in permanently.

I have a few touch ups to do eg trim extra material, but I’m pretty much done. I’ve gotta find a time to get it in play and I’ll put up final pics.
 

Attachments

  • 2EE8C6FB-EE76-4F5E-AEE7-B4D2621A5E8C.jpeg
    2EE8C6FB-EE76-4F5E-AEE7-B4D2621A5E8C.jpeg
    171.4 KB · Views: 111
I was able to basically use half as much rail foam for mine as a normal table, but I think the trick was making the rail into four equal sections. I have enough foam left over for another table of a similar style. I think with your version, you pretty much have to use a full sheet because you can't really easily use the "inside" parts of the foam that are normally discarded.


I had also ordered too little rail foam, but since the seams won't show i just hacked it as you see below. I think you might be able to tell if you know to look, but im hoping my players are not too bothered by it. but of course a seam like that would not work with the top layer.
 
The more and more I play at various casinos , I’ve come to realize I hate cup holders in the rail. I rather have the ones you can stick under the rail. That way you can move them around or get rid of it
 

Create an account or login to comment

You must be a member in order to leave a comment

Create account

Create an account and join our community. It's easy!

Log in

Already have an account? Log in here.

Back
Top Bottom