DTS Table Rebuild/Murder(?) (1 Viewer)

davethesave

3 of a Kind
Joined
Apr 12, 2020
Messages
653
Reaction score
536
Location
Toronto, Canada
Hi Team,

I had some time and was able to take about one of the table I acquired (it came with the shuffletech I have posted in classifieds here, https://www.pokerchipforum.com/thre...tion-ends-fri-july-31-9pm.58872/#post-1146696 I thought I could save the vinyl bumper, but I know that would be a real tough ask, but nonetheless attempted.

The PURPOSE:
1.
Eliminate shuffletech hole (and maybe dealer tray hole/cashbox slot) @Dix @namsupak @sheikh617
2. Refelt custom or speedcloth @T_Chan
3. Install T-nuts system to allow for ease of rail removal/refelting for the future. @markleteenie @Richard Cranium @Jake14mw @celticnoel @BGinGA @Mr Tree

The way I figure, if it doesn't come out great I can always just sell it as a refurbished table; plus I have another unraised bumper table with a shuffler hole that needs refurbishing. As a novice with builds, having the cutouts already done gives me hope that a facelift would be a good start rather than a build from scratch. We all had those friends growing up that took apart things just to put them back together... this is kinda what this is... except I am grown up... and the table wouldn't have gotten much if sold with a huge shuffletech hole in it.

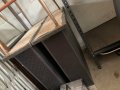
The DISSASSEMBLY leaves me with:

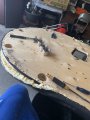
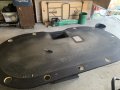
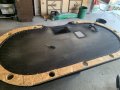
a.
Main table with cupholder cutouts and ruined clothe; shuffletech hole, dealer hole, cashbox hole;
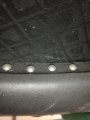
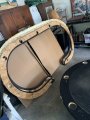
b. raised rail with the button beads or whatever they are called on it; cupholder cutouts;
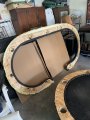
c. rail with wrecked vinyl partially attached; cupholder cutouts.
d. All silver metal cupholders

The NEEDS:

i.
new felt
ii. plywood to fill holes & strategy
iii. new unpadding
iv. New foam? Vinyl?

A few recommendations would be great. I am sure I am missing something, but that's why I created this post. For all I know I will need to replace everything except the actual table plywood. I do have a myriad of questions that I will leave open to any of you who would like to give me advice. I know a few of you have already helped me with ideas through PM so thank you for that!

Keep in mind this is a rebuild that I am not looking at breaking the bank - if I was i would attempt a start from scratch reuild - but hey I have these tables laying around!

QUESTIONS:
1.
Should I scrap the raised rail? Is it possible to T-nut a raised rail? [Scrapping the raised rail may allow me to reuse the rail vinyl/foam (longshot, but who knows)]
2. Dedicated dealer spot - it tends to underused as we mostly self deal... but has anyone converted a table like this into a full racetrack? If I were to do this, it means new vinyl for sure.
3. Has anyone successfully don't this with a hand staple guy? I am not opposed to renting/borrowing a staple gun, but has anyone been able to to this by hand?
4. Legs - the table came with the rectangular built legs... not easy for storage, but sturdy - defeats the purpose of T-nut table convenience... Thoughts?
5. Cup holders - Option 1: get rid of them and get new rail vinyl and foam. Option 2: keep them; attempt to keep the vinyl and foam? I am undecided.. if new foam and vinly is needed, then the cupholder convo can be had... convince me yaw or naw?
6. Table dimensions - Thoughts on shaving an an inch or so off the edge to make it a more compact table?

I have so many more questions, but I will leave it at that for now.

Thank you for your input PCFers!

DTS
Toronto, Canada

01EA83BD-22AB-4772-A683-876ACA1843D7.jpeg
 

Attachments

  • E9586E78-A936-4230-8384-964A61D59C31.jpeg
    E9586E78-A936-4230-8384-964A61D59C31.jpeg
    129.2 KB · Views: 156
  • DB56F400-370A-4432-A5DB-0B5180581406.jpeg
    DB56F400-370A-4432-A5DB-0B5180581406.jpeg
    107.1 KB · Views: 146
  • A36197F1-E087-48F6-B050-9A1F50C2E137.jpeg
    A36197F1-E087-48F6-B050-9A1F50C2E137.jpeg
    151.8 KB · Views: 162
  • 3457494C-C442-4EA8-8253-CE50568A1010.jpeg
    3457494C-C442-4EA8-8253-CE50568A1010.jpeg
    120.6 KB · Views: 160
  • 2DCB9C87-191F-447C-B854-575995148E68.jpeg
    2DCB9C87-191F-447C-B854-575995148E68.jpeg
    146.6 KB · Views: 155
  • 41BF3D2E-89C3-441C-9311-A58A6A2CDF8A.jpeg
    41BF3D2E-89C3-441C-9311-A58A6A2CDF8A.jpeg
    151.5 KB · Views: 156
  • 6B0D4FCA-F00B-4ADC-8398-F4A98A4673C3.jpeg
    6B0D4FCA-F00B-4ADC-8398-F4A98A4673C3.jpeg
    150.5 KB · Views: 151
  • A566134C-75CA-4370-9EFA-173E3D1CA093.jpeg
    A566134C-75CA-4370-9EFA-173E3D1CA093.jpeg
    158.1 KB · Views: 151
Last edited:
I'm not getting a good grasp on the status of the rail once disassembled. Is it not just a single piece, with foam/vinyl covering still intact (with cupholder holes)?

Rail status would drive the project for me. Lots of work and expense there, far more than fixing any of the other areas needing attention.
 
From the looks of it the table top is 3/4" thick.... correct?

If true, filling the holes in the playing surface is an easy deal.

Go to any hardware store & grab some cheap 1" x 1/16" aluminum flatstock. Cut into pieces about 4" longer than the opening widths (probably 2 for the shuffler hole & 3 for the chip tray hole) fasten those across the openings on the underside of the table with #12 3/4" long wood screws. Then cut a filler piece of table top from any 3/4" thick piece of plywood/OSB & fasten to the aluminum supports across the bottom of the openings.

Fill in around the edges with some wood filler, sand flat, & you're done.

If the table top is thinner than 3/4 you can always screw from the other direction using flathead machine screws & nylock nuts, counter sinking the screw heads & then filling those with wood filler as well.
 
I'm not getting a good grasp on the status of the rail once disassembled. Is it not just a single piece, with foam/vinyl covering still intact (with cupholder holes)?

Rail status would drive the project for me. Lots of work and expense there, far more than fixing any of the other areas needing attention.

Sorry if I was a bit vague... I guess I am assuming the rail is not “patchable”... but after reading your post I guess if I just leave everything status quo (except felt) then the rail should easily be restapled.

I guess I was thinking of if I should remove the raised rail (which would make the current rail easier to reuse).

I will play with a few ideas and do my t-nut homework!
 
From the looks of it the table top is 3/4" thick.... correct?

If true, filling the holes in the playing surface is an easy deal.

Go to any hardware store & grab some cheap 1" x 1/16" aluminum flatstock. Cut into pieces about 4" longer than the opening widths (probably 2 for the shuffler hole & 3 for the chip tray hole) fasten those across the openings on the underside of the table with #12 3/4" long wood screws. Then cut a filler piece of table top from any 3/4" thick piece of plywood/OSB & fasten to the aluminum supports across the bottom of the openings.

Fill in around the edges with some wood filler, sand flat, & you're done.

If the table top is thinner than 3/4 you can always screw from the other direction using flathead machine screws & nylock nuts, counter sinking the screw heads & then filling those with wood filler as well.

Thanks! I will keep you posted!!! I may send a pm
 
You can also use an oversized piece of plywood underneath the holes as supports for your plywood inserts. Screw to the table surface from underneath, drop in and screw down the inserts, add wood filler, and sand.
 
QUESTIONS:
1.
Should I scrap the raised rail? Is it possible to T-nut a raised rail? [Scrapping the raised rail may allow me to reuse the rail vinyl/foam (longshot, but who knows)]
2. Dedicated dealer spot - it tends to underused as we mostly self deal... but has anyone converted a table like this into a full racetrack? If I were to do this, it means new vinyl for sure.
3. Has anyone successfully don't this with a hand staple guy? I am not opposed to renting/borrowing a staple gun, but has anyone been able to to this by hand?
4. Legs - the table came with the rectangular built legs... not easy for storage, but sturdy - defeats the purpose of T-nut table convenience... Thoughts?
5. Cup holders - Option 1: get rid of them and get new rail vinyl and foam. Option 2: keep them; attempt to keep the vinyl and foam? I am undecided.. if new foam and vinly is needed, then the cupholder convo can be had... convince me yaw or naw?
6. Table dimensions - Thoughts on shaving an an inch or so off the edge to make it a more compact table?

1. Yes you can T-nut a raised rail, or alternatively use threaded inserts.

2. That's a matter of personal preference.

3. I used a light duty staple gun for over 20 tables before I switched to pneumatic. It works, but it's hard on the hands. Especially depending on how many staples you intend to use. My staples practically overlap.

4. If storage is important, then ditch the legs and replace them with folding, or something that's easily removable.

5. Keep. Cup holders are useful. Everyone's drinking something while playing poker, whether it's water, pop, beer, etc. Unless you've got side carts or plan on doing something else to hold drinks, leave them in. If you're re-upholstering you can go over the holes then cut out the holes later to reinstall the cup holders.

6. Up to your preference, though I usually recommend staying under 44" wide to help with reach. Wider than that becomes hard to reach across the table.
 
You can also use an oversized piece of plywood underneath the holes as supports for your plywood inserts. Screw to the table surface from underneath, drop in and screw down the inserts, add wood filler, and sand.

Always an option. Using aluminum straps as lower supports just saves on leg/knee room under the table & a thicker wood block under the shuffler opening may interfere with mounting folding legs depending on their design. Also saves a pound or two on weight.

Oh, & since I'm not a fan of suited speedcloth, my vote would be to go with the @T_Chan gaming suede option... but that's just me. :D
 
QUESTIONS:
1.
Should I scrap the raised rail? Is it possible to T-nut a raised rail? [Scrapping the raised rail may allow me to reuse the rail vinyl/foam (longshot, but who knows)]
2. Dedicated dealer spot - it tends to underused as we mostly self deal... but has anyone converted a table like this into a full racetrack? If I were to do this, it means new vinyl for sure.
3. Has anyone successfully don't this with a hand staple guy? I am not opposed to renting/borrowing a staple gun, but has anyone been able to to this by hand?
4. Legs - the table came with the rectangular built legs... not easy for storage, but sturdy - defeats the purpose of T-nut table convenience... Thoughts?
5. Cup holders - Option 1: get rid of them and get new rail vinyl and foam. Option 2: keep them; attempt to keep the vinyl and foam? I am undecided.. if new foam and vinly is needed, then the cupholder convo can be had... convince me yaw or naw?
6. Table dimensions - Thoughts on shaving an an inch or so off the edge to make it a more compact table?

Sorry if this was already answered earlier. Late, but trying to answer it.

Basically, I think you should be able to reassemble it exactly, with the raised rail intact. You could replace the vinyl rail on the top piece (with black to match the raised rail color) if the top rail fabric is not salvageable.
Wood cut to the size of the hole, and then either pipe strap, a steel bar or wood as a brace to hold it sturdy. You don't want that patch to "flex" when pressed down on.

1. It is not likely that you could T-Nut under existing stapled down fabric, a threaded insert would work better in that situation.

2. If you have a dedicated dealer spot, you could always make a removable or temporary rail piece to fill that space (it might not look great though).

3. I only have a manual stapler and it gets the job done. It blows out your grip and you have to press firmly as you pull the lever for the staple to not bend sideways and be ineffective.

4. Do you have another option for legs? If not, then just roll with it. Honestly, I'd say just roll with it until you get to build your own table. T-nuts assist in maintenance for the rail and felt. They can be used for the legs (on one of my tables they are used for both). Or you could go folding legs style, that screws directly into the wooden base. One of my tables is like that too.

5. Have you played with cup holders in the rail? Do you enjoy it? I personally do not, so I don't have tables with cup holders in the rail. I have played on them and they are fine. It's personal preference. If you are on the fence, I'd say keep the cup holders - do the least amount of work, and then plan out your next table build (see my theme here?)

6. I love a compact table, if you're not planning on a full 9 or 10 players. Although - changing the table dimensions means redoing the rail. In order for the dimensions of the rail to not look weird, you either need to cut the same amount from the entire outer edge, or recut a new rail piece. And cut the base to match.

At that point, you're patching the table surface, hate the existing blocky legs, and redoing the rail size/cup holders and all of the rail....you should just build it from scratch rather than resize the table. :tup:
 
Last edited:
Thoughts on Keeping the rail raised, or losing the raised insert ? It makes for a heavier rail, but it I can detach it, no big deal!

Regarding the t-nuts, I guess I should ensure the nut is recessed on the underside of the table so it sits flush with the plywood rather than jutting out? @markleteenie
Here's a good example of patching a table:
https://www.pokerchipforum.com/threads/jack-poker-tables.46593/

I personally like a slight raised rail, but I'm not sure about the decorative nails. I think it's your personal preference. Well the T-nut would be in the railing under the foam and cloth and a bolt would come up through the table base and fasten into the rail. That T-nut should always be flush too, that's the purpose of using it or a threaded insert.

There probably isn't a T-nut or Nut on the table base underside. Underside, the head of the bolt won't be flush with the base unless you cut a recess into the base. I'm not certain the base is thick enough to completely recess a bolt head, but it's possible it is.

Sorry if my lingo is newbie-ish.

What I mean is the nut should sit recessed under the table or I guess it really doesn’t matter?

Asking in case I want to use as a table top on occasion.
 
Also... what would anyone recommend for the raised rail portion of the table? I mean the decorate buttons or whatever are there, but what other options are good ones? @justsomedude
 
Also... what would anyone recommend for the raised rail portion of the table? I mean the decorate buttons or whatever are there, but what other options are good ones? @justsomedude

Plenty of options...

You can use wood banding and stain/lacquer it (apply with bandy clamps and wood glue):
1594857169892.png


Or acrylic banding (I got this shiny black acrylic from a local shop at an absurd price - apply with bandy clamps & construction):
1594857605460.png


Or you can do peel-and-stick faux-chrome (image credit @bsdunbar1):
1594857296188.png


For my current build I'm doing wood veneer banding on the lower/outer edge, and black acrylic for the raised rail.

It's all deadly.
 

Create an account or login to comment

You must be a member in order to leave a comment

Create account

Create an account and join our community. It's easy!

Log in

Already have an account? Log in here.

Back
Top Bottom