does this matter for each set up? the L way and the way with the first one in the postRemember that not every chip is centered. Actually, most of them are off a chunk. Make sure that the jig itself can be mounted and moved easily to get the chip in the sweet spot.
-
PCF is an eBay Partner. If you make a purchase through one of our links, we may earn a commission at no extra cost to you. Thank you for your support!
You are using an out of date browser. It may not display this or other websites correctly.
You should upgrade or use an alternative browser.
You should upgrade or use an alternative browser.
Complete drill press milling setup tutorial with details and links (2 Viewers)
- Thread starter Eloe2000
- Start date
So. I center my jig once. That's it. If you chase each chip and project, it's going to be brutal. I do have the ability to "kick" the mill a hint to an edge, which can help adapt for the chip being off or the stamp being huge or wonky, but it can adapt for only do much.does this matter for each set up? the L way and the way with the first one in the post
You'd be surprised if you REALLY dig into a rack of chips how many are off. Check out Dem out ring spacing..... Ooph.
I will say my jig is built a bit different then most, and it auto centers once it's set. So I don't need to fight it too much unless I gotta take it apart to swap certain bits (RHC)
GenghisKhan
Full House
- Joined
- Nov 7, 2014
- Messages
- 2,898
- Reaction score
- 4,723
- Rewards
- 0
I have found the worst chips to be off center are Paulsons so far.does this matter for each set up? the L way and the way with the first one in the post
I have done 1000s of chips: HHR, Nevada mold, Circle Square, and a few others. I set my jig center, then I'm good.
It's only once I milled a few THC Paulsons that I got what everyone was talking about with off center chips.
If they're not Paulsons, you can probably center it and forget it and have excellent results.
Mike mac
Straight Flush
i could watch that drill press alllll day! very satisfying
May be too difficult to tell from the photo but does the depth look about right for a label? I think @BillyBluff will be using laminated labels but forget off the top of my head.


Deep to me, just a hint thoMay be too difficult to tell from the photo but does the depth look about right for a label? I think @BillyBluff will be using laminated labels but forget off the top of my head.
View attachment 1019156
View attachment 1019154
Colquhoun
Straight Flush
I agree.Deep to me, just a hint tho
I shoot for just a tiny bit of depth, usually once you’re just through the hotstamp. It’s easy to go too far.
It’s a very similar depth as the mold.
I like to do two quick cuts. Luckily, if you do go too deep, just put two labels. It'll bump it up enough that it's not noticable.I agree.
I shoot for just a tiny bit of depth, usually once you’re just through the hotstamp. It’s easy to go too far.
View attachment 1019159
Colquhoun
Straight Flush
Trade secrets!I like to do two quick cuts. Luckily, if you do go too deep, just put two labels. It'll bump it up enough that it's not noticable.

I got tons of them. But the double label technique is purely what I've done on my sets. LolTrade secrets!
Colquhoun
Straight Flush
If it’s not a textured label, I like to keep it really shallow. Sometimes I’m amazed at how little needs to be removed to fit a non-textured label. This worked great for a matte one:

- Joined
- Dec 29, 2017
- Messages
- 25,940
- Reaction score
- 35,090
- Rewards
- 0
- Location
- Burnaby (Greater Vancouver), BC
That does look deep. You only to remove enough to ensure the surface is flay. If there's a teeny bit of hotstamp still there, that's ok. It just means the chip was a little warped to start out with.
Rooster410
Straight
mustard shavings

Save them. They’re worth a fortune.mustard shavings
View attachment 1127329
chutracheese
Straight
Here's my first attempt!


maxim_666666
Flush
Damn... It's a pity that I saw this only now...Ok, you know how life goes sometimes. The past week has just been busy af.
But good news are, today I managed to build everything.
So here goes my building pr0n and my experiences.
Please excuse all of the wanky a*s lines. I dont know what happened either xD
View attachment 847034View attachment 847035
Here, the idea and the finished product. Although my lines where off af, this turned out quite nice!
View attachment 847036View attachment 847037
And here you can see my first try on the left and about three chips later another chip.
View attachment 847038
And now a picture of the chip in the milling jig:
View attachment 847039
So my experiences:
So I read on here that a slower speed is better but I can assure you, 200 rpm is waaaaaay to slow. I figured that about 650 rpm was more beneficial because I felt like the milling bit didn't catch that much on the chip. I However forgot to use a rubber mat underneath the chip so I had to jam the chip in there using a piece of wood wich was not optimal to say the least.
Tomorrow I will try it again with a piece of rubber.
The alignment was a bit of a pain but the laser from the drill press helped alot and also the videos from @Eloe2000.
So far I cannot find any obvious flaws with just cutting out a "V" shape. If you guys see anything that is improvement worthy, please tell me. I wont take it personally, I promise
Are you still working on this?
I hated the drilling method as it never got the chip centered and cut off too much precious clay for my liking. I solved this all using a lathe. It can center chips, remove the perfect little clay (or to any depth you want) and any diameter. I've just started, but I'm very impressed with how it turned out.
The only drawback is that the process takes much slower than drilling.


The hole was 0.25mm. And it became 0.3 mm.

https://www.pokerchipforum.com/threads/cpc-hot-stamping-set.112589/
Colquhoun
Straight Flush
The issue I found with centering the chip is that NO Paulson mold is centered on the chip. NONE of them.Damn... It's a pity that I saw this only now...
Are you still working on this?
I hated the drilling method as it never got the chip centered and cut off too much precious clay for my liking. I solved this all using a lathe. It can center chips, remove the perfect little clay (or to any depth you want) and any diameter. I've just started, but I'm very impressed with how it turned out.
The only drawback is that the process takes much slower than drilling.
View attachment 1239244View attachment 1239245View attachment 1239246View attachment 1239247
The hole was 0.25mm. And it became 0.3 mm.
View attachment 1239248
https://www.pokerchipforum.com/threads/cpc-hot-stamping-set.112589/
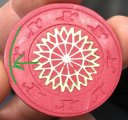
The rings of the THC mold are closer to the edge on one side than the other, so if you mill a recess in true center, it often looks like you screwed up.
I found it best to put a chip in the jig and be mindful of which way it went in (turn the chip so the extra space from mold ring to chip edge faces up, for example). THEN center the bit so it strikes the middle of the mold ring when turned. Now, you are centered on the mold, not the chip.
With each new chip, a quick look as to which way the chip is oriented will make a centered-looking recess.
Note, you can even see how off center the mold is on the chip above...the hotstamp is done at true chip center, yet it is closer to the ring on the "C" in Casino compared to the text on the bottom of the stamp. It looks like the stamp is off center, when it is acually the mold that is off center.
Last edited:
THCs will never be centered. And if you do it chip by chip, that sir is hell on earth. You'd need to center each chip and each side. Each side is going to centered differently on the axis of the chip, even on the same chip.
Why is the inner ring missing? That's a wide mill for a THC.
Why is the inner ring missing? That's a wide mill for a THC.
Colquhoun
Straight Flush
Yep, I did all mine individually by hand. Each side.THCs will never be centered. And if you do it chip by chip, that sir is hell on earth. You'd need to center each chip and each side. Each side is going to centered differently on the axis of the chip, even on the same chip.
It was hell, but they’re spectacular.
And I’ll never do it again.
You couldn't pay me enough....ever, to go thru that.Yep, I did all mine individually by hand. Each side.
It was hell, but they’re spectacular.
And I’ll never do it again.
maxim_666666
Flush
It's hard, but worth it...Yep, I did all mine individually by hand. Each side.
It was hell, but they’re spectacular.
And I’ll never do it again.
Colquhoun
Straight Flush
I know Josh is milling on a scale I couldn’t imagine. I only milled a couple hundred.It's hard, but worth it...
Last edited:
Agreed. You couldn't pay me enough (or could you???You couldn't pay me enough....ever, to go thru that.
 ) to do it that precisely. But I might go to that much trouble for my own set like @Colquhoun did.
Colquhoun
Straight Flush
I joke about them being spectacular, but they're not perfect. Because the mold is off center more on some chips than others.Agreed. You couldn't pay me enough (or could you???
I went out of my way shooting for 100%, but was happy with anything over 95%
I milled a few hundred chips for a friend earlier this year. At first I didn't realize that the molds themselves weren't centered. I would spend 15 minutes getting the jig perfectly centered for one chip, then the next one would be off, and I thought WT???!!! Then I'd adjust it again and do a few more. I got a lot of them pretty close, but I finally realized it was impossible to get every chip perfect without spending endless hours on them. I did the best I could and I think they turned out pretty good. Right @toothpic ?I joke about them being spectacular, but they're not perfect. Because the mold is off center more on some chips than others.
I went out of my way shooting for 100%, but was happy with anything over 95%
maxim_666666
Flush
You might be surprised, but in your case (drilling) it will be a little easier! All you need is a centering ring and press the chips not from the side, but from above. They will all be perfectly in the Center! 100%I milled a few hundred chips for a friend earlier this year. At first I didn't realize that the molds themselves weren't centered. I would spend 15 minutes getting the jig perfectly centered for one chip, then the next one would be off, and I thought WT???!!! Then I'd adjust it again and do a few more. I got a lot of them pretty close, but I finally realized it was impossible to get every chip perfect without spending endless hours on them. I did the best I could and I think they turned out pretty good. Right @toothpic ?
So, if you center the chip in the center of the mold, and the mold is wonky, the label is going to be center but off axis, but from a glance it's going to look off as the label isn't in the center of the chip. It's in the center of the mold. I found that if you center the inlay into the chip, it might look weird against the mold with it hugging one side, but in play at a glance, becomes off as a centered chip. There really isn't a way to get both, unless you find perfectly centered THCs during a clean run.I milled a few hundred chips for a friend earlier this year. At first I didn't realize that the molds themselves weren't centered. I would spend 15 minutes getting the jig perfectly centered for one chip, then the next one would be off, and I thought WT???!!! Then I'd adjust it again and do a few more. I got a lot of them pretty close, but I finally realized it was impossible to get every chip perfect without spending endless hours on them. I did the best I could and I think they turned out pretty good. Right @toothpic ?
maxim_666666
Flush
Because they use centerless grinding when finishing the edge.So, if you center the chip in the center of the mold, and the mold is wonky, the label is going to be center but off axis, but from a glance it's going to look off as the label isn't in the center of the chip. It's in the center of the mold. I found that if you center the inlay into the chip, it might look weird against the mold with it hugging one side, but in play at a glance, becomes off as a centered chip. There really isn't a way to get both, unless you find perfectly centered THCs during a clean run.
maxim_666666
Flush
Similar threads
- Service
- Replies
- 9
- Views
- 809
- Replies
- 9
- Views
- 688