Barrington poker table thread (35 Viewers)

Finally figured out some carrying handles.

Materials:
2 guitar amp handles: https://www.ebay.com/itm/Leather-St...eg-Vox-Black-Vintage-Style-H1008/382129391886
1 yard of strap material: https://www.dritz.com/quilting-sewi...straps/polypropylene-webbing-belting/28602-1/
2 wood screws

I got the strap material from a local fabric store (JoAnn's).

The handles work great. The table is pretty heavy but with the handles much less awkward to carry and two people can carry it pretty easily. When the table is set up the handles hang underneath but they are really not noticeable.

IMG_2890.JPG IMG_2905.JPG IMG_2906.JPG IMG_2907.JPG IMG_2908.JPG IMG_2909.JPG IMG_2910.JPG
 
These look very handy, I might have to do it too.
 
Last edited:
Did anyone else have this issue with their table out of the box? Seems like flimsy screws or they drilled the holes too wide.

20180907_232819.jpg
20180907_232826.jpg
20180907_232743.jpg
 
I've found that the placement of those tension bars varies and can cause the screws to pop out :-(

I've had to reposition one side on my table.
 
I've found that the placement of those tension bars varies and can cause the screws to pop out :-(

I've had to reposition one side on my table.

That seems to have been the case. I'm gonna try with thicker screws this weekend and see if that works.
 
Does anyone know if there's a difference between the three tables below besides the felt? I've seen these tables consistently for this style of table and almost always the first table (brown felt) is the cheapest. I looked at the specs of each and they're identical besides the felt. Is the discount (usually $50-$120) on the first table just because it's got uglier felt?

3d9001ec-e997-484f-bc8d-c97f50ef4388_1.20e4abb7f71cb251f5aeaaf9939b08c3.jpg
f608c780-54cb-4cd5-8265-5a35fb283b94_1.354fc7ad32ecc7da3f1d292a979d6f83.jpg
51414435-1969-4aaf-a95d-95dd6c9d9500_1.ca29ccf108b61a56a3a62d19e51eacbf.jpg


The last one comes with handles already but they're in a pretty poor spot so I'll likely get one of the first two and add my own handles.
 
Also has anyone tried re-felting the ESPN version of this table with the LED lights?
 
Maybe it's cheaper because it was their first in the product line, and they either ordered more of that one for initial manufacturing or got a better deal at the time? I might be giving strange-sounding advice here, but try going on local craigslist and finding a really cheap but serviceable used folding-leg table, and then putting some money aside every month until you've got enough for a basic custom, either built by @T_Chan or someone more local, that you'll be happier about in the long run. It's a natural progression, start with least expensive everything, upgrade your chips, then upgrade your table. Everyone wins in the end!
 
It's a natural progression, start with least expensive everything, upgrade your chips, then upgrade your table.

I agree and hear what you're saying but I can't fit a non-folding table let alone a 8x4 in the space I'm playing in right now. I'm looking at these used but still found the similar price difference between them all and since its something I'll have for a few years it'd be worth it to me to spend an extra $50 if there's a difference besides the felt. As for overall cost, I'm estimating it'll be around $200-250 including re-felting, adding in new and deeper cup holders, plus a few handles which is a drop in the bucket considering I just purchased a barrel of hundos for $200 alone.

If anyone knows if there's a structural or manufacturing benefit with the more expensive tables please let me know :D
 
@saleen121212 question: in this picture (more visible in the one before this one) there’s what may be chalk marks on the far side of the table near the edge of the felt. Are these chalk marks (if so what purpose) and if not what are they?

Also, in this picture have you just not cut the felt on the near side of the table yet or do you wrap it underneath the table and staple gun it there?

Not sure which picture you mean, but it was probably the lighting or dust. No chalk. The half closer to me was not stapled or cut yet I stapled both on top under where the arm rests would go.
 
One pro tip I can give is you might find it alot easier to put the hinges and legs back on before the arm rests. One of my rails was to far forward and created a gap between the two halfs when it was all finished. Had to redo the rail and all hinges.
 
Thanks for the info would have definitely run into that issue if you hadn’t mentioned it. Is the felt from YAT?

As for the picture I was referring to these:
 

Attachments

  • 8C8AC1B4-4BE7-4C37-8D54-BBFA98C30FB7.jpeg
    8C8AC1B4-4BE7-4C37-8D54-BBFA98C30FB7.jpeg
    48.5 KB · Views: 573
Really interested in the table. May get the ESPN version. Would this table really sit 10? My guess is no, but it looks like 8 people might feel cramped.

What do you think?
 
Just did mine last night. Pretty straightforward project and took about 90 minutes. The only semi tricky part when getting the rail sections to line up when reattaching them to the playing surface - I ended up laying on the floor and putting a couple screws in place, then flipping the whole thing to screw the rest down.

One tip I might add is to try to reupholster your table in a clean space where you can work around the perimeter 360 degrees. In my instance, I used my office.

The only modification I made was I used some longer screws when I reattached the gusset part of the table legs to the frame.

In the future, I expect the cheap vinyl on the rails to tear - in which case I'll either replace them entirely with a one-piece ring or simply reupholster the sections with a more durable product.

blue2.png
blue1.jpg
 
90 minutes? I should have paid you to do mine. I guessing doing it in the living room with a baby and your wife arguing with you about the best way to do it slows you down lol! I also used way too many staples but had no idea what I was doing so I wanted it to be tight.
 
I would have done it in trade for some of those Horseshoe Quarters in your profile pic... those are slick :)

I don't think you used too many staples... better to use too many than not enough and have it tear when you're pulling it taut.

It's probably worth pointing out that I've built many tables before, so doing the upholstery work isn't anything new to me... I think it took longer to take apart and re-assemble than it did to actually re-felt the table.
 
I know this isn't Barrington :eek: but has anyone owned or tried refelting one of these tables? I see the a lot and they look like they may have better rails plus ones available near me for $50.

38977708_350936392116157_777609596_n.jpg
 
I know this isn't Barrington :eek: but has anyone owned or tried refelting one of these tables? I see the a lot and they look like they may have better rails plus ones available near me for $50.

It depends on how the rail sections come off and how the felt is attached to the playing surface. If the rails are simply screwed in place from the underside of the table then they should pop right off... and even if the felt is attached using some type of adhesive you could just go over the top of it with your SSC and not deal with it.

What makes the Barrington tables so convenient to reupholster is that the stock cloth just peels right off the padding with no adhesive residues to deal with. Not sure about this one... so the best thing to do is start disassembling and see what you're working with.
 
I know this isn't Barrington :eek: but has anyone owned or tried refelting one of these tables? I see the a lot and they look like they may have better rails plus ones available near me for $50.

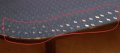
View attachment 208764
I've redone a couple of those table types for friends, and it's a real PITA. Easiest way to get a new playing surface is to make a fitted insert (1/4" MDF) with padding/felt and just set it in place on top of the existing table (inside the rail circumference). You lose rail depth, but trying to do anything else is usually much more than you bargained for.

The construction techniques used on those tables are typically designed to be quick and very inexpensive (aka often shoddy), making disassembly extremely difficult and almost impossible to do without destroying something. Often the outer edge of the rail covering is stapled/glued to the underside of the table, and then wrapped up, over, and back under the rail top and is also stapled/glued to the table top under the rail, if that makes sense (and actually constructed in reverse order). Some rails aren't even really fully wrapped at all, but just have vinyl on two sides with the playing surface glued on top of the vinyl (which is glued/stapled to the table). Difficult to describe without corresponding pics, but once you discover how they're done during disassembly, it's a combination of OMG and WTF. Bottom line: the rail generally doesn't come off of the table unless you destroy it, so easily getting down to just the playing surface felt isn't feasible.

After repairing the second one, I decided it's not worth the effort/cost. I just consider them disposable tables -- cheap, functional for awhile, and when they break or need repair, just throw 'em away. Similar to War Games, the only winning move is not to play buy.
 

Create an account or login to comment

You must be a member in order to leave a comment

Create account

Create an account and join our community. It's easy!

Log in

Already have an account? Log in here.

Back
Top Bottom