Here was my experience, mostly following what I've read in this amazing thread with a couple of new things (at least I think they are new).
I drilled out the cupholders
first. I used this auto trim remover tool kit I bought from harbor freight for a few bucks. If you back out the screws underneath the rail just a bit (enough for it to be able to lift up a little without becoming detached completely), and shimmy this auto trim remover tool underneath the cupholder while heating with a blow-dryer, they pop right out.
Another HUGE plus to drilling out the cupholders first, in my opinion, is that the hole and new cupholder will acts as a sort of alignment guide peg when reassembling the rail. After re-felting, you just lay the rail on top and insert the new cupholders. This way, there were absolutely no issues with alignment of the rail pieces; everything went back precisely in the same position/orientation.
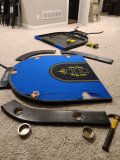
View attachment 629197
View attachment 629193 View attachment 629194 View attachment 629195View attachment 629196
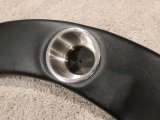
From there, I drilled out the cupholders without having to worry about snagging the cloth. Note that you will only be able to drill out 6 of the cupholders as the other 4 are obstructed by the legs underneath. What I did was drill those 4 about halfway (to make sure I was drilling in the exact correct spot), then finished the job when the legs were removed. If I did this again, I would DEFINITELY buy a better hole saw bit. This thing was cheap and dull, and I nearly started a few fires. Be careful if you have a cheap dull bit like this the friction will cause the wood to smoke.
View attachment 629198
Another note. Wait for the glue to dry again after blow-drying or else it will gum up the teeth of the hole saw bit.
View attachment 629200
One last note is that you do not have to remove the screws underneath the rails completely. I just backed them out enough to remove the rail, but kept them screwed into the top. This way, you don't have to worry about labeling each one. This coupled with the cupholder-alignment-guide-peg thing mentioned earlier made for a totally seemless reassembly.
View attachment 629201View attachment 629202
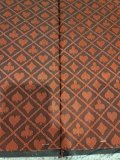
Here is me attempting to line up the cloth (I deemed it "good enough" especially doing this alone)
View attachment 629204View attachment 629205
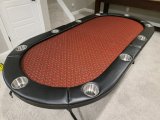
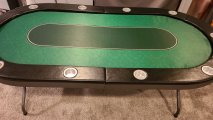
Finished product:
View attachment 629206
Super easy and fun project! I could not have done this without this forum, thank you all!!