Just ordered the bit. I think I'll probably make the safety guard too.
-
PCF is an eBay Partner. If you make a purchase through one of our links, we may earn a commission at no extra cost to you. Thank you for your support!
You are using an out of date browser. It may not display this or other websites correctly.
You should upgrade or use an alternative browser.
You should upgrade or use an alternative browser.
Complete drill press milling setup tutorial with details and links (1 Viewer)
- Thread starter Eloe2000
- Start date
GenghisKhan
Full House
- Joined
- Nov 7, 2014
- Messages
- 2,898
- Reaction score
- 4,723
- Rewards
- 0
The guard is a good idea. I made one but can't install it as my L bracket hole is too small. I hit my finger 4x today.
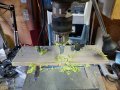
I took out the duck tape earlier and taped the shopvac in place. Cut into the box a bit to fit it on top. Was overthinking the bracket and thought fk it, tape it. I also use a piece of wood to put pressure on the chip. Works great.

Also cut down the cardboard box as it was too high especially on the arm side.

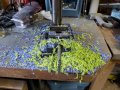
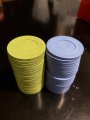
Got some practice chips done today.

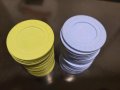
These are next. I'm still practicing depth before I move on to nicer condition Paulsons.

I took out the duck tape earlier and taped the shopvac in place. Cut into the box a bit to fit it on top. Was overthinking the bracket and thought fk it, tape it. I also use a piece of wood to put pressure on the chip. Works great.
Also cut down the cardboard box as it was too high especially on the arm side.
Got some practice chips done today.
These are next. I'm still practicing depth before I move on to nicer condition Paulsons.
markleteenie
4 of a Kind
Love the shop vac idea, will be doing that too!
rimmerryan
Flush
Watching...
GenghisKhan
Full House
- Joined
- Nov 7, 2014
- Messages
- 2,898
- Reaction score
- 4,723
- Rewards
- 0
So, can anyone think of a reason to NOT order this off Amazon for $66 Canadian?
Milling table
X and Y micro adjustments, plus tilt.

Milling table
X and Y micro adjustments, plus tilt.
OP
OP
Eloe2000
Straight Flush
So, can anyone think of a reason to NOT order this off Amazon for $66 Canadian?
Milling table
X and Y micro adjustments, plus tilt.
View attachment 469571
I didn't know this was a thing. So this is just an aftermarket attachment that fits on top of the work base? I am going to buy one! This looks fantastic.
Edit: "Milling Work Table" or "Milling Slide Table" or "XY Table"
Last edited:
It's better to buy a better Mill table then a cheaper one, since the goal is precise work. Cheaper ones can be off and not "tight".I didn't know this was a thing. So this is just an aftermarket attachment that fits on top of the work base? I am going to buy one! This looks fantastic.
What is this piece of equipment generally called?
Edit: "Milling Work Table" or "Milling Slide Table"
No clue on chips, but that was beat into my head when I was making knives.
OP
OP
Eloe2000
Straight Flush
It's better to buy a better Mill table then a cheaper one, since the goal is precise work. Cheaper ones can be off and not "tight".
No clue on chips, but that was beat into my head when I was making knives.
Sure. You are absolutely right. I am generally a cheap guy, but with tools I try to buy for a lifetime. That being said I don't have the space for a larger milling setup and only use it for the purpose of milling chips. I also need it to be movable. But I don't have problems with my current setup either. Seems to work fine for me.
I thought this would be a small easy add on to improve accuracy, but I am looking at how these pieces operate and its clear it would need to be very solid and precise otherwise it would actually harm my precision.
It seems these cheap add-ons are intended to actively manipulate the object while milling, NOT to improve accuracy of a single strike of the bit.
For others reading, here is video of this piece in action and you can sense that this would be worthless if it wasn't stable and without locks on it.
GenghisKhan
Full House
- Joined
- Nov 7, 2014
- Messages
- 2,898
- Reaction score
- 4,723
- Rewards
- 0
Holy crap, wobble wobble.
I had been thinking of making something with an XY adjustment, but that locks in place. Found some diy videos. Will go back to check those out to see if they'd be more stable.
This Amazon thing is 100% crap for our use if it wobbles that much lol. Thanks for finding the video!
I had been thinking of making something with an XY adjustment, but that locks in place. Found some diy videos. Will go back to check those out to see if they'd be more stable.
This Amazon thing is 100% crap for our use if it wobbles that much lol. Thanks for finding the video!
Has anyone found an RHC solution yet? (apologies if I missed it)
.... What's the issue?Has anyone found an RHC solution yet? (apologies if I missed it)
I was under the impression there wasn't an exact bit size. 1 1/16" maybe?
I have heard the legend that a 1 1/4 works with RHC right to the edge, but I've never done it myself. I have the bit, but never had a HS RHC run across my desk.I was under the impression there wasn't an exact bit size. 1 1/16" maybe?
uclaure
Flush
Holy crap, wobble wobble.
I had been thinking of making something with an XY adjustment, but that locks in place. Found some diy videos. Will go back to check those out to see if they'd be more stable.
This Amazon thing is 100% crap for our use if it wobbles that much lol. Thanks for finding the video!
OP
OP
Eloe2000
Straight Flush
I was under the impression there wasn't an exact bit size. 1 1/16" maybe?
I have tried it different ways which I document in the thread linked below. The problem is that there is no good bit size available. I don’t recommend the larger bit size of 1-1/4 because it takes out a lot of chip. The one thing I haven’t mentioned much about but that I have experienced is that with some smooth RHC inlays (Harrahs Cherokee tournament chips are some that I remember specifically) I have tried a smaller 7/8” and 1” bit and if you use a slow drill speed and approach the chip very slowly the entire inlay pops right out when you touch the inlay. Like crazy easily and perfectly. I would need to test more chips to confirm what is going on with that behavior. It’s worth more experimentation, but I personally prefer THC so I haven’t experimented more myself. But it is worth experimenting for someone in modern smooth inlay RHCs using slow press speed and slow approach.
@Josh Kifer didn’t you say you experienced something similar with some RHCs?
https://www.pokerchipforum.com/threads/inlay-removal-by-milling-with-a-drill-press.51172/
Last edited:
Yeah, my targets are hot stamps so I'll have to experiment.
i'm nobody
Flush
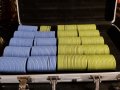
This instructional thread could not have been better. I am so happy that @Eloe2000 put this together. I don't know what I would have done to prepare these roulette's for a labeling. And I have box upon box of chips that are waiting in Colbert, WA that I can't access until the borders open. This was such a fun project and it certainly took some patience with trial and error getting the bit centered. I was able to get down to about 10 mins per barrel and found the process to be quite soothing. So thanks again and once I get my labels made up and all of the other chips I will post more pics.
Attachments
blindman
High Hand
I have ordered a 30mm bit and intend to grind a little off each outer edge to get the diameter I want (eg 1 1/16 inch). We will see how it works.Since I keep receiving questions I figured I should try to compile all of the details into one post. Full write up, details, tips, and purchase links for a <$100 chip milling rig used for milling hotstamps and inlayed chips. This requires a moderate level of handiness and decent eyesight. If you don’t have the spare time, skill, or just want to mill a small amount of chips just reach out to @Josh Kifer or @Gear for milling by hire. Once you have your jig created and everything setup and aligned, I was able to reach a rate of about 30min per 100rack milled by my third rack. This is just a detailed explanation of my setup and experiences, but most of my knowledge just came from other posts here. I am trying to credit where I remember but just remind me if I stole your idea so I can link to your post
What chips can I mill?
This is meant for 7/8” hotstamp or inlayed chips or molds that are meant for 7/8” inlays including THC, suits mold/card pip, Paulson mold, many CPC/ASM including HHR etc. This will NOT work on RHC chips which have a 1-1/16" inlay since there is no bit available at that size and a 1-1/4” bit is too large. However a 1-1/4” bit will work for Roulette mold chips. Some CPC/ASM may also be appropriate to mill with a 1” bit.
What you will need:
Optional for finger guard:
- Drill Press: Harbor Freight 8 In. 5 Speed Bench Drill Press (look online for coupons you can usually find 20% off as I only paid $50)
- Magnate 2712 Surface Planing ( Bottom Cleaning ) Bit - 7/8" (thanks @wonderpuddle)
- Silicon Sheets
- 1.5” hole saw, fostner, or spade bit
- 0.25”x4x16” wood cut into two approx. 8” lengths (best to get from local hardware store or HomeDepot)
- (2) 4”x1/8 or 1/4” eyebolt + (2) 1/8 or 1/4” wingnuts + washers (best to get from local hardware store or HomeDepot)
Tools you will need:
- 2” diameter by 1.5" tall precut pvc collar from HomeDepot
- 3"x3" "L" right angle bracket
- Screws and nuts and bolts
View attachment 448124
- Drill and standard bits
- Sandpaper
Creating the jig:
Cut two pieces of wood to be 1/4”x4”x8”. Use a 1.5” hole saw, fostner, or spade bit to drill/cut a hole in one of the pieces of wood in a way that the hole touches edge of the wood. This will allow you to pry the chips out if they fit too snugly. Begin lightly sanding the inside of this hole/recess until your sample chips fit snugly. Try several different chips because there is some variance.
Measure the distance between the mounting holes on the drill press working surface. Align the piece of wood with the chip recess that you just cut on top of the other piece of wood so that the top piece overhangs the bottom piece by about 1/8” to allow you to grab chips more easily. Please not that you don't see this overlap in my video because it was a later change I made which definitely makes it much easier to grab the chip and flip it over by hand. Drill holes through both pieces of wood for the bolts to mount to the press working surface. The cut a piece of silicon to fit in between the pieces of wood which will help reduce the likelihood of chips spinning in the jig.
Finger guard:
I created a finger guard using a 2” diameter 1.5" tall precut piece of PVC and a simple 3" “L” or right angle bracket. This allows me to keep the machine running but protect fingers when flipping a chip. The 3" bracket (from Home Depot) holes lined up perfectly for me with my jig bolts. Your mileage may vary there.
Setting up the press:
I have not experimented with the speeds of this press since it is a manual process of changing the belts. I haven’t felt the need to experiment other than the default belt setting. I use a very large cardboard box with the front side cut out and place the entire press inside of the box to operate. This completely contains all of the debris. I do not have a garage so I simply set this up outside on a patio table every time I intend to use it. When I am done I just take the press out and dump the debris into a garbage bag.
Aligning the jig:
Place a chip in the wood and silicone sandwich jig on the work surface and loosely bolt down the jig. Set the work surface platform close to the bottom of the travel space so that you will allow the most room to flip chips once the drill bit has been lifted. With the Magnate bit installed in the press and the machine OFF slowly lower the press to determine the alignment of the bit relative to the chip in the jig. Rotate the bit by hand to make sure the jig is completely centered and then tighten everything down (see video below). Because of the limitations of this cheap drill press, leveling may be easier with small shims under the jig than using the press leveling controls. Expect to realign the jig for every use and every different kind of chip.
Milling hotstamps:
Depending on how snug your chip fits in the jig you can use another chip or a tool to apply some amount of pressure to keep the chip from spinning or jumping. I generally do not need to do this but with some chips it may be necessary due to slight variations in diameter. Slowly lower the press to the chip surface and you will see the bit working. Remove just enough so the hotstamp is gone by eyeballing. My eyesight isn’t great but I still find this very easy to eyeball. Some chip hotstamps/inlays are slightly off center. I have found that typically all the chips in that rack will be slightly off. So if my jig accounts for that slight off centered-ness I just eyeball the chip as it goes in and can get the chip oriented correctly so the bit hits perfectly. Experiment with the speed of your press, but I found with this drill press the slowest setting produced the smoothest chip surface and the cleanest debris.
Milling inlayed chips:
I have found that each inlay behaves differently when it gets milled out, but it actually creates less mess than hotstamp milling. It is also obvious as soon as the inlay gets pulled up. The tricky part is the alignment since the inlay is exactly 7/8” like the bit. I have compensated for this when necessary by aligning the jig in a way that it is very very slightly off center (like 1mm). In this scenario I do an initial drill press and then slightly rotate the chip to hit the remaining inlay if at all necessary. The first inlayed chips take a little while to get aligned and figure out how to attack but after that they are the same speed to mill as the hotstamps. Experiment with the speed of your press, but I found with this drill press the slowest setting produced the smoothest chip surface and the cleanest debris.
Shaped inlays can be tricky as I have found some inlays to be excess of 7/8” on THC. I have even found variation in the same rack of chips. One way to address this is to align the jig very slightly off center and then hit the chip several times while rotating the chip in the jog to create a slightly larger recess and remove all of the inlay. This is not ideal however.
Label design and label printing for your new fresh chips:
Make sure to use the forum vendors for the rest of your custom set resources.
Label designs go to @timinater or @p5woody
Inlay labels go to @Gear or @ABC Gifts and Awards
Milling for hire go to @Josh Kifer or @Gear
")
I've got everything except the bottom clearing bit which should be here Tuesday. I'll set it up and run a few tests to dial it in before I start milling the 8,000,000 chocolate THCs that I've accumulated for a limit set that I'll used once a year if I'm lucky.
Why am I in this hobby again?
Why am I in this hobby again?
I've got everything except the bottom clearing bit which should be here Tuesday. I'll set it up and run a few tests to dial it in before I start milling the 8,000,000 chocolate THCs that I've accumulated for a limit set that I'll used once a year if I'm lucky.
Why am I in this hobby again?
Don't you laugh at me @Josh Kifer! Just because you mill professionally doesn't mean you know anything about it!
Also, can you give me any advice on the best way to bandage the bloody fingers I'm sure I'll end up with?
Also, can you give me any advice on the best way to bandage the bloody fingers I'm sure I'll end up with?
I totally can. Happy to help. I'm far from an expert, but I've milled a few. LolDon't you laugh at me @Josh Kifer! Just because you mill professionally doesn't mean you know anything about it!
Also, can you give me any advice on the best way to bandage the bloody fingers I'm sure I'll end up with?
GenghisKhan
Full House
- Joined
- Nov 7, 2014
- Messages
- 2,898
- Reaction score
- 4,723
- Rewards
- 0
Don't you laugh at me @Josh Kifer! Just because you mill professionally doesn't mean you know anything about it!
Also, can you give me any advice on the best way to bandage the bloody fingers I'm sure I'll end up with?
I've yet to install the guard I made, so I've actually nicked my hand about 10x by now when flipping chips over. Not sure if it's my bit, or the speed I'm using, but not a scratch on me.
Most of the time it'll bounce off. One time.... One time I milled thru my thumb. Blood everywhere. It slowed me down a smidge.I've yet to install the guard I made, so I've actually nicked my hand about 10x by now when flipping chips over. Not sure if it's my bit, or the speed I'm using, but not a scratch on me.
I didn't buy the PVC etc. for the finger guard, but maybe that would be a good idea.I've yet to install the guard I made, so I've actually nicked my hand about 10x by now when flipping chips over. Not sure if it's my bit, or the speed I'm using, but not a scratch on me.
GenghisKhan
Full House
- Joined
- Nov 7, 2014
- Messages
- 2,898
- Reaction score
- 4,723
- Rewards
- 0
I have it made. Pvc pipe, 2 holes, attached to corner bracket. And after Josh's thumb comment, looks like I'm gonna finally attach it. Lol.
I bleed for my love of chips!I have it made. Pvc pipe, 2 holes, attached to corner bracket. And after Josh's thumb comment, looks like I'm gonna finally attach it. Lol.
OP
OP
Eloe2000
Straight Flush
I've yet to install the guard I made, so I've actually nicked my hand about 10x by now when flipping chips over. Not sure if it's my bit, or the speed I'm using, but not a scratch on me.
Actually I had knocked my finger too multiple times before I built that guard. I figured I got lucky and should not keep pressing it, but I didn’t get even a scratch either. Which is odd because that bit is definitely sharp.
OP
OP
Eloe2000
Straight Flush
I've got everything except the bottom clearing bit which should be here Tuesday. I'll set it up and run a few tests to dial it in before I start milling the 8,000,000 chocolate THCs that I've accumulated for a limit set that I'll used once a year if I'm lucky.
Why am I in this hobby again?
Honestly once you have it dialed in I find it kind of soothing. It’s repetitive but enjoyable destruction. Make sure you are standing or sitting in a comfortable position so fatigue doesn’t ruin the enjoyment and throw some tunes and get into the flow.
Last edited:
GenghisKhan
Full House
- Joined
- Nov 7, 2014
- Messages
- 2,898
- Reaction score
- 4,723
- Rewards
- 0
Honestly once you have it dialed in I find it kind of soothing. It’s repetitive but enjoyable destruction. Make sure you are stabding or sitting in a comfortable position and throw some tunes and get into the flow.
Good advice. I actually like to put on over ear headphones with tunes, it helps to drown out the press and the shopvac too.

Similar threads
- Service
- Replies
- 10
- Views
- 855
- Replies
- 9
- Views
- 691