The Ocean Club - Poker Table DIY (2 Viewers)

LeRoi

Sitting Out
Joined
Dec 1, 2016
Messages
43
Reaction score
291
Location
Hannover, Germany
Hi folks, I’ve been a mostly passive observer of this forum for quite a while now, sucking in all the great info on here. Because there have been a few members helping me on my journey to my (hopefully final) poker table build, I want to share my process and progress now. I don’t think I did or will do a whole lot differently than others, but maybe it encourages more members to go down the DIY route. Trust me, I’m not an expert woodworker (it is a hobby though), so I think almost anyone can do this if you put in the right amount of planning and care during the build.

Background
This is actually my second build. Here is a picture of the first one I did a few years back.

IMG_0389.jpeg


I know, a racetrack table. I can only repeat what so many members on here have said. A wooden racetrack looks great, but it plays terribly. We play about once a month. And while my guests don’t seem to care (we are all casual players and my guests are just happy that we have a ‘real’ table) I’m triggered every time I’m trying to pick up cards.

So, a new table then. And this time I’m not cutting any corners. But what should it look like? A wanted the table to reflect a bit of personal history and fit to my set of CPCs (I never really introduced them here, but here is the design thread. It took me another few years to actually have them made and I lost track of this site back then. Maybe I’ll show them off later). I contacted @timinater about designing a custom cloth. After only a few iterations, we settled on this.
1697575038286.png


This combines the oceanic theme, the branding on my chips and a style of designer tables which were created by artist Duffy London, which I absolutely love. The most inner section in navy blue serves as the betting line. The players sort of throw their chips into the abyss. The seahorse with the top hat & cane is the logo of a Bermudian hotel where I lived for some time. I don’t have a THC chip set yet, but being a member of this forum, I guess never say never. I ordered the cloth from @T_Chan and by then it was time to design the rest of the table.

One mistake with my first table was, that I built the table, but never got to building a fitting base for it. I still had a steel base of an old IKEA desk. That worked, so I never put in the effort to build a base myself. I did not want to make the same mistake again. And because I know myself and how quickly I can get distracted with other projects, I knew that the only way to avoid a half-finished project was building the base first. I cannot do anything with just a base, so the motivation will stay high to finish the rest of the table. And because I’m actually still in the building process of the table, I will cover the base build here first.

Building the base
I clicked myself through this entire forum, Chanmans gallery on his website, Pinterest etc, to find some inspiration. I knew that with the curvy felt design I wanted the base to be curvy as well. One design I fell in love with are the LaFortune legs which Chanman has put on a few tables in the past.
1697575327507.png


So far, I had no experience with building something out of actual solid hardwood, nevertheless something so intricate. So, I thought this was beyond my skillset. My uncle is a retired carpenter who wanted to help me, but his workshop is inaccessible at this time due to renovation. I did not want to contract this part out completely (I know I could have ordered them from Chapman, but that would have been beyond my budget and ego as I wanted to do this build myself) so I was back to the drawing board, trying to find another design which I was comfortable enough to try building myself. I always came back to this style though. So, after much back and forth I said to myself: how hard can it be. Let’s do it. I needed some additional tools (planer, jointer and a few new router bits), but as this is my hobby, I consider this an investment in future projects.

Step 1: I built a prototype of a leg out of wood which I still had laying around. For that I created a template from MDF board and routed the shape out of the real wood by using a curve ruler which I built myself. I used two pieces of 1 inch thickness, giving me 2 inches total. I was quite happy with the result, so I decided to continue with the project.
IMG_2396.jpeg
IMG_2402.jpeg

IMG_2404.jpeg
IMG_2421.jpeg


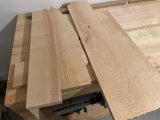
Step 2: The wood. I settled for ash, because I like the light color, which fits much better into our home where we mostly have oak and ash accented furniture.
IMG_2429.jpeg


Step 3: Cutting off the bark, planing and gluing the boards to reach the desired width.
IMG_2466.jpeg

IMG_2468.jpeg

IMG_2510.jpeg

IMG_2517.jpeg


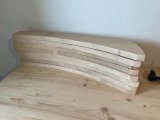
Step 4: I now built the template for the cross bars at the bottom using MDF again.

IMG_2508.jpeg


Step 5: I cut all parts roughly with my jig-saw. Then used the templates to get everything in perfect shape.
IMG_2575.jpeg


Step 6: Time to create the half-lap joint of the cross bars. This was done with a Japanese Ryoba handsaw and a chisel.
IMG_2656.jpeg


Step 7: I joined the legs and crossbars with wooden dowels. The glue-up was quite tricky though. Because there were no parallel faces from leg to leg, I had difficulties attaching clamps here. Also, my clamps were not long enough. So, I built some jiggies to help create some parallel faces and shorten the distance a little. Now I was able to glue legs and crossbars together. The glue-up of the overlapping crossbars was simple enough.
IMG_2658.jpeg

IMG_2661.jpeg


Step 8: In one of @T_Chan's posts he mentioned he had problems with the table being wobbly with these legs. I got in touch with him and braced the top of the legs with additional lateral support. I used a combo of wood glue and CA glue to attach these. The CA glue works in seconds (using activator spray) and creates the pressure needed for the wood glue. That way I did not need to use clamps again.
IMG_2676.jpeg


The finished base is really sturdy and does not wobble one millimeter. I’m really happy how it turned out.
This concludes the base. I'm still waiting for all the material for the table to arrive. Once the table is finished, I will share the rest. I hope I can get that done in the next 4 weeks. I have a day job and a family, so I only get to work on this maybe an hour per day, sometimes not at all.

In the meantime I might share my thoughts on material selection and budget, but that's for another day.
 

Attachments

  • IMG_2556.jpeg
    IMG_2556.jpeg
    110.6 KB · Views: 46
  • IMG_2572.jpeg
    IMG_2572.jpeg
    37.9 KB · Views: 47
It’s done. I didn’t get to do a writeup on materials so far because once the plywood arrived I was fully focused on the build. It took me 2 weeks of work, mostly during the night when the family was asleep. So something like 30h of work I guess. Add to that roughly 40h for the base.

I will follow up shortly with details on the build, material and cost (although I’m not sure how much that will help you as I live in Germany where pricing might be different). But now here are some pics of the table.

IMG_3216.jpeg

IMG_3213.jpeg

IMG_3206.jpeg

IMG_3214.jpeg

IMG_3208.jpeg

IMG_3203.jpeg


Specs:
86“ x 43“ inch oval table
Beige faux suede rail, 5“ rail width
1“ tall illuminated raised rail, battery powered
Custom made Chanman cloth, with the logo matching my CPCs
Legs from ash hardwood shamelessly copied from Chanmans LaFortune legs
Light construction, so I can set up the table on my own. The whole table top only weighs about 55lbs. I have more details on the special plywood I used to achieve this, later.

Overall I’m very happy with the result. The cost and time I put into this project was definitely worth it.
Special thanks go to @T_Chan and @heiterbiswolkig for answering all my questions very patiently.
 
Holy CRAP this is a beautiful build. Thanks for documenting. Table legs tend to be one of the most difficult parts of the build, and this out great.

The felt was already cool enough as it is. Then, on top of that, this might be one of the most effective uses of diffused lighting I've seen on a table so far. It's almost like being a submarine descending into the darkness.

Gorgeous, gorgeous, gorgeous.
 
Looks fantastic, great job. Glad to see the wrinkles were ironed out on the felt. Nice work!
Yes.. I went over the whole felt twice with steam and increased the temperature as much as possible. The tension during the installation did the rest.
 
It’s done. I didn’t get to do a writeup on materials so far because once the plywood arrived I was fully focused on the build. It took me 2 weeks of work, mostly during the night when the family was asleep. So something like 30h of work I guess. Add to that roughly 40h for the base.

I will follow up shortly with details on the build, material and cost (although I’m not sure how much that will help you as I live in Germany where pricing might be different). But now here are some pics of the table.

View attachment 1227270
View attachment 1227272
View attachment 1227273
View attachment 1227274
View attachment 1227276
View attachment 1227277

Specs:
86“ x 43“ inch oval table
Beige faux suede rail, 5“ rail width
1“ tall illuminated raised rail, battery powered
Custom made Chanman cloth, with the logo matching my CPCs
Legs from ash hardwood shamelessly copied from Chanmans LaFortune legs
Light construction, so I can set up the table on my own. The whole table top only weighs about 55lbs. I have more details on the special plywood I used to achieve this, later.

Overall I’m very happy with the result. The cost and time I put into this project was definitely worth it.
Special thanks go to @T_Chan and @heiterbiswolkig for answering all my questions very patiently.
I don't like race tracks, but your first table is sexy clean, I do like it.

This table you just posted makes me jealous, I think that is one of the best felts I've ever seen if not the best - Fantastic job to you and @timinater

You did great on the legs, but man that light and felt ... amazing!! So envious and now I gotta try to sleep! Please post photos of your next few games on this table!!!
 
First of all, thanks for all the kind words. The felt really looks amazing. The colors came out even better in print than in the graphics file.

I want to start the rest of the documentation with…

Material and cost

I will gladly supply the link to stores, products etc via PM. Again since I’m in Germany, the majority might not need those details anyway. I’m including shipping costs in my figures.

Plywood: I put more time into this than I thought in the beginning. We don’t have a dedicated poker room, so I have to assemble the table every time we play (i.e. I attach the top to the base/legs). I quickly realized with my current table, that carrying a 2x1 meter oval made of fiber board is not something I can accomplish myself but I don’t want to inconvenience my wife more than necessary (she helps me of course, but ideally, I’d like to be able to set everything up myself). This means, finding material which is sturdy but light. After much research I stumbled on Queenply (at least that’s the brand name it goes by in Germany), which are plywood sheets made of extremely light wood. These are usually used for building caravan furniture, as the additional weight is kept at a minimum. For comparison: a full sheet of 15mm birch plywood is about 26.5kg, while a comparable Queenply sheet is only 14.8kg. That means I’m saving almost 45% weight here. That is well worth the extra cost for me. The disadvantage is that these sheets are very soft. They scratch easily if you bump into them with tools which happened a few times. But that is only cosmetic and invisible in the end anyway. I’m using 3 sheets (lighted raised rail construction with base, playfield and top of rail) so this adds up to quite a bit of wood stacked up on one another. I can confirm that the table is as sturdy as any table. It does not bend when I lean on it. Also I achieved what I wanted. The table is very lightweight and I can easily carry it.
Cost: $500

Playfield padding: I couldn’t find a store in Germany (or Europe) which sells Volara. I used this thread to figure out what I should use. In the end I settled for something which in Germany is known as ‚Moosgummi‘, which should be close to Ensolite (i.e. Foam Rubber). It’s on the firm side but works well enough for me when picking up cards or shuffling chips. Disadvantage: it’s a closed cell foam and if you put something heavy on it it can leave marks. It actually came with some dents in it because the company who shipped it bent it for packaging. I was about to return it, but after leaving it out for a day, the dents rebounded. This gives me confidence that it will not be permanently damaged easily. I will not leave my complete chipset in a case on it overnight though.
Cost: $58

Lighting and diffusor: The table is lighted, as my first table. On my first table though, the strip I used had the LEDs quite far apart and the diffuser couldn’t manage to do its job. I can see every LED. So now I’m using a COB LED strip which I can control via an app on my phone. The options on colors, gradients, movements etc are endless. As diffuser I’m using white 45% translucent acrylic. I found a shop that sells acrylic which is specifically made to diffuse LEDs which shine from the back. Also I get to specify the size I want to a certain degree so I only had to make two cuts for assembly.
Cost: $67 (led strip) + $75 (acrylic)

Miscellaneous
Raw ash boards for the legs (see first post): $230
Faux suede leather for rail covering: $130 including cost for samples to figure out the best color and texture
1“ hd foam sheet for rail padding: $80
Powerbank with 12v output: $100 (I use an XTpower XT—20000 QC3 power bank)
Edge banding in ash to match the legs: $15
Wood putty, mdf boards for building the templates for the legs, screws, t nuts, glue, hdf board to cover up the sides of the rail construction and other minor stuff: $100

Including the design and print for the custom cloth this brings the total cost to roughly $1700. Doing the numbers myself now hurts a bit. It’s clear that material has become much more expensive over the past years though. My first table (although not really comparable) did not cost me more than $400 when I built it 3 years ago. I did purchase the material over 3 months time though, which spread the damage to my wallet a little.

Next up is the build with many more pictures.
 
Awesome table build! you are clearly way ahead of a hobby woodworker ;) nice to see some other chipper from Hannover :tup:
 
I needed some time to write this up, but here goes the step by step.
  1. The construction consists of 3 boards of plywood. Here is my sketch (sorry, for the bad quality).
    IMG_3222.jpeg
    Sheet A is the base board. Sheet B is split into 3 parts: B1 is attached to the rail (i.e. railnose) and will also be upholstered, B2’s only reason of existence is to hold the acrylic diffusor in place, which sits between B2 and B3 (i.e. the play field). The upper part of the rail is cut from sheet C. The dots on sheet B denote the positions of the t-nuts to hold the table together (the positions are copied to sheet A as well which is not indicated on the sketch). Red t-nuts fix A to B1-B3, while blue t-nuts attach the table to the legs (the 4 in the center of the B3) or are needed to attach 2 kickstands (the 4 on the lower end of B3 and B1) to the table when it is stored. I store the table top upright behind a door in my house and the kickstand provide stability as there is no flat side where the table could rest on and this way it does not rest on the rail foam the whole time.
  2. Here is my sketch of the profile which also has the measurements.
    IMG_3221.jpeg
    Sorry for using the metric system from here on. But otherwise my sketch doesn’t make sense anymore. I did cut all sections with my router and a 6mm bit. Given that the table’s outside dimensions are 218x109cm, this gives me a radius of 54.5cm. My circle jig for the router has a tape measure on it for setting the desired radius, which does not take into account the router bit. Therefore, if I want a 54.5cm circle, I need to set it to 54.8cm when I use a 6mm router bit (add half the diameter i.e. 3mm). I wanted B1 to be 5cm in width, therefore I needed the radius set to 49.2cm. I wanted the acrylic diffusor to sit 1cm off to the inside of the rail. The rail is 12cm in width, so I need to come out at 11cm. That leaves room for B2 to be 5.4cm in width (5cm (B1) + 0.6cm (first cut) + 5.4cm (B2) = 11cm). So the radius to set is 43.2cm. Did I mention that I’m a mathematician?:unsure:
  3. Before I started cutting, I placed all 3 sheets on top of each other and fixed them with screws so they couldn’t shift.
    IMG_3067.jpeg

    IMG_3068.jpeg

    Because of how accurate my router jig is, I really only needed markings on the top sheet to set good locations for the screw holes. So I marked all lines of sheet B on top.
    IMG_3069.jpeg
    Then I drilled the pivot hole for the router jig through all 3 sheets. I then removed sheet C from the stack because there will not be any screws in there and then I drilled all locations for the t-nuts through sheet B and A. This makes sure that they are fully aligned. I also used a forstner bit on sheet B so the t-nuts can sit flush with the plywood, which is especial important within the play field B3 (sorry, I forgot to take a picture)
    IMG_3070.jpeg
  4. Time to make the cuts. I used my circle jig for the round sections (added stop blocks at the ends of the semi-circles) and a long straight piece of lumber as guide for the straight sections.
    IMG_3071.jpeg
    IMG_3101.jpeg
    For the cuts between B1/B2 and B2/B3 it’s wise to put spacers into the cuts (same diameter as the cuts) to keep the whole thing from shifting just before the final section is cut. Otherwise the router might shift and ruin the cut. I used some screws which were 6mm. That worked well.
    IMG_3100.jpeg
    IMG_3102.jpeg
  5. I now installed the t-nuts. For the ones in B3 I used wood putty to make the playfield perfectly flat again. Just make sure to not press too much into the t-nut itself. That needs to come out again, so it does not press against the playfield padding when you put in the screws.
    IMG_3103.jpeg
    IMG_3104.jpeg
  6. From the leftover pieces of one of the sheets I cut the risers for the rail. I wanted a 2.5cm (approximately 1 inch) visible lighted rail. You need to add the thickness of the playfield padding (8mm in the end) to that though. So the risers needed to be 3.3cm tall. I cut them 9.4cm in width.
    IMG_3105.jpeg
    IMG_3106.jpeg
    Together with the 3mm HDF board I used to close off the gaps between the risers on the in and outside of the rail, this comes to 10cm, so 1cm of air between the LED strip and the acrylic (see 2 for the acrylic placement). Why not more? I had a 5 metre LED strip, which I wanted to use to the max, but also not more. I didn’t want to buy an extra one for extending the first and then only use a tiny bit of it. I spare you the math, but between maximizing table dimensions and working out the placement of the LEDs I came up with this setup. I tested it beforehand to make sure the acrylic diffuses well, but with a COB strip and professional acrylic, there was no problem.
  7. Building the rail. Glue The risers to the underside of C. I used a combination of wood glue and CA glue again. If you use activator spray for the CA glue, this stuff dries in about 5 seconds and provides the clamping pressure for the wood glue. That way I didn’t need to use a ton of clamps (which I do not have).
    IMG_3110.jpeg
    IMG_3112.jpeg
    When placing the risers, I made sure to leave 3mm of distance from the outside of the rail. This is where the HDF board will come to seal the rail off (I nail this in place with my nail gun).
    IMG_3113.jpeg
    Also leave yourself some room for the electronics of the LED strip. Now glue B1 on top of the risers.
    IMG_3114.jpeg
    Afterwards a dry fit was in order.
    IMG_3115.jpeg
    Please note: usually you would also seal the inside of the rail off with HDF board before attaching B1 to the risers. I left that part for later on purpose. I thought I would do the upholstery first, otherwise I would only leave me with 2cm of space to staple. This saved me a ton of frustration. Given that upholstery is frustrating anyway, I think that was a good choice.
That concludes part 1 of the build. Part 2 is on the way.
 
8. Glueing on the rail foam. The spray adhesive I used worked well after I let it sit for 5 minutes after spraying. It became very tacky then and the foam stayed in place.
IMG_3116.jpeg
IMG_3118.jpeg

9. I did not have an electric turkey knife, so I though a bit on how I could get the cleanest cuts possible. I did have a hot wire cutter which I used for Styrofoam before. It worked well for HD foam too, but it was slow. So I guess nothing beats the electric knife.
IMG_3120.jpeg
IMG_3121.jpeg
IMG_3122.jpeg

10. Upholstery. What a bitch. This was by faaaaaaaaaar the worst part of the build. I don’t want to go into full detail here (I don’t want to relive those memories), but I followed this guide here. In the end I probably pulled out more staples than ended up in the rail. And I still have wrinkels. The fabric I used did not have a lot of stretch, so I partly blame the fabric. Still I did better than in my first build. But this is the only part where I’m not 100% satisfied and I may redo this in the (distant) future.
IMG_3124.jpeg
IMG_3125.jpeg
IMG_3126.jpeg
IMG_3128.jpeg
IMG_3130.jpeg


11. Now I installed the inner HDF board where the LED strip will sit on. I used my nail gun again.
IMG_3133.jpeg


12. LED strip installed (the adhesive on the back side was sufficient. The strip is routed into the rail via a 10mm hole. And my math worked out. I made use of 497cm out of 500cm total length.
IMG_3136.jpeg
IMG_3137.jpeg


13. I wanted the power cord to come out of the sheet A in the middle of the table. I drilled a hole in A where I wanted it to appear and another hole (not actually a hole because I only went down half the strength of sheet A) where the cable is fed from the rail and then used the router to create a channel for the cable. The cable will then run from the rail nose through the base board A (below the playfield) to the middle of the table.
IMG_3139.jpeg
IMG_3138.jpeg


This concludes part 2 of the build.
 
14. Padding the playfield was easy enough. First place the foam sheet on the table, flip half of it over, glue, then do the other half.
IMG_3141.jpeg
After I cut the foam to size I stapled a ring of 2mm balsa wood to the side.
IMG_3143.jpeg
This serves two purposes. 1. when the cloth is installed, the wooden ring creates a very neat edge of the playfield which is impossible to achieve when there is just rubber foam which is compressed by the cloth. 2. The gap between parts B2 and B3 is 6mm. The acrylic diffuser which goes in there is 3mm strong. The rest of the space is occupied by the 2mm wooden ring and the cloth. That means I do not need to screw or glue the acrylic in place because it’s already a tight fit.

15. Cloth installation. The cloth came folded and sat in the closet for a few weeks before installation. My first attempt at ironing did not work. I had the feeling the wrinkles always reappeared 10 seconds after I moved along with the iron. I consulted Tony and then repeated the whole procedure with more heat (tried it on the edge first) and steam. Wrinkles were still visible but the tension during installation did the rest.
IMG_3147.jpeg
IMG_3148.jpeg


16. Edge banding for sheet A. Unfortunately I did not take pics.

17. Time to put the pieces together. I still had to cut the acrylic strips. Did that with the table saw and a very fine blade. In some places there was still room between the acrylic and B2 so I just pushed some more balsa wood in the gaps. Now the diffuser sits absolutely tight.
IMG_3199.jpeg
IMG_3200.jpeg


18. I installed some strong magnets to attach the battery.
IMG_3207.jpeg


19. Carried it into the living room and enjoyed my work.
IMG_3212.jpeg
IMG_3215.jpeg
IMG_3202.jpeg
IMG_3216.jpeg


And that’s it. I hope this is of use to anyone. And if it’s just to motivate you to do this yourself. I tried to be as detailed as possible but there is always room for improvement. I’m happy to answer any questions.

Cheers
 
It’s done. I didn’t get to do a writeup on materials so far because once the plywood arrived I was fully focused on the build. It took me 2 weeks of work, mostly during the night when the family was asleep. So something like 30h of work I guess. Add to that roughly 40h for the base.

I will follow up shortly with details on the build, material and cost (although I’m not sure how much that will help you as I live in Germany where pricing might be different). But now here are some pics of the table.

View attachment 1227270
View attachment 1227272
View attachment 1227273
View attachment 1227274
View attachment 1227276
View attachment 1227277

Specs:
86“ x 43“ inch oval table
Beige faux suede rail, 5“ rail width
1“ tall illuminated raised rail, battery powered
Custom made Chanman cloth, with the logo matching my CPCs
Legs from ash hardwood shamelessly copied from Chanmans LaFortune legs
Light construction, so I can set up the table on my own. The whole table top only weighs about 55lbs. I have more details on the special plywood I used to achieve this, later.

Overall I’m very happy with the result. The cost and time I put into this project was definitely worth it.
Special thanks go to @T_Chan and @heiterbiswolkig for answering all my questions very patiently.
Wow... this is absolutely stunning! Every element of the design flows perfectly into the next and really looks like a piece of furniture in the home. Maybe I missed it but what finish did you use on the base? So well thought out, really appreciate you sharing the journey!
 

Create an account or login to comment

You must be a member in order to leave a comment

Create account

Create an account and join our community. It's easy!

Log in

Already have an account? Log in here.

Back
Top Bottom