Restoring Old Table (1 Viewer)

ProdigalSUN413

Waiting List
Joined
Jan 26, 2024
Messages
9
Reaction score
10
Location
Tampa, FL
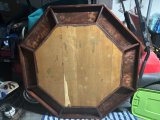
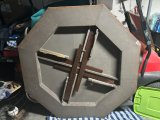
I live in the Tampa, Florida area and have an old wooden octagon poker table that belonged to my great grandfather. The table seems fairly standard, as in not exceptional quality or high end build, but I would love to have it restored. I don't feel up to doing it myself, but I'm having a difficult time identifying viable options. I've reached out to several antique furniture shops but either haven't gotten responses or stuff like "we don't work on things like this".

Just looking for some advice and direction.
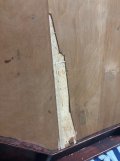
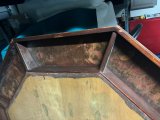
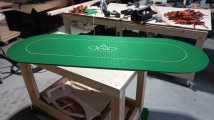
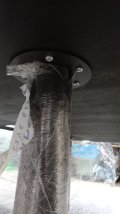
I'll attach some picture, but essentially the table need to be sanded and refinished, new felt/padding, and it needs new legs.

First time doing this, so excuse my ignorance, but thanks in advance for any help!
 

Attachments

  • IMG_6577.jpg
    IMG_6577.jpg
    131.4 KB · Views: 142
  • IMG_6576.jpg
    IMG_6576.jpg
    150.8 KB · Views: 144
  • IMG_6575.jpg
    IMG_6575.jpg
    149.2 KB · Views: 138
  • IMG_6574.jpg
    IMG_6574.jpg
    143.5 KB · Views: 147
What? Unreal that the furniture restoration shops would turn that project away.
 
Posting here is a good idea. Someone among our members might be able to take this on for you.

If not, you can certainly do this project yourself. All you need is time and some (relatively) inexpensive materials.

Sanding and refinishing are easy enough, especially if you have a mechanical sander.

You can choose how much you want to spend on felt or speed cloth, depending on how "high-end" you want the table to look when it's finished. For top-of-the-line speed cloth, check out the Casino Supply website. You can buy as much or as little as you need for the playing surface and the eight pockets. Don't forget to get some padding to put under the playing surface. Having some padding under the speed cloth will make the tabletop feel softer and more professional, and will allow you to be able to push down on it just a bit, which will make dealing, collecting cards and shuffling much easier.


For a cheaper alternative, you can get some felt or cloth in just about any color at a craft store or material retailer like JoAnn Fabrics. (You'll still want to put a little bit of padding down on the playing surface first.

Make sure to get a can of spray adhesive, usually available at the same store.

And don't forget to post pictures as this progresses. Looks like a nice project.
 
Agree with the above. If you have some tools, space, time and basic skills you can make this happen yourself.
 
Wow. Does an “antique furniture shop” really get enough business to turn down something like this!? Silly.
 
Posting here is a good idea. Someone among our members might be able to take this on for you.

If not, you can certainly do this project yourself. All you need is time and some (relatively) inexpensive materials.

Sanding and refinishing are easy enough, especially if you have a mechanical sander.

You can choose how much you want to spend on felt or speed cloth, depending on how "high-end" you want the table to look when it's finished. For top-of-the-line speed cloth, check out the Casino Supply website. You can buy as much or as little as you need for the playing surface and the eight pockets. Don't forget to get some padding to put under the playing surface. Having some padding under the speed cloth will make the tabletop feel softer and more professional, and will allow you to be able to push down on it just a bit, which will make dealing, collecting cards and shuffling much easier.


For a cheaper alternative, you can get some felt or cloth in just about any color at a craft store or material retailer like JoAnn Fabrics. (You'll still want to put a little bit of padding down on the playing surface first.

Make sure to get a can of spray adhesive, usually available at the same store.

And don't forget to post pictures as this progresses. Looks like a nice project.
& @JackJack @Kam

I think my biggest concern in tackling this myself is the center piece of wood. I'm not experienced with projects like this, but I thought I could tear out that center piece and basically cut a new one, pad and felt it, and then stick it back into that same space. You can see from the photos where I started to tear it out, but it's layered differently than I expected, and I'm worried I'll end up trashing the whole thing when the point was to preserve as much as possible since it has sentimental value.

I'm wondering if I could simply cut that center octagon out of plywood, pad and felt that and then place it on top, but I would prefer that it is well-integrated and securely attached to the rest of the table...

I know I could easily sand and refinish the rest of the table.
 
Do it yourself, it will mean more to you once finished. You have the power of YouTube and PCF behind you!

Start a thread and chronicle your effort. When you hit a point of uncertainty you can crowd source an array of potential solutions :tup:
 
@ProdigalSUN413 apparently you don't have enough posts yet to engage in private messages so ...

Can you post close-ups of the underside table supports? Wondering if the top is an insert anchored to the supports with pocket screws

table.jpg
 
OP could:

1. use a wood filler to fill in the top. Sand it down to be smooth and flush with original wood.
2. Sand table thoroughly
3. Stain all visible wood
4. Poly, sand, poly, sand, poly
5. Use pressure adhesive on top/center, apply foam (carpet glue. Or spray adhesive works too)
6. Place felt/cloth on top/center
 
I'm wondering if I could simply cut that center octagon out of plywood, pad and felt that and then place it on top, but I would prefer that it is well-integrated and securely attached to the rest of the table...
Yes do this. To make it seamless put a thin piece of trim around all the edges of the octagon making sure it has a 1/2 inch lip (extends below the octagon piece) along the bottom.

Then slide that down on top, with the lip going into the cavitys that hold chips.
 
Hi there!

I'm owner of ArenaWoodworks.nl. I build custom tables.

Congrats on this nice table! Since it has some history, bringing it back to life is really special.

Woodfiller is a valid option, but tends to shrink a bit. If you're able to use polyester you have a much stronger fill and a smoother finish.

The easiest way to redo the playing surface is to buy a piece of plywood about 1/2" is more than enough. You need about 3/16" thick EVA foam or polyether foam as surface padding and staple the speed cloth or felt tight around the edges on the bottom. (out of sight)

Then you can tap a few screws from the bottom to fix it. Thats the easiest way.

When you want to keep the chip trays natural you need to take a few steps. Since it has an existing finish I suggest you use a so called cabinet scraper to slightly take off the old finish or hit it with a 240+ grain sandpaper and refinish it with a brush and PU coating.
 

Attachments

  • 20241125_132526.jpg
    20241125_132526.jpg
    92.1 KB · Views: 35
  • 20241126_124822.jpg
    20241126_124822.jpg
    114 KB · Views: 36
Last edited:
Thank you so much everyone for the feedback and advice! Thankful to have found this forum and great community.

I was finally able to find a local restoration group that I think will do a good job, so I think I'll go that route. (I'm realizing now that some of the initial pushback I got was in the wake of hurricane Milton, so I think there was high demand in the last several months).

At the end of the day, I'm just not that experienced or confident in my own abilities to tackle this yet. I know it'd be so awesome if I did it myself, but I'm afraid I'll beat myself up if it's not up to snuff. I am trying to become more handy, building some headboards and shelves for the house this Spring, so I'll continue learning and hopefully build another table from scratch in the future! ;P

Still, thank you for the advice and input @Chippy18 @JackJack @Kensco @Kam @dennis63

I asked the folks doing the restoration if I could supply my own foam and felt (since they don't specialize in poker tables necessarily). Sounds like the volara foam and speed cloth from Casino Supply would be a good choice. Any other recommendations or tips for these?

I also asked them if they could make the centerpiece easier to remove in the future by either attaching with screws or pocket holes from the bottom (nod to @Kensco )

Lastly, just looking for some opinions.
-I had considered cutting out inserts for cupholders in each tray (like cutting a hole for a drop in drink holder), but I think I'm leaning away from this so I can keep the table in it's original form as much as possible. That being said, any other modifications you might recommend? Rubber inserts or another material to line the bottom of the trays?
-Also curious how people feel about chip management at these octagon tables? Biggest problem is you can't easily see everyone's' stacks. Could use some elevated chip trays? Not a huge problem, and worth the hassle to play on the family heirloom.
 
Couple of final thoughts:

1. For the octagon center that’ll have the padding/cloth - you might want to make this somewhat removeable. The center piece looks pretty fixed in place. In future you may want to switch out the cloth etc, if the center piece could be removed that’ll help the longevity.
2. An alternative to the speedcloth could be a custom felt, @T_Chan does custom printing & design where you can have pretty much anything. You can search I think for one of his threads where he shows his work.
3. Another alternative are ‘toppers’, @rjdev7 - check for some of his offerings, not 100% on size, but that could be a way to change the top in the easiest way.

GL
for sure! I asked them to give me some options for making the topper easier to remove in the future and they said that's a total go, no problem.
They also told me they need to use their own padding/felt to ensure quality and consistency of their work, but sounds like they know what they are doing. I'll post back here once they give me the options, just for the collective wisdom
 
  • Like
Reactions: Kam
Sounds good - looking forward to seeing the results.

Also, if you’re keeping the chip trays, definitely recommend having some type of padding to be gentle to the chips!
 
for sure! I asked them to give me some options for making the topper easier to remove in the future and they said that's a total go, no problem.
They also told me they need to use their own padding/felt to ensure quality and consistency of their work, but sounds like they know what they are doing. I'll post back here once they give me the options, just for the collective wisdom

Magnets … fantastic solution to the topper. Skip the screws or pocket holes. Something like this will work (maybe like 4 of them for peace of mind). The link below is to Grainer, can be found cheaper at any big box hardware store.

https://www.grainger.com/product/Door-Latch-Steel-2VAG1
 
Last edited:
I’ve built 2 poker tables thus far - octagon and a hexagon. I would restore that table allowing center to be removed as I did. That will allow u to change it easily if needed. You can install new support structure using solid wood. God - Do not use plywood for your center it will warp. Use 3/4 inch substrate that’s solid. I’ll send some photos if you’d prefer. I purchased car trunk liner - grey thicker felt not that crap from Joann fabric it’s toooo thin. You can buy it from a car upholstery shop. It can be stapled underneath after you wrap it around , then install your top of choosing the same way. You just need to kno if you want the top of finished felt to be above slightly, level, or below existing table top surface. Then you can add supports at appropriate height to accommodate top thickness( 3/4 plus felt and table topper. Then u can install new legs securely to supports. I’d use popular, pine is too soft and your legs will wobble over use. I’ve attached few photos to give u few ideas.
Bracing structure ,—— 3/4” top material —-
8 sided table sits above surface-cards slide off table some times since it’s leather , the 6 sided is recessed - my preferrence, leather not installed yet. Hope you can see clearly felt car liner and top material.
Hope this helps
Good luck - don’t rush your work.
IMG_3809.jpeg
IMG_3808.jpeg
IMG_9718.jpeg
IMG_9528.jpeg
IMG_2386.jpeg
 
Magnets … fantastic solution to the topper. Skip the screws or pocket holes. Something like this will work (maybe like 4 of them for peace of mind). The link below is to Grainer, can be found cheaper at any big box hardware store.

https://www.grainger.com/product/Door-Latch-Steel-2VAG1
no need for magnets if you use a topper; the underside is rubber and grabs foam very well (mine sits on my closed cell foam and never moves during a game, especially if your rails are slightly raised and you can tuck the topper under them)
 
I’ve built 2 poker tables thus far - octagon and a hexagon. I would restore that table allowing center to be removed as I did. That will allow u to change it easily if needed. You can install new support structure using solid wood. God - Do not use plywood for your center it will warp. Use 3/4 inch substrate that’s solid. I’ll send some photos if you’d prefer. I purchased car trunk liner - grey thicker felt not that crap from Joann fabric it’s toooo thin. You can buy it from a car upholstery shop. It can be stapled underneath after you wrap it around , then install your top of choosing the same way. You just need to kno if you want the top of finished felt to be above slightly, level, or below existing table top surface. Then you can add supports at appropriate height to accommodate top thickness( 3/4 plus felt and table topper. Then u can install new legs securely to supports. I’d use popular, pine is too soft and your legs will wobble over use. I’ve attached few photos to give u few ideas.
Bracing structure ,—— 3/4” top material —-
8 sided table sits above surface-cards slide off table some times since it’s leather , the 6 sided is recessed - my preferrence, leather not installed yet. Hope you can see clearly felt car liner and top material.
Hope this helps
Good luck - don’t rush your work.
View attachment 1446778View attachment 1446779View attachment 1446780View attachment 1446781View attachment 1446782
Cool project, looks great!!
 
I’ve built 2 poker tables thus far - octagon and a hexagon. I would restore that table allowing center to be removed as I did. That will allow u to change it easily if needed. You can install new support structure using solid wood. God - Do not use plywood for your center it will warp. Use 3/4 inch substrate that’s solid. I’ll send some photos if you’d prefer. I purchased car trunk liner - grey thicker felt not that crap from Joann fabric it’s toooo thin. You can buy it from a car upholstery shop. It can be stapled underneath after you wrap it around , then install your top of choosing the same way. You just need to kno if you want the top of finished felt to be above slightly, level, or below existing table top surface. Then you can add supports at appropriate height to accommodate top thickness( 3/4 plus felt and table topper. Then u can install new legs securely to supports. I’d use popular, pine is too soft and your legs will wobble over use. I’ve attached few photos to give u few ideas.
Bracing structure ,—— 3/4” top material —-
8 sided table sits above surface-cards slide off table some times since it’s leather , the 6 sided is recessed - my preferrence, leather not installed yet. Hope you can see clearly felt car liner and top material.
Hope this helps
Good luck - don’t rush your work.
View attachment 1446778View attachment 1446779View attachment 1446780View attachment 1446781View attachment 1446782
those look amazing the wood is beautiful! Great build!
I think you're right about the advantages of a slightly recessed centerpiece
 
A flush or slightly elevated center section is far better than a recessed center -- cards will slide on the former, but will 'catch' on the latter and create problems dealing, plus it can actually cause damage to plastic cards.

If supported properly, a lightweight removable playing surface can be easily made using 1/4" MDF (polycoated to make it waterproof) plus 1/4" YAT foam covered with gaming cloth. SSC will not match the antique look of the table, imo. Magnets or just gravity should hold it in place, or you can secure it underneath.

I would be very wary of letting a restoration shop select either the foam or the cloth -- what you end up may look nice, but not be optimum for actual play.
 

Create an account or login to comment

You must be a member in order to leave a comment

Create account

Create an account and join our community. It's easy!

Log in

Already have an account? Log in here.

Back
Top Bottom