Paulson: Full label replacement tutorial thread (11 Viewers)

I'm curious about inlay replaced THCs. When I look at good pictures of them, I can always tell that they're replacements (and not overlabels) because you can see the label sitting deeper in the recess than factory paulson inlays. I always assumed that the recess was just milled a hair too deep. But when I was thinking about it today, I realized that there's no milling at all with inlay replacements. So it's just a matter of the replacement lables not being as thick as the multi-layer inlays they're replacing? Has anybody looked into having thicker labels produced, to better fill that hole where the inlay once was?
Ill be testing out this theory with thick laminated glossy labels on some milled IHC chips soon.
 
Back to report:
Paulson THC (Tigers)
Ledge created by the mold to the edge of the chip = .005"
Total distance from the bottom of the vinyl (after murder) to the chip edge = .020"
Total amount of material removed from process of murder = .015" (which matches the total thickness of the Vinyl + Laminate)
Vinyl thickness = .005"
Laminate thickness = .010"

Gear Labels:
Thick Laminated:
from gears website: "the difference between laminated and unlaminated labels is what happens after the labels are printed" so what I read into that is that the vinyl that he prints on for laminated or unlaminated labels is the same.
my measurements of his labels:
Vinyl = .004"
Laminate = .006"
Total thickness = .010"

My Comments & Conclusion:
- I'll first say my measurements match up with what actually works and what gears suggestions are on his website, are so I think they are very close
  • It is possible to overlabel new chips as there is sufficient space to apply an vinyl only (unlaminated) label. There will be very little space = .001" but it is doable without creating spinners
  • Over-labeling chips with unlaminated labels have some issues that are undesirable: They do not look as close to a real inlay as a laminated label. They will not wear well as they are much easier to get dirty/damage/scratch etc. The original inlay will likely be seen around the edge on at least some chips too which may be a visual issue for some.
  • In addition to the visual issues, .001" is really, really tiny space (a piece of paper is .004) so if the chips are worn or if any labels are misapplied in any way there are likely to be spinners.
  • Murdered chips create a void that will be (mostly) filled by the new label/laminate combo.
  • Murdering chips alleviates all of the previously mentioned negatives of over-labeling, but....
  • Murdering chips creates some issues too so some will prefer the murder route and others will prefer the over-label route
  • Murdering issues are: It is a permanent thing and can not be reversed. There will often be a very small gap between part of the label and the impression that is left from murder process. There will be a slightly more recessed look to the chip as the new label/laminate combo will not completely fill up to the same height at the removed label. In my opinion this is not very noticeable, but that is just me.
As with lots of things in life there are trade offs here. In my opinion, the murder route is much better. In my opinion the positives far outweigh the negatives. There are lots here that agree with me and some that will disagree.

As far as putting a second label in there after murder:
2 laminated labels will fill up that space completely and might work, but it will be really close and certainly open up the possibility of spinners. You can certainly try it and see if you like it. To me it seems expensive for limited improvement, but ymmv...
 
Very happy with the result of just one Gear label personally and luckily the tigers are super easy to delabel with how fresh they are. Takes me about 2 min a chip total. You'd have to be inspecting the chip up close to notice and it's not something you would think about at all while having them in play.

20230817_134521.jpg
 
Last edited:
I'll put two in to bump them up. Helps immensely
No spinners? I been considering adding an unlaminated (blank) label under the laminated printed label to raise it up on murdered Paulsons, but thought using a laminated label underneath would add too much height.
 
No spinners? I been considering adding an unlaminated (blank) label under the laminated printed label to raise it up on murdered Paulsons, but thought using a laminated label underneath would add too much height.
Nope. I use my old inlays as bumps for projects. Never had any spinners or issues. Just gives it a hint higher sit.
 
I'm curious about inlay replaced THCs. When I look at good pictures of them, I can always tell that they're replacements (and not overlabels) because you can see the label sitting deeper in the recess than factory paulson inlays. I always assumed that the recess was just milled a hair too deep. But when I was thinking about it today, I realized that there's no milling at all with inlay replacements. So it's just a matter of the replacement lables not being as thick as the multi-layer inlays they're replacing? Has anybody looked into having thicker labels produced, to better fill that hole where the inlay once was?
Yes. It partly the reason why we have thick laminate at all.
Finding a laminate that is the right thickness, and the right look, and the right feel, and can be cut by our specific brand of printer, and that doesn't warp or curl, and can be sourced over and over again, and can be shipped to Canada for a reasonable price... Your choices get narrowed.

Paulson THC (Tigers)
Ledge created by the mold to the edge of the chip = .005"
Total distance from the bottom of the vinyl (after murder) to the chip edge = .020"
Total amount of material removed from process of murder = .015" (which matches the total thickness of the Vinyl + Laminate)
Vinyl thickness = .005"
Laminate thickness = .010"
The important part of this very good and detailed post is right at the top. Paulson THC (Tigers)
These measurements are for TIGERS... not BTP's not PCA's, not Paris etc...
Paulson's are individually pressed by a person. There is some variability that isn't there with Bud Jones / Matsui / Gemaco / CPC/ASM.
That variability comes in label shape, size, and in depth. It's part of what makes Paulson's great IMHO.
  • Was the person doing it new and hesitant?
  • Were they rushing to fill their quota?
  • Did they have a crappy day and vent their frustration in the press?
This one of the major reasons why we literally ask to know each and every target chip per denomination.
We will vary the cut size for each chip.
Our database is huge, and the variability is more than you might think. *(no you can't see it unless we sell the business to you)
We're working in millimetres here.
Fractions of millimeters really.

The problem with after market anything, is you have to manufacture for the average without going over.

It's way easier to do that for something that was made by a machine.
We can test a Bud Jones or a Gemaco chip for thickness and be confident that will be the same for all the chips.

For Paulson Chips:
What is a perfectly smooth transition from label to chip on this chip, can be proud on that one.
What is a no gap fit on one chip, can be a fraction too big on another.

  • The label that's too big, you can't use it at all.
  • The label that's too tall, will catch and peel and cause racking/stacking issues.
  • Even if there isn't a spinner issue, you will feel the edge of the labels, this is a plastic edge cut with a blade.
  • At least if it's shallow, the human fingertip can't tell by how much.

We actively warn against thick laminates on Paulson's because there will be a percentage of chips that the labels will be proud of the space.
We do our measured best to manufacture so 100% of our labels will fit in the space allotted, and last as long as the originals.

@WhiteMamba1646 should be an interesting test case.
Since he is milling, he can control the depth, but unless I am mistaken it's a hand drill press. (albeit wielded by someone with lots of experience)
I am interested to hear how they turn out.
 
Yes. It partly the reason why we have thick laminate at all.
Finding a laminate that is the right thickness, and the right look, and the right feel, and can be cut by our specific brand of printer, and that doesn't warp or curl, and can be sourced over and over again, and can be shipped to Canada for a reasonable price... Your choices get narrowed.


The important part of this very good and detailed post is right at the top. Paulson THC (Tigers)
These measurements are for TIGERS... not BTP's not PCA's, not Paris etc...
Paulson's are individually pressed by a person. There is some variability that isn't there with Bud Jones / Matsui / Gemaco / CPC/ASM.
That variability comes in label shape, size, and in depth. It's part of what makes Paulson's great IMHO.
  • Was the person doing it new and hesitant?
  • Were they rushing to fill their quota?
  • Did they have a crappy day and vent their frustration in the press?
This one of the major reasons why we literally ask to know each and every target chip per denomination.
We will vary the cut size for each chip.
Our database is huge, and the variability is more than you might think. *(no you can't see it unless we sell the business to you)

Fractions of millimeters really.

The problem with after market anything, is you have to manufacture for the average without going over.

It's way easier to do that for something that was made by a machine.
We can test a Bud Jones or a Gemaco chip for thickness and be confident that will be the same for all the chips.

For Paulson Chips:
What is a perfectly smooth transition from label to chip on this chip, can be proud on that one.
What is a no gap fit on one chip, can be a fraction too big on another.

  • The label that's too big, you can't use it at all.
  • The label that's too tall, will catch and peel and cause racking/stacking issues.
  • Even if there isn't a spinner issue, you will feel the edge of the labels, this is a plastic edge cut with a blade.
  • At least if it's shallow, the human fingertip can't tell by how much.

We actively warn against thick laminates on Paulson's because there will be a percentage of chips that the labels will be proud of the space.
We do our measured best to manufacture so 100% of our labels will fit in the space allotted, and last as long as the originals.

@WhiteMamba1646 should be an interesting test case.
Since he is milling, he can control the depth, but unless I am mistaken it's a hand drill press. (albeit wielded by someone with lots of experience)
I am interested to hear how they turn out.
Wifey is smart.
 
Yes. It partly the reason why we have thick laminate at all.
Finding a laminate that is the right thickness, and the right look, and the right feel, and can be cut by our specific brand of printer, and that doesn't warp or curl, and can be sourced over and over again, and can be shipped to Canada for a reasonable price... Your choices get narrowed.


The important part of this very good and detailed post is right at the top. Paulson THC (Tigers)
These measurements are for TIGERS... not BTP's not PCA's, not Paris etc...
Paulson's are individually pressed by a person. There is some variability that isn't there with Bud Jones / Matsui / Gemaco / CPC/ASM.
That variability comes in label shape, size, and in depth. It's part of what makes Paulson's great IMHO.
  • Was the person doing it new and hesitant?
  • Were they rushing to fill their quota?
  • Did they have a crappy day and vent their frustration in the press?
This one of the major reasons why we literally ask to know each and every target chip per denomination.
We will vary the cut size for each chip.
Our database is huge, and the variability is more than you might think. *(no you can't see it unless we sell the business to you)

Fractions of millimeters really.

The problem with after market anything, is you have to manufacture for the average without going over.

It's way easier to do that for something that was made by a machine.
We can test a Bud Jones or a Gemaco chip for thickness and be confident that will be the same for all the chips.

For Paulson Chips:
What is a perfectly smooth transition from label to chip on this chip, can be proud on that one.
What is a no gap fit on one chip, can be a fraction too big on another.

  • The label that's too big, you can't use it at all.
  • The label that's too tall, will catch and peel and cause racking/stacking issues.
  • Even if there isn't a spinner issue, you will feel the edge of the labels, this is a plastic edge cut with a blade.
  • At least if it's shallow, the human fingertip can't tell by how much.

We actively warn against thick laminates on Paulson's because there will be a percentage of chips that the labels will be proud of the space.
We do our measured best to manufacture so 100% of our labels will fit in the space allotted, and last as long as the originals.

@WhiteMamba1646 should be an interesting test case.
Since he is milling, he can control the depth, but unless I am mistaken it's a hand drill press. (albeit wielded by someone with lots of experience)
I am interested to hear how they turn out.
See, this is the kind of knowledge worth paying for. I’m sure there are lots of companies that can print round stickers. But if I’m looking to make poker chips, there’s no doubt that I’d want the services of people who have been specializing in relabeling Paulsons for what, over a decade?
And anybody who thinks I’m sucking up hasn’t been paying attention to me. I hate relabels. But I’m still curious about all things poker chips. And it’s clear to me that you guys know your trade like nobody else.
Finally. We agree. @Wifey is teh best.
 
Wifey is smart.
;)
Smart enough to pick the smartest guy in the room, and listen to his trials and tribulations.
Like any good wife, my memory is long...

specializing in relabeling Paulsons for what, over a decade?
Coming up on 9 years of being in business this November! But he was a chipper long before that...
 
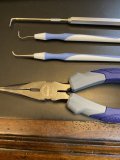
1st, there is no need to make multiple cuts. 1 cut starting about half way between the center of the chip and and the edge of where the inlay is and extending out to the edge of the inlay is all that is needed. 2nd thing is you should have the knife as horizontal (as close as possible to parallel to the face of the chip) as possible

After having a frustrating morning of botched murder, this post from @Nanook resolved most of my struggles.

Naboo’s one cut method saved me.

Starting about 1/8” from the edge, I make an incision only about 1/4” long toward the center.

Using an X-acto, I try to slip the tip of the blade under both the laminate and the vinyl layers.

I then turn the blade slightly while trying to drive it (gently) further under both layers, then lifting.

The goal is to create a small pouch or pocket for the X-acto to lift from. Using only one cut gives more leverage.

One the inlay begins to lift from the chip, I can start to pull from the edge, following the circumference. I keep my lifting finger on the chip so that it doesn’t tear into smaller pieces.

If done right, you can usually (not always) get the whole inlay up with a slow circular pull.

It seems crucial with these vinyl inlays not to separate the two layers. Once the laminate is lifted off on its own, you’re in a world of hurt.

The vinyl on my victim chips was not weighty enough to pull off in large chunks on its own. When connected to the laminate, the full inlay holds together enough to tug against the adhesive without tearing or breaking.

Without the laminate attached, I wound up having to scrape off a lot of medium to tiny pieces of vinyl, bit by bit. This is not only extremeky slow, but results in potentially more damage to the clay. If you can get it off in one piece, the tile savings is huge.

Learning how deep to cut to get through the laminate and vinyl layers without cutting into the clay takes practice; can’t say I’m there yet.
 
Last edited:
After having a frustrating morning of botched murder, this post from @Nanook resolved most of my struggles.

The one cut method saved me.

Starting about 1/8” from the edge, I make an incision only about 1/4” long toward the center.

Using an X-acto, I try to slip the tip of the blade under both the laminate and the vinyl layers.

I then turn the blade slightly while trying to drive it (gently) further under both layers, then lifting.

The goal is to created a small pouch or pocket for the X-acto to lift from. Using only one cut gives more leverage.

One the inlay begins to lift from the chip, I can start to pull from the edge, following the circumference. I keep my lifting finger on the chip so that it doesn’t tear into smaller pieces.

If done right, you can usually (not always) get the whole inlay up with a slow circular pull.

It seems crucial with these vinyl inlays not to separate the two layers. Once the laminate is lifted off on its own, you’re in a world of hurt.

The vinyl on my victim chips was not weighty enough to pull off in large chunks on its own. When connected to the laminate, the full inlay holds together enough to tug against the adhesive without tearing or breaking.

Without the laminate attached, I wound up having to scrape off a lot of medium to tiny pieces of vinyl, bit by bit. This is not only extremeky slow, but results in potentially more damage to the clay. If you can get it off in one piece, the tile savings is huge.

Learning how deep to cut to get through the laminate and vinyl layers without cutting into the clay takes practice; can’t say I’m there yet.
I have long since given up on doing my own label removal and send pretty much everything to @Nanook. But when I was doing it - after I peeled up the label and laminate with the exact knife, I griped them both with a needle nose pliers and rolled the pliers so that they both wrapped around the pliers as they came off. I tried not to pull them off directly away from the chip as that puts a lot of stress on the chip and could cause it to break. I used the red handle blade to pry up the label and laminate - thicker blade works better.
IMG_0708.jpeg
 

Attachments

  • IMG_0710.jpeg
    IMG_0710.jpeg
    128.7 KB · Views: 36
I have long since given up on doing my own label removal and send pretty much everything to @Nanook. But when I was doing it - after I peeled up the label and laminate with the exact knife, I griped them both with a needle nose pliers and rolled the pliers so that they both wrapped around the pliers as they came off. I tried not to pull them off directly away from the chip as that puts a lot of stress on the chip and could cause it to break. I used the red handle blade to pry up the label and laminate - thicker blade works better.
View attachment 1209387

I think we have the same knife set. I tried a bunch from the kit, but went back to the X-Acto. The narrowness of the blade seemed to help get deeper under the vinyl before turning/lifting.

If done successfully I don’t need pliers or tweezers. The inlay lifts enough to be gripped with fingers.

(90% of my IRS were likewise done by Nanook, but I added a few chips to the set recently and didn’t want to wait.)
 
Hey all. I decided to start murdering a few of these greens. I’ve murdered a few racks of RHC in the past and they are pretty easy although time consuming.

These inlays are weird… the plastic top layer is very brittle. It doesn’t hold together to pull off in one piece after the first cut and lift.

Do you ever encounter this? Any advice?

JB
 

Attachments

  • image.jpg
    image.jpg
    190.6 KB · Views: 63
Hey all. I decided to start murdering a few of these greens. I’ve murdered a few racks of RHC in the past and they are pretty easy although time consuming.

These inlays are weird… the plastic top layer is very brittle. It doesn’t hold together to pull off in one piece after the first cut and lift.

Do you ever encounter this? Any advice?

JB
Why are you cutting into the visible portion of the chip? That damage will always show.
Screenshot_20231107-154915_Chrome.jpg


Have you tried applying a solvent like isopropyl alcohol to the exposed space when you clear some of the plastic to see if it will help?
 
These happened when I murdered the worn Lake Ensinore RHC $1s, the plastic would come off in pieces. What I ended up doing was making two cuts to form an X in the center of the inlay, at a sharp angle with an exacto knife. Then I'd use the blade to get under the cut and pry a "corner" of the X up and use a bent needle-nose plier to pry it up. Usually I can get a decent wedge of the inlay to come up, and then I repeat the process 3 more times to get most of the inlay off.
 
Why are you cutting into the visible portion of the chip? That damage will always show.View attachment 1221371

Have you tried applying a solvent like isopropyl alcohol to the exposed space when you clear some of the plastic to see if it will help?
Definitely not trying to do that. These things are sunsofbitches. So hard to keep control of the cut on these for some reason.

I have tried the non acetone nail polish remover in the empty void while I try and keep working, but haven’t tried the iso alcohol.

Has anyone ever gone as far as to put some chemical on the plastic itself without even cutting? Like something to just dissolve or eat up the whole inlay? Is that even possible?
 
These happened when I murdered the worn Lake Ensinore RHC $1s, the plastic would come off in pieces. What I ended up doing was making two cuts to form an X in the center of the inlay, at a sharp angle with an exacto knife. Then I'd use the blade to get under the cut and pry a "corner" of the X up and use a bent needle-nose plier to pry it up. Usually I can get a decent wedge of the inlay to come up, and then I repeat the process 3 more times to get most of the inlay off.
Good idea. I’ll try this as well.
 
Definitely not trying to do that. These things are sunsofbitches. So hard to keep control of the cut on these for some reason.

I have tried the non acetone nail polish remover in the empty void while I try and keep working, but haven’t tried the iso alcohol.

Has anyone ever gone as far as to put some chemical on the plastic itself without even cutting? Like something to just dissolve or eat up the whole inlay? Is that even possible?
I think you need a smaller, sharper blade if you are having that much trouble controlling the cuts. I don't think putting solvent on the plastic itself would do anything other than make the solvent spill onto the chip. My hope is that with some iso down under it, you could pull the label and plastic up at the same time.
 
Another I'll help you post:
I'll give another hint to everyone trying this themselves and I would say this one is the biggest of all: Go slow at first and make sure you like what you are doing before proceeding with a mass murder.

Here is my reasoning:
There are several things that can go wrong with the whole murder thing. I am sure that there are others, but these are the ones that jump to the top of my mind as I am thinking about this. All of the following can be avoided by following my advice of going slow and if you don't like the results just slow down and change your procedure/method of murder or just stop all together and let someone else do it that can do it without damaging the chips (other than the murder part)
a) you might not even like the chips you have chosen to murder & once murdered you can't un-murder.
This one has been discussed quite a bit before, but it a big one and deserves mentioning again. You can murder just a few chips and label them 1st so you are confident that you like the final result before mass murder.
b) Damaging the chips by cutting too deep: (1st pic below)
This was a chip that I did not murder, but is a good example of this. The angle of attack with your knife to the face of the chip is too steep and you wind up cutting too deep. A small nick isn't a big deal and will be covered up by the labels, but a deep cut/gauge will be seen and can be felt through the new label. Hold the knife as parallel to the face of the chip that you can. I almost never cut into the clay at all. When I do it is very shallow.
c) Damaging the chips by NANPR causing discoloration: (2nd pic below)
Different chips react a lot differently to different solvents. In the pic below you can see that the clay material on chip on the left in the area that used to be covered up by the inlay is not discolored, but the one on the right is. These two chips were done with the same NANPR, but as you can see one color gets discolored and the other does not. I am not going to intentionally ruin a chip so I can show you all what that damage looks like on the face of the chip, but I think everyone can imagine that if the discoloration in the middle of the chip on the right was on the face of the chip you would wind up with a really bad looking finished product. Some colors are extremely sensitive to discoloration and others are not very sensitive at all, others are in between somewhere. You are not going to know until you try and I can assure you that if the chips you are murdering are sensitive to discoloration you are going damage at least a few, probably a lot, before you figure out how to murder them without damaging them. Once again, I almost never damage the face of the chip by discoloring it from the solvent because I have figured out how to keep the solvent off the face of the chip.

Moral of the story:
Go slow and make sure you are getting satisfactory results before proceeding with mass murder

 
Last edited:
So I’ve started murdering a couple racks. I’m committed to the relabel—esp with the chips I’m whacking—but I’ve hit a snag I’ve never experienced before.

When I murdered chips previously (namely Flamingos $1s), the vinyl was a *breeze*. The laminate would pop off, bringing up some of the vinyl, and a few drops of NANPR would bring those suckers right up to the surface. With the older Paulson fantasy chips, though, I have “vinyl behaving like paper”. The laminate pops up fine, but the vinyl requires several gos around of “solvent and scrape”.

One thing I did notice, however, is that CDM 5s are REMARKABLY impervious to NANPR. I’ve left puddles of the stuff on the chips for far longer than I care to admit, and no damage from what I can tell
 
......With the older Paulson fantasy chips, though, I have “vinyl behaving like paper”. The laminate pops up fine, but the vinyl requires several gos around of “solvent and scrape”.

One thing I did notice, however, is that CDM 5s are REMARKABLY impervious to NANPR.....
If you look back through this thread, you will see it mentioned several times that not all chips react to all NANPR the same way.

I have now murdered more than 40k chips & have plenty of experience with those older fantasy chips. You are right, they are tough. I've cracked the code though, and now can do them much easier than I could at the beginning. Is all about using the right NANPR for a particular chip and soaking the proper amount of time. There are lots of different NANPR and many don't work well at all with older fantasy THC's.

Experiment a bit with some different NANPR & different soak times. That is the key.

If they are still frustrating you, send em' my way & I'll take care of them for you.

......One thing I did notice, however, is that CDM 5s are REMARKABLY impervious to NANPR. I’ve left puddles of the stuff on the chips for far longer than I care to admit, and no damage from what I can tell
This is another one of those "it depends a lot on the chip and the NANPR being used" situations. Some chips can withstand some NANPR pretty much indefinitely and others will start to melt almost immediately. This is another reason to go slow and just murder 1 or 2 at a time until you have a good NANPR for your chips.

Many chips will soften somewhat with NANPR soak. They will harden back up after drying back out. It only takes an hour or two for them to harden back up, but I just leave them sit out overnight and then come back the next day and do a last one over scrape to make sure all the adhesive is off and there aren't any left over bits of vinyl still on there.
 
Last edited:
Hi,
With the right technique it‘s easy as say hello to remove a label.
Only take care with the polish remover:
Apply with a brush or q-tip both sides.
After 5seconds you have 5-10seconds to remove the label with ease.
Dry quick with a coffee filter and its done!
1min/chip
 

Attachments

  • IMG_5314.jpeg
    IMG_5314.jpeg
    166.3 KB · Views: 55
Yeah - BTP snapper - a pain in the ass with the wrong technique, but it took me only 1min/chip!

Don‘t worry to relabel racks of chips. It‘s just time consuming…
 
Yeah - BTP snapper - a pain in the ass with the wrong technique, but it took me only 1min/chip!

Don‘t worry to relabel racks of chips. It‘s just time consuming…
Try some of the chip room THC roulette solids or PCA 1 secondary and you can get that up to 30 min/chip
 
30min per chip?! Outch!

Maybe they were exposed to high heat?

This is not normal - NANPR solve everything that was glued on whatever…

In a tutorial i saw, the guy let sit the soup for about 20min.
NANPR works best when it‘s liquid, and it vaporizes very fast!
When i let sit for 10-20min. it‘s like i did nothing at all…
It‘s 5sec after the application you‘ve got 5-10 sec to remove the label. Otherwise it sticks again like before.
At least with the product i use…
 

Create an account or login to comment

You must be a member in order to leave a comment

Create account

Create an account and join our community. It's easy!

Log in

Already have an account? Log in here.

Back
Top Bottom