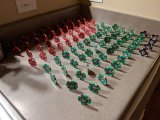
Go Hawks!Weekends on lockdown aren't as fun as regular weekends. Spent the afternoon waiting for the Giants game to come on compression oiling two racks of Key West $1's and edge oiling all of my Paulsons and BCC chips yet to be oiled.
The Jack $5's and $100's, CDI $1's, $100's, and $500's, and Protege $5's, $100's, and $500's benefitted the most from the oil, I think!
View attachment 587834View attachment 587835View attachment 587836View attachment 587837View attachment 587838View attachment 587839View attachment 587840View attachment 587842
-
PCF is an eBay Partner. If you make a purchase through one of our links, we may earn a commission at no extra cost to you. Thank you for your support!
You are using an out of date browser. It may not display this or other websites correctly.
You should upgrade or use an alternative browser.
You should upgrade or use an alternative browser.
Oiling Chips Done Right (6 Viewers)
- Thread starter Stibnite
- Start date
Almost one full year without playing, my CPCs seem to be thirsty for a little oil again.
IMHO, if you don't play regularly with clean hands (I 'm not even thinking about unwashed hands), they need some light oil every two years of total idling.
IMHO, if you don't play regularly with clean hands (I 'm not even thinking about unwashed hands), they need some light oil every two years of total idling.
Ben8257
Royal Flush
- Joined
- May 20, 2019
- Messages
- 11,082
- Reaction score
- 47,795
- Rewards
- 418
- Location
- Finksburg, maryland USA
They look like they are still wet but I see chips laying out to dry to the right. Did you just oil the edges or also the faces? If you did oil the faces did you lay them out to dry 24 hrs and then wipe them down again?Weekends on lockdown aren't as fun as regular weekends. Spent the afternoon waiting for the Giants game to come on compression oiling two racks of Key West $1's and edge oiling all of my Paulsons and BCC chips yet to be oiled.
The Jack $5's and $100's, CDI $1's, $100's, and $500's, and Protege $5's, $100's, and $500's benefitted the most from the oil, I think!
View attachment 587834View attachment 587835View attachment 587836View attachment 587837View attachment 587838View attachment 587839View attachment 587840View attachment 587842
JMC9389
Royal Flush
Yep, I took the photos literally right after I oiled the chips. On the photos with a single denom, the bottom rack is oiled and the top is not.They look like they are still wet but I see chips laying out to dry to the right. Did you just oil the edges or also the faces? If you did oil the faces did you lay them out to dry 24 hrs and then wipe them down again?
I did just the edges for all of the racked chips pictured. No need to do full compression oiling on them, IMO. With the Jack's especially, I was worried about oiling the unlaminated Gear labels on them. Some of the oil from the edges will seep into the main body of the chip. Not entirely worried.
New CPC's are very thirsty and need lots of oil, so I compression oil all of those. With those, I compression oil, wait 24 hours, flip each individual chip over, wait another 24 hours, then wipe down the inlays with the dry end of my oiling cloth to wipe off any excess oil, and then I apply another light coat of oil to the chip edges and rack them up. They're usually dry and ready for play between 12 and 24 hours from edge oiling.
Jeevansluck
Royal Flush
Got new chips...get out the oil...bring them to life.


#mineraloillife
#mineraloillife
TeddyKGB82
Sitting Out
I have a tourney set of the Bluff Canyon china clays that I am really starting to see a lot of chipping around the edges. This is not the kind of rounding off that I think you would see from normal play. It seems a little more like the chip is getting brittle and flaking or breaking of at the edges. I have never oiled these chips. Anyone have any thoughts on whether oiling them would help with this or is it a matter of cheap chips not holding up to use?
TeddyKGB82
Sitting Out
Sorry all. Just want to edit my above question. I did a little digging through other threads and it doesn't look like the Claysmith Bluff Canyon are china clays but just plastic. But I guess my OP question still plays. Does oiling them help?
Jeevansluck
Royal Flush
I had Milanos CC's once. They also did this, but I didn't keep them long enough to find out how badly.I have a tourney set of the Bluff Canyon china clays that I am really starting to see a lot of chipping around the edges. This is not the kind of rounding off that I think you would see from normal play. It seems a little more like the chip is getting brittle and flaking or breaking of at the edges. I have never oiled these chips. Anyone have any thoughts on whether oiling them would help with this or is it a matter of cheap chips not holding up to use?
I've also had a set Desert Palms CC's, and they always left behind some small bits and pieces just from doing pr0n sessions. Again, I didn't keep them long enough.
End of CC journey.
I'm leaning towards...
is it a matter of cheap chips not holding up to use?
- Joined
- Dec 29, 2017
- Messages
- 25,940
- Reaction score
- 35,097
- Rewards
- 0
- Location
- Burnaby (Greater Vancouver), BC
I don't think oiling will help with this issue at all. It's a problem with the manufacturing process and materials itself.
TeddyKGB82
Sitting Out
That's kind of what I was thinking as well. I bought these a while back for tournament games due to my BBC Modern Clay set and denominations not being viable for a tourney. I really don't mind using the Bluff Canyons for tourneys and busting out the Modern Clays for when I get a serious group for cash games. I was just hoping that there was a way to stop the flaking/chipping so I didn't have the replace the Bluffs anytime soon.I don't think oiling will help with this issue at all. It's a problem with the manufacturing process and materials itself.
Poker Zombie
Royal Flush
My original set of ABS customs (circa 2005) have seen some chipping as well. Cheap plastic isn't meant to last a lifetime.
hopetobloom
Pair
Relatively new chipper here, with my 'recipe': After washing in a basin with some dish detergent, I applied mineral oil around the edges with a towel, then I stand the chips up on the countertop, assuming a level countertop is available. It takes a little more patience to balance each chip, but this allows for maximum contact with the air for drying out, I usually like to wait a full 12 hours. I've been pretty happy with the end results!
Attachments
- Joined
- Dec 29, 2017
- Messages
- 25,940
- Reaction score
- 35,097
- Rewards
- 0
- Location
- Burnaby (Greater Vancouver), BC
Relatively new chipper here, with my 'recipe': After washing in a basin with some dish detergent, I applied mineral oil around the edges with a towel, then I stand the chips up on the countertop, assuming a level countertop is available. It takes a little more patience to balance each chip, but this allows for maximum contact with the air for drying out, I usually like to wait a full 12 hours. I've been pretty happy with the end results!
You really don't need to do this. Just place them on a clean bath towel, and flip once after a few hours.
Hahaha, I could just imagine 100 of those on my counter, and then my kid come crashing through the kitchen and they all fall over domino-style! Thanks for sharing! Curious to know if you get any build-up on the bottom from this method.Relatively new chipper here, with my 'recipe': After washing in a basin with some dish detergent, I applied mineral oil around the edges with a towel, then I stand the chips up on the countertop, assuming a level countertop is available. It takes a little more patience to balance each chip, but this allows for maximum contact with the air for drying out, I usually like to wait a full 12 hours. I've been pretty happy with the end results!
Welcome to PCF!
Edit: similar to @allforcharity I don't know if this necessary; I've oiled 1000's of chips without the need to balance them...
Mineral oil doesn't evaporate. So maximum air contact will not do anything. If you have excess oil, just wipe it off.Relatively new chipper here, with my 'recipe': After washing in a basin with some dish detergent, I applied mineral oil around the edges with a towel, then I stand the chips up on the countertop, assuming a level countertop is available. It takes a little more patience to balance each chip, but this allows for maximum contact with the air for drying out, I usually like to wait a full 12 hours. I've been pretty happy with the end results!
That's why I was curious if it would pool at the bottom after a day or two. When I do the edge oiling, I always get a little dot on the sides where it would settle that needs to just be wiped off.Mineral oil doesn't evaporate. So maximum air contact will not do anything. If you have excess oil, just wipe it off.
Yep. Best to just lay the chips flat on paper towels. The paper towels can absorb excess oil on one side. Then when you flip the chips the paper towels can absorb the excess oil from the other side. Balancing the chips on edge seems like gravity would cause the chips to be unevenly oiled.That's why I was curious if it would pool at the bottom after a day or two. When I do the edge oiling, I always get a little dot on the sides where it would settle that needs to just be wiped off.
There's always a sense of satisfaction when I'm done with a rack of chips and I hold up the paper towel to a light and I see all those glorious, oily circlesYep. Best to just lay the chips flat on paper towels. The paper towels can absorb excess oil on one side. Then when you flip the chips the paper towels can absorb the excess oil from the other side. Balancing the chips on edge seems like gravity would cause the chips to be unevenly oiled.
") ... Yes, and paper towel does make a difference for me too. The thicker/plusher towels seem to have more of a well-defined oil ring per-chip.
... Yes, and paper towel does make a difference for me too. The thicker/plusher towels seem to have more of a well-defined oil ring per-chip.dukeshow33
Pair
Worked on mine! ThanksI won't profess to know everything about anything or anything about everything; but what I do know is I often research and test subject matter to the fullest extent possible to find the best results.
Using a combination of advices from numerous poker minds, I set myself up to test oiling of chips in a variety of ways--from wipe n dry, to dip n drip and oil and water dont mix except with chip tricks. Yada yada.
Well, with a number of mixed results, I discovered that most methods left the chips looking great--at first--then left them lacking thereafter (usually within 1-5 days). A number of factors playing--oil type, drying method, application method, etc.
Well, after much testing using just basic Milano China Clays (which aren't supposed to take oil as well as CPC or Paulsons), I believe I have discovered the best way to oil those chips and keep them that way afterward. I named this method: Compression Oiling. A mix of common methods with a touch of my own strategical experimentation and creativity.
Hopefully my step by step tutorial on Compression Oiling will help others who keep having trouble with their oiling, and it seeming like a waste of time. Yes, your oil and chips will dry out--unless you follow the instructions I'm about to present.
Without further delay, let's jump right in!
First, I am assuming by this point you have already removed the factory dust by wiping off your chips with warm water and a little Dawn dishwashing liquid--I used the pink hand lotion version as it helped tone down the clay smell also.
Here is the difference between factory shipped dust-covered chips next to unoiled cleaned chips with 2 oiled chips hiding within.
View attachment 53908
Bear in mind, most of the tests I conducted for oiling made the chips shine for about a day and then they returned to the "clean" matte color on the right. That suggests that most people who oil all their chips collectively probably won't notice the dullness a day later as the chips will still look clean compared to factory dust-covered. Be not deceived. Unless done right, the oil is probably gone a couple days later (as all my tests proved)--you just can't tell without a comparison. There is a significant difference beyond clean chips and clean oiled chips retaining their sheen.
Here is an example of clean chips next to oiled chips done right and still holding their shine nearly a week later and showing no signs of fading.
View attachment 53909
So, what do you need to get started after cleaning your chips?
You need a microfiber cloth, pure mineral oil (fragrance free), and chips! A flat surface covered with plain colorless paper towels is essential.
View attachment 53910
Some will agrue here and say to use a shoe polish applicator or water/oil dip, etc. for speed and ease. To each their own. I tried every method I could find and none of them worked better than what I am going to share, so more on that further in. Meanwhile, I will point out that if you want something done right the first time, and not having to do it over, then effort and time is required to make it so.
A wise man once told me, "Adam, how come there is never enough time to first do something right, but there is always enough time to do it over?"
Let's do this right, folks!
First thing I am going to tell you is the oil does not hurt your adhesive stickers on Milanos. I can't speak for other chip stickers or inlays yet (I'd be cautious if the sticker is paper made), but to test, I left a Milano chip submerged in oil for a week and there is no discoloration of the plastic label or loosening of its adhesive seal. Myth busted.
Next, oil can be a little liberal if you're using microfiber cloth. I start by filling the oil cap and then massaging it into the cloth to form an oil spread 3 times the chip size. Do not use the baby oil--it is filled with evaporative agents. Do not use wax--it is petroleum-based. Use pure mineral oil. Walgreens has an excellent version shown above.
View attachment 53911
View attachment 53912
The next step is something you wont read anywhere, and I had to learn it the hard way. I think it is the single most critical reason why everyone's oil keeps drying out. I will quickly trademark this rule as mine. We will call it the "Stibnite Seal n Shine©", all rights reserved 2016.
Working with polymers, seals, impregnators, densifiers, urethanes and other forms of coverants in my business, I am highly experienced when it comes to sealing off the microscopic pores of surfaces. One thing is for sure--in order to seal something with non-water based substances like oil, it requires compression. Wooden cutting boards, for example, must be press-oiled 2-5 times before they are sealed tight and ready to use.
In layman's terms, that means if you want this china clay chip sealed right with oil, then you must add pressure to seal and lock it in. Sorry shoe polish applicators and oil-water dips--your oiling method won't stand the test of time on China Clays. Plus, water/oil mixtures apply unevenly and leave a splotchy appearance on the chip faces. That said, however, because the higher end clays are more porous, those methods are more effective overall than they are on china clays, but compression oiling WILL still be far better and provide a uniform and lasting covering and seal.
What is compression oiling? Well, it is quite simple. It means you add pressure while oiling. Using one hand, hold the oiled microfiber cloth with three fingers and using the other hand, spin a single chip between your thumb, index and middle finger firmly--applying surrounding pressure to both faces and edge at the same time. You WILL feel the chalky substance peeling off (yes, AFTER having washed the chips already), and once the edge feels smoothened from both pressure and oil, it is done. Set it on the paper towel.
View attachment 53913
View attachment 53914
View attachment 53915
View attachment 53916
Now, you've done this rack of 100 chips and the hard part is next. You must wait 24-48 hours. Air drying is the only way to let these seal and cure. Do NOT disturb them during the air dry process.
Now, to show you why compression is important during oiling, take a look at how much rough surface came off onto the microfiber rag during compression oiling AFTER these chips had been soap washed and dryed from the factory dust.
View attachment 53917
Compression oiling smoothens the surface and edges and forces the oil deep into the pores of the clay that oil layering or dipping cannot achieve. It also makes them much better for shuffling, etc.
The next step is another factor you wont see in the instruction manuals of chip oiling. If you use plastic trays, then you should know that they, too, are porous microscopically. Yes, get that rag out and oil the inside of your trays also, and let them air dry for 1-2 days along side of your chips. You'll be glad you did, as the charge from the plastic can withdraw active oils from within the clay. Oops! Who'd thought their plastic trays were drying out their chips? Just seal them the same way.
View attachment 53918
Now, after waiting a day or two, your anticipation is getting the best of you. Time to get those chips off of the paper towels and dry off the adhesive sticker. Do not wipe the edge and face of chips dry with the microfiber towel as this just needlessly dulls the chip and sucks out the oil--defeating the whole purpose for air drying. Just grab the chip and quickly swipe the sticker dry and clean only. I hold the chip on the edges and make a small central swirling motion with a pinch of the thumb and index finger to clean the sticker on both sides, and done. Then start putting your chips in stacks of 10. The oil should be properly air dried by this point anyhow. The oil on the sticker, however, will still be moist enough to wipe away since the sticker on Milanos is non-porous.
View attachment 53919
View attachment 53920
Adhesive sticker is clean and intact!
Now, you have many oiled chips in stacks of 10 sitting there. Grab a stack and place it on your oiled microfiber cloth within your hand. Hold them evenly and firmly in place and roll the edges only--avoiding faces and stickers. The edges are far more porous and truly require this second coat, but the second coat does not require compression. During this step I did not re-oil the rag, but used the leftover, nearly dried oil from the day prior. No need to make this coating heavier than a simple brisk.
View attachment 53921
Now, place the chip stacks right into the rack, as is, to air dry for another 12-24 hours. After air drying, take them out one last time and there will be a line of settlement oil that didn't absorb left on two sides of the chips where the rack made contact on the edges. Just use your fingers and wipe it away or massage it into the chip. Do not wipe them off with the microfiber. The trace amount is so insignificant that your skin will absorb it even if you just bust them out and play them at this point.
View attachment 53922
View attachment 53923
Congratulations. Your chips are ready to play. Place them back into the racks and call your friends and enemies over.
After nearly a week, you can see clearly that these chips are holding their shine both in play and out of play.
View attachment 53924
Unplayed compression oiled reds 6 days old next to clean unoiled reds.
View attachment 53925
Oiled blacks oiled and played for 6 days and holding their shine without any signs of wear.
In conclusion, Compression Oiling is the way to go in my book. I am currently applying this method to the 1000 lot and looking forward to the difference it makes to these Milanos.
I hope you found this information and guide helpful to your oiling process.
Oiling Chips Done Right!
Update: September 5, 2016 (Two week mark)
After two weeks of rigorous play, these racks which were finished back on the 21st of August still look amazing. No chips have dried out or lost sheen. I used a more natural lighting and opposing background to capture the real look so they don't appear "too" shiney.
View attachment 54836
View attachment 54837
View attachment 54842
View attachment 54843
Also, the shuffling ability of these chips after proper oiling is pretty solid. I can smack two stacks of 20 with both hands at the same time. I can't achieve this with most casino chips consistently.
View attachment 54844
hopetobloom
Pair
Thanks for setting me straight @Himewad ! I totally didn't think about it but totally makes sense -- after 12 hours there's a small pool of oil under each chip, so nothing actually evaporated, gravity just pulled it off  Did I say I was a newb? I'll say it again
  and yes not a big deal, but the edge needs to be wiped off where it pools!
Did I say I was a newb? I'll say it again and yes not a big deal, but the edge needs to be wiped off where it pools!dmoney
Full House
FordPickup92
Royal Flush
You'll get used to if after awhileFirst oiling. I sure hope this is one of those times where doing it right hurts... because my fingers are sore.
View attachment 623431
Luckless
")
Did these yesterday. A couple things were different compared to my other CPC sets (blanks).
Much more clay dust compared to my blank sets, and the chips took more oil than I expected.


Much more clay dust compared to my blank sets, and the chips took more oil than I expected.
Poker Zombie
Royal Flush
I still maintain if your fingers hurt, you listened to the idiot from the OP.
You do NOT need to press the oil into the chip. Casino chips get "oiled" by players handling the chips, and oiling the chip simulates hours upon hours of handling.
This is the worst titled thread in all of PCF. It should be "I'm an idiot that oiled chips until my fingers bled - I want you to be as stupid as I am".
I've oiled thousands of chips. I've never "pressed" the oil into a chip.
CRAW
Two Pair
A decent "rub" of the oil into the chip w/ a micro-fiber rag is necessary though, or at least it helped my china clays.
Jeevansluck
Royal Flush
I haven't reached thousands....yet!I've oiled thousands of chips. I've never "pressed" the oil into a chip.
But I have done hundreds upon hundreds. No hurt fingers..
Mostly when I do alot of oiling...I get drunk from the beer I drink along with it and can't get through.
I've also never done the "compression" thing. I just slap the oil on, give it time to seep into the pores of the chips, wipe excess, repeat. Very simple.
after 10 years of chipping i won't oil MINT chips anymore.
faded chips or cleaned chips ok but not for minties
if you don't play with them the color pop effect disappears in two years...
if you play with them they are naturally oiled by hands of the players... so ...
faded chips or cleaned chips ok but not for minties
if you don't play with them the color pop effect disappears in two years...
if you play with them they are naturally oiled by hands of the players... so ...
Jeevansluck
Royal Flush
To each their own. There is no real way to quantify right and wrong, or too little or too much. Preference is a big part of it.after 10 years of chipping i won't oil MINT chips anymore.
faded chips or cleaned chips ok but not for minties
if you don't play with them the color pop effect disappears in two years...
if you play with them they are naturally oiled by hands of the players... so ...
However, I can't receive chips like this, and not clean them or oil them.
These HSI $25S are dead mint but there is no way they hit my felt with the brown crap dust all over them.
Just one example, but I had to oil the works.
Even the $5s were bad. Left little pieces of dirt in my hand if they werent cleaned.
Got new chips...get out the oil...bring them to life.
View attachment 598909
View attachment 598912View attachment 598915
View attachment 598917
#mineraloillife
those HSI $5 secondaries speak to me so much. gorgeous chips.
Similar threads
- Replies
- 6
- Views
- 560
- Replies
- 44
- Views
- 5K