Concurrent Builds; The College Table and The Ellipse (1 Viewer)

Well, she’s done. The Black Hole is in the room. And with almost a Hole week to spare (see what I did there).

I’m pretty pleased. Game 100 in the chamber. There will be pics.

I made a ton of mental notes on this build, a solo build from start to finish. Maybe that’s not a big deal but some folks seem to over imply that building a table is rocket science. It’s not like falling off a log but folks, if you need a table and aren’t dangerous with say a jigsaw, do the homework and build it yourself. There’s nothing like people sitting around something you built taking all your chips. At least you’ll have the table to fall back on.

Good luck kids. Next build starts March 31st. I’m told it’s going to be spectacular.

Ken (merkong)
Owner/Operator/Founder
*The Godfather Club MN (The Venue)
*The Executive Game, Eagan MN (Current)
*Frogtown Card Club, St. Paul (Retired)
*The Poker Family (Our Philosophy)

Making her first ever appearance in the card room at The Godfather Club, MN and going into service for the first time ever at historic Game 100 (in 18 months) at The Executive Game…. The Chairman is proud to present to you, a self built wonder known as a Super Ellipse… **The Black Hole**

“The only thing deeper than The Black Hole is your chipstack.
IMG_6101.jpeg
 
Alright Forum. After a kind of recovery from my travels and a Friday after work nap it’s rail time.
First off I still had to finish stapling the outer aspect of the rail. No matter what you do there’s going to be some creases. I wound up pulling some staples and do more pulling and stapling. I did like the end result.
View attachment 1284720

Stapled up. Let the trimming begin.
View attachment 1284721

More trimming and more staples as far as the eyes can see.
View attachment 1284722

After a ton of stapling and being on a re-stapling detail for crease control I gave her a flip.
View attachment 1284723

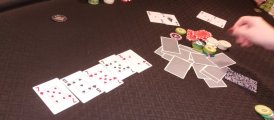
X marks the spot. Finding the spacers at each spot I cut the proverbial X with my utility knife and gently pushed the drink holder into the Captain’s spot to start this process.
View attachment 1284724

Before I knew it I had the drink holders in place. Let’s play.
View attachment 1284725

I’m pretty pleased.
View attachment 1284726

I’ll say this, the inside aspect of the rail was a real pig. My hands are sore but she’s done. Two nights and about 5 hours total. And remember this; never let perfect get in the way of really good.

Tomorrow we have some record warmth up here in Minnesota so the table goes into the driveway and I’ll do spray glue and table pad, spray glue and speed cloth and staples galore. The under the rail LED exactly like the one on my oval will be here in the morning according to Amazon so that will be installed.

If this becomes my main table I’ll move the 10 USB ports over the Super Ellipse “The Black Hole.”

It’s been a great project and I’ve used no outside help at all. This has been a solo mission. More to come.

Yay me.

Ken (merkong)
Owner/Operator/Founder
*The Godfather Club MN (The Venue)
*The Executive Game, Eagan MN (Current)
*Frogtown Card Club, St. Paul (Retired)
*The Poker Family (Our Philosophy)
The interior aspect is the worst!! When I have arthritis later in life, I will curse the interior aspect of poker table builds and nothing else.

*Complaining out of the way*

This table is dead sexy!! This build has me sold on the super ellipse 100%. I'll be bookmarking for reference later.

I'll be interested to see how you feel about the spacing of the cup holders after a few sessions
 
Good question on the spacing. I stood over the table for a good hour before I decided to mark it up and go for it. I could have added an inch or so between the center spots and ones to the left and right but it’s so deceiving about how bad you’re pinching those end seats.

I have another ellipse starting at the end of the month so maybe they’ll be a tweak.
 
The interior aspect is the worst!! When I have arthritis later in life, I will curse the interior aspect of poker table builds and nothing else.

*Complaining out of the way*

This table is dead sexy!! This build has me sold on the super ellipse 100%. I'll be bookmarking for reference later.

I'll be interested to see how you feel about the spacing of the cup holders after a few sessions
Good question on the spacing. I stood over the table for a good hour before I decided to mark it up and go for it. I could have added an inch or so between the center spots and ones to the left and right but it’s so deceiving about how bad you’re pinching those end seats.

I have another ellipse starting at the end of the month so maybe they’ll be a tweak.
 
With Game 100 at TGC in the books I’ve survived the two table cash game celebrating this impressive achievement.

Now for the news. I’ve decided to go back to my roots despite a few threads on the subject trying to get me to overthink it.

The racetrack table.

I’ve wanted to build one for awhile as it’s probably the only style I haven’t actually built. Here’s what I decided to do.

I love the betting line and our red oval has one. The speed cloth I have on that table came from Casino Supply and I just don’t feel it’s superior to suited speed cloth in any way. It looks like hell after a session with marks everywhere from fingernails and chips sliding around and there are two spots where the same players had resided for a long time, the banker and the gunbearer (my shuffle guy) that took on pronounced wear.

So a racetrack it is. But what I’ll do is simply rebuild the playing surface and drop the rail from the red oval onto it. I’ll pull the rail and trace the exact dimension onto my plywood. Then I’ll drop the rail onto the new new oak plywood so I can approximate where different width racetracks look and likely feel. You want to be able to have your cards on the speed cloth and be able to check them etc while having your forearms resting comfortably and naturally on the rail. I’ve owned 3 racetracks dating all the way back to The Frogtown Card Club (RIP) and that has always been the case with those tables and they played wonderfully. We always asked that players keep their chips at the edge where the track and speed cloth meet, out of their way so the dedicated dealer has a target when pitching hands.

Once the plywood is marked I’ll cut the “infield” where all the pots and flops etc reside, repurpose table foam from the oval and speed cloth it. This way I can begin the process of doing a slight adjustment to the underside of the plywood to ensure the exact level transfer of height between the track and the infield, accounting for the table foam and cloth.

At that point it’s to get to finishing the racetrack with 6-7 coats of polyurethane (I have some research to do) sanding between coats as prescribed after 100% thorough drying. We’ll do this in the 20x20 shed at the bankers recently purchased house (my son in law) three minutes from us here at TGC. Then we’ll pull all the electrical from the bottom of the old basement level of the oval (the power source for the 10 USB’s and rail light, the USB router) and the legs and prepare for assembly once the work on the track is finished. I already have enough red two tone suited speed cloth for the project since I had bought it for a build I did for The Red Light Game, our sons game at college. I went a different route.

Pics when the process begins.

Oh, the ellipse played great last night but I decided I’m an oval guy.

So, I listed it on CL and FB. We’ll see how it goes.

Ken (merkong)
Owner/Operator/Founder
*The Godfather Club MN (The Venue)
*The Executive Game, Eagan MN (Current)
*Frogtown Card Club, St. Paul (Retired)
*The Poker Family (Our Philosophy)

https://minneapolis.craigslist.org/dak/tag/d/saint-paul-poker-gaming-table-table/7725550904.html
 
The Black Hole Ellipse has been rehomed so you know what that means…

Build another table.

I’m building a standard 8 foot oval w/ brass in rail drink holders and an LED underrail light.

I’ll be tracking how many hours all told the build takes. The table should be in “bare naked lady” mode, as in ready for hardware, later today. I’ll place the order for parts later tonight and will finish the table this week.

Wish me well.

A table is born.
IMG_6141.jpeg
 
Last edited:
Cold as hell up here in MN. Mostly the wind I’m sure because it’s 43 degees. I keep stepping into the house to warm up.

Almost done with the outer cuts to my 3 sheets of plywood. After drawing my arc in one corner, I’ll cut it and use that scrap as a template for all other corners. The more you know people.

After the last board is cut, I’ll build the jigs to cut inner diameters on the three boards to 4,5, and 6” (after warning up) and start screwing this thing together.

IMG_6142.jpeg
IMG_6143.jpeg

IMG_6144.jpeg
 
Alright folks. Stayed busy today with getting this build going. The ellipse was a fun build but I tabled it (no pun) for a couple of months over the holidays. As previously mentioned, I rehomed her Thursday night. Bittersweet but I told the guy “Now it looks like I have the second nicest table in town.”

So, I have 3 oval pieces of plywood. Let’s play! Ok, calm down Skip. Time to make three long pain in the butt cuts to build the rail. I need an inner diameter of 4”, 5”, and 6” out of these three pieces. The 4” ID will be the bottom of the rail sitting next to the “basement” which is the playing surface. Ironically, this 4” ID piece living next to the “basement” are well-acquainted; same oval just making that cut. These now two pieces will get the routing I’ll mention later so they more easily get together. The 5” ID will be the “middle layer” and the exposed surface is where the LED gets mounted. The 6” ID will be the “top floor” of the rail and create the “overhang” atop the LED. Let’s get to cutting.

Wait! I need lines. I built a jig for use when I built the ellipse and was getting ready to replicate that engineering wonder but I thought; “Come one, you know your policy on perfection, we neither strive for it nor ever come close.” I grabbed my T-square, marked it at 4” and dragged a sharpie behind it while edging the outside of the basement. Sounds dirty… Here’s the now infamous T-square and the line she helped me draw.
IMG_6146.jpeg


IMG_6151.jpeg


Seemed to do a fine job and I replicated it again and again for the 5” and 6” lines. I ran the jigsaw in 36 degree, hurricane wind weather with a blade that will be changed before my next build and the next thing you know, I have parts. Brutal but it’s poker related so I’m cool. Actually, I was cold but I digress. Here’s my stack after I was though.

IMG_6155.jpeg


So, I stacked everything and patted myself on the back. Not counting drive time to pick up lumber and the multitudinous warm up breaks (the winter we had here in MN wasn’t a winter and seemingly made me into a bit of a baby) I have about 4 hours into this yet to be named oval. Plus cutting took a bit longer with my average blade. Tomorrow I’ll run the router on the OD of the basement and the ID of it’s matching basement portion of the rail. I mean really run it. If you don’t you’ll be running it after all the hardware is installed. If you don’t the rail will not go on after cloth.

After routing, I’ll decide about a sub-basement for the legs. It’s not essential as the legs will go fine on the underside of the basement and all it really does is add 30# to the finished table. *Edit* No sub-basement. I realized that my original oval I assisted with has a sub-basement annd ironically enough, I also had to take “1 off of the legs later on because the table was just a little too high. No sub- basement kids.

After legs I’ll screw the rail together and use some black spray paint to where the LED will be attached. After the paint dries I’ll screw the rail to the table and haul it inside until hardware arrives this week. I put all the tools away and hauled the parts into the garage. Time to snack, shower and hit the rack. I’ll pick up some screws tomorrow and will be further deliberating my solution to building spacers for the drink holders. Spacers take time to build and even my solution takes time it’s just easier and takes less time. Here’s to the new oval, my 8th build being safe and sound.

IMG_6156.jpeg
 
Last edited:
Up and at it already on this cold Sunday in MN. After an errand or two I’ll install the legs on Unnamed Oval.

Following that frigid mission I’ll make the 3 minute drive to Home Depot run for a box of screws and put the rail together.

Stay tuned.

Ken (merkong)
Owner/Operator/Founder
*The Godfather Club MN (The Venue)
*The Executive Game, MN (Current Game)
*Frogtown Card Club, St. Paul (Retired)
*The Poker Family (Our Philosophy)
*Founder - Bankroll Builders Poker Tables
 
Ok, still cold as not hell up in MN but I continued onward and upward. I screwed the basement layer and the meat layer of the rail together after using the router on the two portions of the basement of the table and the rail where they will come into contact. If you don’t or at least give yourself some space before upholstery you’re hosed and will be routing that rail anyhow. The two bottom layers of the rail fit like a glove.

I guessed where the drink holders would go when I sunk maybe a dozen screws just to keep these two pieces together but decided to mark where that hardware will go before I sunk more screws. Worst case scenario is cutting the holes for the holders and hitting a screw.

IMG_6160.jpeg


So I measured for placement and used an old spacer I built to draw my spots for the holders. No screws to back out. I know about where the cuts will be made. So from the center spots to each one on either side the holders are 24” apart on center. From those two spots to the ones in the “corners” is 21” on center and the space between the two corner players is also 21” on center. Such a wide open and comfortable design. Since we’re a dedicated deal game it’s essential that we do 3 spots on the run and two in the “corners”. This is the only design I endorse and the corner players have as much if not more space that the players on the straightaway because they’re sort of pitched at an angle.

I’ll finish punching in screws, mark the center of each drink holder on the side of the rail and drop the “ceiling” piece on. More screws. I’ll probably just go ahead and mark the actual spots for the holders on the ceiling after that. One thing I remembered at the last moment on the ellipse is not to center the holder on the rail or else my hole would have cut into the face of the middle layer where the light is attached. I’m smart but it was a last second catch.

IMG_6162.jpeg


If I’m feeling motivated to pull out the hole saw and get covered in sawdust, I’ll cut the holes. We’ll see.

Again, and so important, if what you’re doing will be covered by anything then give yourself all the slack in the world. It won’t be visible and there is almost zero chance you’d be able to feel any sort of undulation.

Good luck.

Ken (merkong)
Owner/Operator/Founder
*The Godfather Club MN (The Venue)
*The Executive Game, MN (Current Game)
*Frogtown Card Club, St. Paul (Retired)
*The Poker Family (Our Philosophy)
*Founder - Bankroll Builders Poker Tables
 
Watching a little NCAA Big Ten Championship since it’s here in Minneapolis. Just ordered the hardware for the table. I use Casino Supply out of Dallas. They pack it quick and it’s free shipping. It’ll be here in time to finish the table this coming Saturday.

Ken (merkong)
Owner/Operator/Founder
*The Godfather Club MN (The Venue)
*The Executive Game, MN (Current Game)
*Frogtown Card Club, St. Paul (Retired)
*The Poker Family (Our Philosophy)
*Founder - Bankroll Builders Poker Tables
 
Alrighty, I took it as far I decided to today. In the absence of pseudo winter weather I would have cut the holes for the drink holders today even though they say not to cut them before your drink holders arrive. I just did this a little over a week ago, same saw same holders.

So…
IMG_6171.jpeg


Hmmm…
IMG_6170.jpeg


Ooo…
IMG_6168.jpeg


Ahh…
IMG_6169.jpeg


Swapped out the rubber feet and parked her in the garage. Now nothing to do but start tracking my packages. All told, about 10 hours in so far and $500. Because Amazon is crazy fast, I’ll order the LED tomorrow.

Be good.

Ken (merkong)
Owner/Operator/Founder
*The Godfather Club MN (The Venue)
*The Executive Game, MN (Current Game)
*Frogtown Card Club, St. Paul (Retired)
*The Poker Family (Our Philosophy)
*Founder - Bankroll Builders Poker Tables
 
Ok… the parts for the oval are arriving tomorrow. Also arriving this week winter weather up here in Minnesota. So it was essential that I got all the sawdust type work done tonight and in the driveway. Let’s get started..

I ran the router around the top edges inside and out of the rail. it’s not essential because you won’t be able to feel that squared off edge after the foam and vinyl go on but it makes pulling the foam a little easier.
IMG_6177.jpeg


Time to cut the holes for the drink holders. I got the spaces marked and got started.
IMG_6178.jpeg


Let’s play!
IMG_6179.jpeg


All in.
I’ve been using hearing protection for a while it’s so nice. It’s been windy up here in Minnesota and I got tired of getting all that sawdust in my eyes. I found these goggles at work in my office and they worked great.
IMG_6181.jpeg


Time to make the donuts. Actually it’s time to build the spacers. I used pine this time with the spacers. The plywood being a layered wood had a higher failure rate as far as a perfect spacer went. My thoughts with the pine were spot on. I will say though that this is the most time-consuming aspect of the table aside from stapling maybe. The issue also is that you will fail a few spacers. You can’t build a table with drink holders without spacers or you’re doing it wrong. so I have a 4 inch and a 3 1/2 inch hole. Cut the 4 inch screw it to the board cut the 3 1/2 inch. And that’s how you build a spacer out of wood. I will be trying a PVC spacer for my next table. I’ll build a jig and cut them at 1 inch apiece. I’ll keep you posted.
IMG_6182.jpeg


We have spacers. Obviously I needed 10. Of the first 10 that I cut two failed. So I cut four more and one of those failed. Another strong argument for the PVC experiment.
IMG_6183.jpeg


Spacers.
IMG_6184.jpeg


I brought the table inside the garage and set it up.
IMG_6185.jpeg


Even though it was in the garage, I decided to hit it quick with some spray paint. The area that I painted of the rail under the overhang is where the LED will go. I don’t want any plain plywood showing through.
IMG_6188.jpeg


You failed me.
IMG_6190.jpeg


Spacers glued in place. It’s a little tenuous working the foam with the spacers glued in place but it is doable. I’ll pull the rail and drop a piece of half inch plywood on the table as a workstation. I will roll out the foam, put the rail on the foam, top side down and begin marking my cuts for the edges. I don’t glue the foam at all. I will flip the rail, drape the foam over it and begin cutting for my spacers. We’ve seen pictures like that before.
IMG_6191.jpeg


Time to eat and hit the rack. My shipment from casino supply will be here tomorrow and we’ll get back at it.

Good night folks.
 

Attachments

  • IMG_6191.jpeg
    IMG_6191.jpeg
    171 KB · Views: 10
Well, I’m sure the dogs were cheering through the front window when the UPS person showed up and now we know what tonight involves.

IMG_6192.jpeg


The goal is to have a completed rail at bedtime. If I’m feeling it I could conceivably cut the table foam and cloth but we’ll see. The table should be finished Saturday afternoon. There is a buyer in the cue. Once out the door I will instantly pay off my silent partner for the parts (wife) and reborrow funds for table 9 in my career and 7th since Godfather Club opened. I’m excited to try a few hacks and tweaks. Also, during my downtime between patients at work, I am working on the instructions on how to build Model 3-456.

Wife, myself, and son Zack, the Lewis Flyer and owner of The Red Light Game in Chicagoland, and his girlfriend are planning a trip to Bozeman, MT to visit his HS best friend who is starting a game so I can build him a table. Billy the Kid will have one of the nicest tables in Bozeman, a custom job courtesy of Bankroll Builders.
 
Last edited:
Got to work on the oval tonight and got all the way through replacing some staples and pounding in the ones I choose not to on the rail. I’ll snap some pics in the morning and update the post.

Foam!
IMG_6193.jpeg


We have a cup holder
IMG_6194.jpeg


Now we have 10 spots
IMG_6197.jpeg


More cutting to the foam
IMG_6198.jpeg


I don’t spray glue my foam typically but had to move the rail and didn’t want the foam popping off.
IMG_6199.jpeg


Spread out the vinyl. Ugh.
IMG_6200.jpeg


All smooth. Time to grab the rail.
IMG_6201.jpeg


Rail, check. Stapler, check. Vale, check.
IMG_6202.jpeg


So the rail is nearly finished. It’s covered in vinyl and after replacing some staples (damn stapler) and pounding the rest it’ll be time to do the table pad and clothzx

Good night everyone.
 
I kind of peed down my leg on the pictures, but decided to finish the table today so the last picture was pre-vinyl. Since then, I’ve taken it up a notch. The rail is done. I moved it down into the Poker Room out-of-the-way in the workshop. I’ll put the light on down here. Next up foam and speed cloth and then it’s done. I have somebody lined up to look at it but we’ll go from there before I start number nine enjoy.

IMG_6202.jpeg
IMG_6203.jpeg
IMG_6204.jpeg
IMG_6205.jpeg
IMG_6206.jpeg
IMG_6207.jpeg
 
Turf time.
IMG_6208.jpeg


The First Cut is the Deepest - Rod Stewart
IMG_6209.jpeg


Sit. Stay…
IMG_6211.jpeg


Just a little off the top.
IMG_6212.jpeg


Ensconced in speed cloth.
IMG_6215.jpeg


The First Cut is… You get it.
IMG_6216.jpeg


Sit. Stay…
IMG_6217.jpeg


I said stay!
IMG_6218.jpeg


A little clean up.
IMG_6219.jpeg


I just spray painted the legs and while that cures I’ll install the LED.

Finish line awaiteth.
 
So here’s today’s adventure.

My life; On the Rail
IMG_6307.jpeg


Holy Smokes!
IMG_6312.jpeg


All leaf blowed.
IMG_6313.jpeg


After building spacers (I effing hate it) they’re all glued in place.

Tomorrow is pad, cloth, vinyl, drink holder, and rail light day.

I have red suited speed cloth with gold brushed aluminum drink holders and green suited speed cloth with brushed silver aluminum holders. Which one first?

That’ll be a wrap.
IMG_6315.jpeg
 

Attachments

  • IMG_6308.jpeg
    IMG_6308.jpeg
    231.2 KB · Views: 4

Create an account or login to comment

You must be a member in order to leave a comment

Create account

Create an account and join our community. It's easy!

Log in

Already have an account? Log in here.

Back
Top Bottom