5V LED
________
Thanks to
@greedyintern,
@RadicusScout,
@dmoney, and others for the great cupholder and LED mod instructions.
https://www.pokerchipforum.com/threads/barrington-poker-table-thread.30910/post-2352520
https://www.pokerchipforum.com/threads/barrington-poker-table-thread.30910/post-2405037
Just finished mine and it turned out great thanks to those detailed instructions.
For the COB LED lights, I did make a minor change which I haven’t seen posted. In case anyone’s interested:
The earlier LED lights are 12V, as are the dimmer and power bank. I instead used a 5V LED strip and dimmer. I wanted 5V so I could use a standard power bank, like the kind to charge a cell phone. It didn’t appeal to me to have a dedicated 12V power bank just for the table….I don’t have any other devices needing the 12V and I already have multiple 5V power banks.
It turns out Amazon has many 5V LED cob strips to choose at very low price. In fact, they typically have a standard USB-A plug already attached to the strip. If you plug it into a standard 5V power bank, it works! It’s too bright of course, so a dimmer is needed. Many have a basic dimmer also built-in to that USB plug, making a very low cost solution. I tried it, and it works, though only providing 6 discrete steps of dimming from about 100% down to about 25%. I chose a 5v strip with just the plain USB plug (no dimmer) and added a separate 5V dimmer which allows continuous dimming from 100% down to 0% (off), so I can use it at about the 15-20% setting which I prefer for my eye comfort.
The 5V strip I used was 3 meters long, enough for half the table with about 20” extra. So I bought two (about $10 each). There is one available 5 meters long, but that is barely long enough, or maybe a hair short. Buying two pieces also means I get two USB plugs and don’t have to add COB strip connectors.
5V COB LED lights
5V Dimmer
Male USB plug to bare wire cable
Female USB plug to bare wire cable (Optional. Delete if willing to cut and strip wiring)
Pictures:
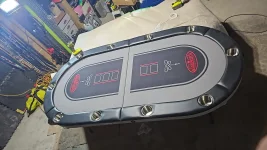
Finished table:
View attachment 1586828
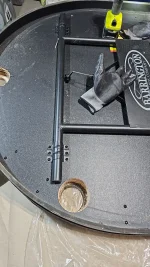
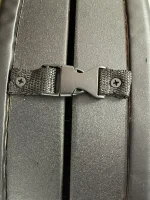
Final mounted dimmer hardware:
View attachment 1586829
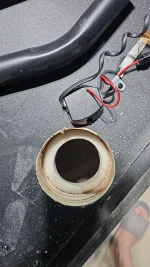
Hardware in testing mode: This is where I used the optional Female-USB-plug-to-bare-wire cable for convenience. This cable can be skipped if you simply cut the end of the LED strip near the strip’s USB plug, strip the wires, and mount them directly to the dimmer. I did that in the picture above (final mounting):
View attachment 1586830
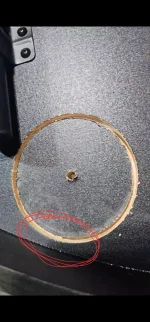
Comparison of original Barrington LED lights to the 5V cob strip light. The latter is much more densely packed like the 12V LED’s. FYI, the 12V LED’s density is 480 LED’s per meter, the ones used by
@greedyintern. The 5V LED density is less at 400 LED/M. It looks fine to me. If I dim it way down I can see individual LED’s similar to
@greedyintern described also for the 12V LED’s. When lit, it looks good and fairly defused to me.
View attachment 1586831
Most of the 5V LED’s on Amazon are actually even lower density, 320 LED/meter. Here’s a comparison of 320 LED/M (left) to 400 LED/M (right). Both are 5V LEDs. Also the left side is a 8mm strip (like
@greedyintern 12V 480 LED/meter strip), while the right side is 5mm I used. The right strip is powered at minimum setting ~ 10% so it looks very faint, while the left strip is at about 25% (min setting of its built-in cheap dimmer). You can see the discrete LED’s of both by zooming-in. 400 LED/M strips were harder to find, which is why I used the 5mm strip. Both look good to me when lit up, especially compared to the original Barrington LEDs.
View attachment 1586832
I took some current measurements at different dimmers setting with an inserted ammeter. The full 3 meter length was measured. I cut about 20” off from each strip for actual install, so actual game night current usage will be proportionally lower than in this table below. For the 400 LED/M strip I measured both/two strips while connected in parallel so I could verify the power bank would be sufficient. All readings are current in Amperes:
| 100% | 85% | 75% | 50% | 25% | 0% |
| Two 5V LED strip with 400 LED/m, 5mm | 3.11 A | | 1.97 A | 1.32 A | 0.75 A | 0 |
| One 5V LED strip with 320 LED/m, 8mm | 1.27 A | 1.09 A | | 0.84 A | 0.12 A | |
From row 1, the required power bank needed can be calculated by: Capacity = Current x Time.
E.g., at 50% dimmer setting, Capacity = 1,320mA x 1 hr = 1320 mAH rated power bank needed for each 1hr of run time. My 10,000mAH USB power bank is more than enough, especially since I’ll be running closer to the 20% dimmer setting and can get close to 13hrs of run time. I verified this, left the lights on for 9 hours at 20%, and the power bank was still 50% full (based on its indicator lights).
Here’s the 5V LED with 320 LED/m, 8mm with a built-in dimmer and USB plug.