Poker Table....should I do it myself.... (3 Viewers)

Marhault

Full House
Supporter
Joined
Jan 15, 2015
Messages
3,572
Reaction score
6,759
Location
Marion, Illinois
I know this has been asked a lot lately but my wait on the list for a chanman table has me thinking once again of trying to do my own table. The hard part is I'm not very handy at all when it comes to woodworking. That and my tool collection is probably pretty lacking as well. So I wondered if anyone had some insight on costs to not only buy materials (more recent costs hopefully) but possibly all/most of the tools needed to build it.

Budget isn't an issue... however if I could save some money that might allow me to add on to my custom set which is definitely tempting. So it would be interesting to know how much I could realistically save over having a custom table built.

Here's what I'm needing/wanting.

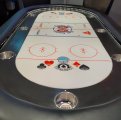
•Lighted Raised Rail (haven't had one personally but played on a lot and I love it, nothing huge just a slight raise)
•Custom Cloth (Will definitely get this from Tony)
•Must be big enough for 10 players, oval shape and must have cup holders.
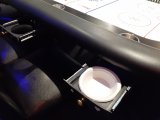
•Would love to have USB charging ports (USB-C maybe?)
•Stationary legs (I have plenty of portable tables, but something more permanent would be great)
•Chip drawer (this isn't a requirement but I would love to have one)

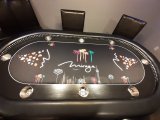
Over all I want this to be the centerpiece of my poker room. I want it to look great, with nice materials, solid design, and great stability, I don't want any wobble or bend to the table.
 
7EF850A9-D837-4E82-9A8F-B1C5EC0815FB.jpeg


B4ABFBD2-2074-417B-AC0C-05D4AD606087.jpeg

I have about $800 into this table. They’re not impossible to build. All hardware (cup holders, pad, vinyl and cloth) from casino supply. Backed into the drawer on this forum. Lighted rail, one color, several settings from Amazon. Each seat has a USB port for charging. Maybe 20 hours of build time. Note the seating arrangement. 3 on the straightaways and two on each end. We’ve played 12 on this table (only once as a couple of drunks rolled in). Plenty of room. Folding legs but I have a dining room table pedestal I’m going to put it on. It’ll look like a table worth several thousand.

We’re planning a second.

Good luck.
 
Last edited:
In my experience building a table is a rewarding process.

For a first build a lighted raised rail and incorporated chargers will probably add a good bit of difficulty/complexity, but I’m hoping to attempt them with my next (3rd) table build.


Figure probably $100-150 for plywood
~$250 for custom felt
Another ~$150 for foam and vinyl
$1-200 for legs/materials depending on design. Pedestal legs can be found on Craigslist sometimes
$1-200 more for chargers/LEDs plus probably an additional 4 build hours I’d guess

So budget about $1k all in and hope to come in under that.

Necessary tools:
Jigsaw
Router
Drill
Hole saw
Stapler
 
View attachment 1071409

View attachment 1071410
I have about $800 into this table. They’re not impossible to build. All hardware (cup holders, pad, vinyl and cloth) from casino supply. Backed into the drawer on this forum. Lighted rail, one color, several settings from Amazon. Each seat has a USB port for charging. Maybe 20 hours of build time. Note the seating arrangement. 3 on the straightaways and two on each end. We’ve played 12 on this table (only once as a couple of drunks rolled in). Plenty of room. Folding legs but I have a dining room table pedestal I’m going to put it on. It’ll look like a table worth several thousand.

We’re planning a second.

Good luck.
Chairs were free. I stalk Craigslist lol
 
In my experience building a table is a rewarding process.

For a first build a lighted raised rail and incorporated chargers will probably add a good bit of difficulty/complexity, but I’m hoping to attempt them with my next (3rd) table build.


Figure probably $100-150 for plywood
~$250 for custom felt
Another ~$150 for foam and vinyl
$1-200 for legs/materials depending on design. Pedestal legs can be found on Craigslist sometimes
$1-200 more for chargers/LEDs plus probably an additional 4 build hours I’d guess

So budget about $1k all in and hope to come in under that.

Necessary tools:
Jigsaw
Router
Drill
Hole saw
Stapler

Also handy:
Circular saw
Power screwdriver
Orbital sander
Spray adhesive

Of those I have a drill, circular saw, orbital sander and stapler. I have spray adhesive and have used it before for my custom cloth on my remodeled table but I'm sure I'll need to get a new can.

I'm pretty good at following instructions as long as they're clear with measurements and everything, is there any build tutorials on here with specific measurements that include all or most of the elements I'm wanting?

The 2 things on my list that I could live without would be the power accessories, the lighted rail and USB chargers. I have gorilla legs on my current table and wouldn't be opposed to using the same thing on this table as long as it's solid as a rock.
 
I'll take the unpopular opinion. If you want it to be the centerpiece of your room, let Tony do it.

I've built 4 of my tables. I love them, but they aren't centerpieces. The rail is a little janky, the felt is a lil loose, and all of the things one would expect from an amateur.

I've played on several @T_Chan tables, as well as other professional built tables and hands down they are better than anything made by a hobbiest.

Building your own tables is super rewarding. But ask yourself what is more important.
I keep thinking the same thing. I soooo want to save some money but I also know if something doesn't come out right or isn't essentially perfect it's going to make me question my decisions. Damnit Craig....now you have me on the fence again!
 
I'll take the unpopular opinion. If you want it to be the centerpiece of your room, let Tony do it.

I've built 4 of my tables. I love them, but they aren't centerpieces. The rail is a little janky, the felt is a lil loose, and all of the things one would expect from an amateur.

I've played on several @T_Chan tables, as well as other professional built tables and hands down they are better than anything made by a hobbiest.

Building your own tables is super rewarding. But ask yourself what is more important.
240844B3-D425-474B-87D8-2BEA1A9A8B6E.jpeg

Just take your time. $700
 
I keep thinking the same thing. I soooo want to save some money but I also know if something doesn't come out right or isn't essentially perfect it's going to make me question my decisions. Damnit Craig....now you have me on the fence again!
I hear you. I LOVE my tables. Don't get me wrong. All in less than $700 each. But they aren't show pieces
 
Ok so I'm in the process of detailing the materials and tools that I'll need so I can get an idea on rough price totals. There are a couple things that I'm not completely sure on or I'd like to hear some opinions on.

One of those is the cup holder debate. I know some prefer them in the rail, some prefer slide under and others like the under the table pull out versions. I want a 3/4" raised lighted rail (not sure if that makes the rail cup holders difficult to do). So I'm curious what you guys prefer. I like the idea of the pull out or swing out cup holders under the table but I don't know if there is a pre-made install on these or if its something I'm going to have to fabricate myself.

I've asked around and most of the tools I'll be able to borrow or I do have a few myself. These are the tools that so far I've determined I will need for the build.
Pneumatic Stapler
Electric Carving Knife
Cordless drill/screwdriver
Router
Circular Saw

A few of the builds I've seen used the router for not only the half circles at the table ends but also the straight cuts but I have a circular saw in case I need it.

Materials for the table
Custom cloth from Tony
YAT 1" HD Rail Foam
1/4" Gym Rubber (used Volara on my other table and its too hard for my taste)
YAT Whisper Vinyl for rail
3 pc of 3/4" plywood (curious what kind/quality is best)
Staples (duh)
Wood Glue
LED light strip (what's the best choice here?)
Diffuser for LED Strip (again what's the best choice here?)


I'm sure there's some bone headed item I'm completely forgetting so feel free to correct or add to this list for me. I appreciate all the help so far.
 
a couple poorly written notes. I love me some slide under cup holders, but i wouldn't attempt that with a lit rail. Drill them into rail if you want them. Holes can be cut with a router if you don't have the right hole saw bit. you can build a circle/radius jig for your router out of just about anything, see google. If you're steadfast that you're "not handy w woodworking" i would suggest avoiding pull out/slide out cup holders unless you can find them pre built, or you have a very detailed drawing. clamp a straight edge as a guide for your skillsaw base on straight cuts. factory edges of plywood are ideal. i cut my foam with a long olfa knife. you don't "need" the carving knife. Cut foam edges will be wrapped in vinyl and compressed at the side/under your rail. you won't see defects unless you're shitfaced when you cut it. side note, get shitfaced AFTER cutting rail foam. bases are tricky, gorilla legs or keep an eye on used tables. can poach a base of a beefy one for minimal cost. router, circ saw, electric/pneumatic stapler, drill. I'm assuming your envisioning a table longer than 96", thus the need for the 3rd sheet of 3/4". If not, 2 should do it. you want plywood core, avoid mdf/particle board at all costs. plywood grade has all kinds of factors/ratings, regional availability will be your hurdle. Honestly as long as it's flat when you buy it you'll be fine. the more you spend, the less voids there will be in the ply layers and the more stable it will be/stay. take your time, have a beer and post a build thread
 
I'm fairly certain that a DIY built table can be a centerpiece if done patiently with the correct tools, and proper planning. The only decisions to make is the materials that you can see, because they must be top notch.
Under rail lighting difuser should be at least 1" high. I have 3/4" high ones, and wish I had done 1"
The LED lighting should be FCOB leds, as they are a solid light, rather than the cheaper LED ligt strips that are separated on the roll.
I built my own, has it's own dedicated poker room to live in, and I think it turned out pretty good with solid half arced legs on each end. the table cannot be folded, and is heavy as old F.
I still need to make a change to the racetrack (remove the cup holders) and move them to the rail, but to do that, I will need to widen the rail so the cup holders won't interfere with the under rail lighting and difuser.

The other option is to do what @Jake14mw did for his cup holders, but that is an extensive change.

Here is his thread
https://www.pokerchipforum.com/thre...-to-the-cup-holder-debate.64594/#post-1299546

My table as is now without the changes I am planning over the summer, when golf takes over poker.
 

Attachments

  • Poker table 1.jpg
    Poker table 1.jpg
    128.1 KB · Views: 78
I'm fairly certain that a DIY built table can be a centerpiece if done patiently with the correct tools, and proper planning. The only decisions to make is the materials that you can see, because they must be top notch.
Under rail lighting difuser should be at least 1" high. I have 3/4" high ones, and wish I had done 1"
The LED lighting should be FCOB leds, as they are a solid light, rather than the cheaper LED ligt strips that are separated on the roll.
I built my own, has it's own dedicated poker room to live in, and I think it turned out pretty good with solid half arced legs on each end. the table cannot be folded, and is heavy as old F.
I still need to make a change to the racetrack (remove the cup holders) and move them to the rail, but to do that, I will need to widen the rail so the cup holders won't interfere with the under rail lighting and difuser.

The other option is to do what @Jake14mw did for his cup holders, but that is an extensive change.

Here is his thread
https://www.pokerchipforum.com/thre...-to-the-cup-holder-debate.64594/#post-1299546

My table as is now without the changes I am planning over the summer, when golf takes over poker.
Do you have a link to the LED lighting you're talking about? Why would 1inch be better than 3/4?
 
Do you have a link to the LED lighting you're talking about? Why would 1inch be better than 3/4?
I'm not necessarily looking for any design on the diffuser just something to make the led light seem continuous instead of individual lights. I'm not opposed to a design I just don't know what I would do.
 
I'm not necessarily looking for any design on the diffuser just something to make the led light seem continuous instead of individual lights. I'm not opposed to a design I just don't know what I would do.
That's fair. If you go with a plain diffuser, 3/4" will work and the cob lighting will becthe cats meow. I originally had the regular led strips and one could see the light separation through the diffuser. Once I stumbled across the COB led strip, I had to have it. My 3/4" diffuser was fine when I had no design, but once I went with the card suit design, then I wished it was 1" tall.
Good luck in whatever you decide.
I just changed out my custom cloth to another design a few weeks ago. I can't seem to stop tweaking with that table. I also have sliders under the rail to hold snack trays.
 

Attachments

  • 20221109_155132.jpg
    20221109_155132.jpg
    77.4 KB · Views: 130
  • 20230108_145552.jpg
    20230108_145552.jpg
    113.7 KB · Views: 128
Additional tools/supplies:
- orbital sander (and sandpaper)
- 3M Super 77 spray adhesive
- cupholders (diameter and depth varies)
- hole saw ( buy the cupholders first)
- router bits (cuts/slots and edge rounding)
- T-nuts (if using to attach the rail/legs)
- screws (if using to attach rail/legs)
- 1/2" x 6" wood (if fabricating under-table cupholder trays)

Also never hurts to have some wood putty handy (just in case), plus both a manual Phillips-head and flat-head screwdriver (the latter for staple removal; the former if using screws during construction). Personally, I use deck screws with a star bit for my power driver.

You should only need 2 sheets of 3/4" plywood (birch is fine, and cheaper than oak).

Not exactly sure what 'gym foam' is, but I share your distaste for hard volara. I find YAT's 1/4" HD table foam to be ideal for table surface padding (several options available).

As for non-fixed-position under-table cupholders, the removable magnetic approach (referenced above) works well, as does the ingenious swing-out type with an under-table routed groove attachment (they slide around the table circumference allowing them to be placed where desired, and swing under the table when not in use). There was a recent PCF post detailing the construction (seems to be less labor/time/material intensive than using magnets). Let me know if you can't find it, and I'll hunt it down.

And don't forget that your diffuser fits into slots above (in the rail upper area) and below (in the table or rail bottom). A 1" diffuser will only have 3/4" showing if those slots are 1/8" deep.

Lastly, consider mounting USB charger connections for your players.
 
Last edited:
Additional tools/supplies:
- orbital sander (and sandpaper)
- 3M Super 77 spray adhesive
- cupholders (diameter and depth varies)
- hole saw ( buy the cupholders first)
- router bits (cuts/slots and edge rounding)
- T-nuts (if using to attach the rail/legs)
- screws (if using to attach rail/legs)
- 1/2" x 6" wood (if fabricating under-table cupholder trays)

Also never hurts to have some wood putty handy (just in case), plus both a manual Phillips-head and flat-head screwdriver (the latter for staple removal; the former if using screws during construction). Personally, I use deck screws with a star bit for my power driver.

You should only need 2 sheets of 3/4" plywood (birch is fine, and cheaper than oak).

Not exactly sure what 'gym foam' is, but I share your distaste for hard volara. I find YAT's 1/4" HD table foam to be ideal for table surface padding (several options available).

As for non-fixed-position under-table cupholders, the removable magnetic approach (referenced above) works well, as does the ingenious swing-out type with an under-table routed groove attachment (they slide around the table circumference allowing them to be placed where desired, and swing under the table when not in use). There was a recent PCF post detailing the construction (seems to be less labor/time/material intensive than using magnets). Let me know if you can't find it, and I'll hunt it down.

And don't forget that your diffuser fits into slots above (in the rail upper area) and below (in the table or rail bottom). A 1" diffuser will only have 3/4" showing if those slots are 1/8" deep.

Lastly, consider mounting USB charger connections for your players.
Awesome. Very detailed, thank you!

I'm in the process of working on a felt design and once that's done I'll get started.

The "gym foam" is ensolite (think that's how it's spelled) it's the material mouse pads are made from. Several builds I've been researching on here used it.
 

Create an account or login to comment

You must be a member in order to leave a comment

Create account

Create an account and join our community. It's easy!

Log in

Already have an account? Log in here.

Back
Top Bottom