Onto #3 Poker table build - Raised rail (1 Viewer)

BDub

Pair
Joined
Dec 7, 2022
Messages
145
Reaction score
238
Location
Washington State
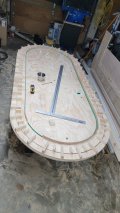
After a bit of research, and excellent advice from the professionals, I'm stepping up my game and doing a raised rail table. There are much easier ways to do these, but this seems to be the best approach.

My first two tables came out ok, but as I said in my last thread, I learned a ton.

Table 1.jpg

Table 2.jpg


Mechanically speaking it's very simple, so I made a quick CAD model and did a few technical drawings. It helps me plan the project and avoid any mistakes or surprises.

If I have time I'll get started tomorrow, and I expect it will take me about a week spending time on it here and there after work. I am much more of a fabricator, and have very limited wood working tools, but for this one I'll be using a router along with jigs to get very clean lines that I can finish with edge banding. Knowing how I do these things, if I'm not careful, I'll have a CNC router before I move onto my 4th table. I've started designing my 4th table to be larger and accommodate 10 with a dedicated dealer. :ROFL: :ROFLMAO: :ROFL: :ROFLMAO: :ROFL: :ROFLMAO: .

Raised Rail Poker Table V2.jpg


This is obviously an incomplete model, but I'd rather start getting my hands dirty than spend time adding too many more details. I'll probably do a full render once I'm done just for fun.

I will update with photos when I get started!
 
Last edited:
Have followed the thread of your two other builds, they came out great ! Can’t wait to see how this table came out, currently in the wood working phase of my first build similar to your purple felted table.
 
That's awesome!

It's crunch time! I have a poker tournament tonight and I'm still finishing the upholstery.:cautious:

I also want to mitigate expectations. I'm really just winging it here. :LOL: :laugh:

I expect I'll have time to put up at post on Sunday. I have some huge props to give out to the community. I will call out individuals that made my tournament tonight a possibility and that make a DIY build possible in the first place.
 
I am in process of assembling all materials for my first build as well — inspired by BDub and others on this forum. In Canada - so suppliers are tighter than your options in US. Bought a cordless router this morning — always looking for excuses to expand my tool set!

will update as I progress next week.
 
That's awesome!

It's crunch time! I have a poker tournament tonight and I'm still finishing the upholstery.:cautious:

I also want to mitigate expectations. I'm really just winging it here. :LOL: :laugh:

I expect I'll have time to put up at post on Sunday. I have some huge props to give out to the community. I will call out individuals that made my tournament tonight a possibility and that make a DIY build possible in the first place.
Nothing like adding some pressure to push you to finishing a job

Friends of mine are usually surprised at what I can accomplish with renovations and such, little do they know I’m a HACK! Here’s to hoping to stay off the F’ugly thread!

Good luck in the tourney! My first cash game at home is April 22nd hopefully I’ll just be scrambling for enough chairs and not looking for more staples!
 
Edit: A few things I want to give more detail:

I used stepped marine cup holders. I don't think I'd use straight ones, jumbo or not. I took out the drain and hole will work for channeling light into the cup holder.
I used 6 points to attach the armrest, and I would do 10 if I did it again.
The diffuser is "sign white" acrylic, and I used two 24v FCOB LED strips with a remote, and a controller.

Another learning journey indeed.

I made this one using a circle jig, a router, small table saw, a few hole saws, and a jig saw. I have a 6ft level that I used for connecting the radii. I "cheated" the cup holders with the hole saws.

I really failed on the photo documentation of this. I was in quite the rush. I'll do better next time.

Overall, it was a pretty standard build.

I used 1/2" ply for the play surface. Do recommend.
20230326_115432.jpg


Quick mock-up to check fitment with the diffuser and play surface edging. More on this fitment later.
20230326_160650.jpg


40 spacers - 4 for every cup holder/seat.
20230326_170906.jpg


After aligning the play surface and the middle ring (play surface alignment ring) I clamped things down, and used Gorilla Glue with finish nails for the spacer blocks.
20230327_184943.jpg


20230327_185212.jpg


I used countersunk t-nuts to hold down the play surface, and armrest.
20230326_192547.jpg


The diffusers you see are just for fitment, hence the gaps.
I aligned the outer rail and spacers glued it all down, and drilled the holes for mounting the armrest.
20230327_200241.jpg


Flipped it over and installed the legs. Unbolted one side to get enough access for cutting the hole for the shuffler.
20230330_161942.jpg


20230330_164600.jpg

Put in the play surface and matched the cut.
20230330_172309.jpg


Glued and stapled the play surface edging. Then did the foam. I went with 47lb open cell this time. I like it more than the closed cell.
20230330_181201.jpg


Cutting these with a hole saw was unpleasant. I will never do this again. I designed one to 3D print. Updates on that below.
20230331_154121.jpg


I drilled the holes for the cup holders, placed and glued the spacers.
20230331_191906.jpg


I used the same hole saw to cut out the relief spots for the bottom of the cup holders. Not elegant, but effective.
20230331_192113.jpg


The rest is pretty standard upholstery.
20230331_203747.jpg


Too many staples?
20230401_122744.jpg


Overall, I'm very happy with how it turned out!
20230416_133713.jpg


I cut the vinyl for the first cup holder in a star pattern, and it didn't "pinch" the cup holder as much as I wanted. I did the rest with a only two cuts like this.
20230416_134827.jpg


I am thermoforming some acrylic tube to go into the bottom of the cup holders for added LED effect. I took out a cup holder to show the first cut pattern I tried.
I also added a pull-out drawer that is a must have. T-nut inserts for that too.
20230416_133754.jpg


I plan on adding melamine to the bottom, and I have edge banding for the base board. So, this one is unfinished still.

That's the update! I will work on taking more pictures next time.

This was much more woodwork, and time than a regular non raised rail/lighted table.

It would be much easier as a kit - So, I bought a CNC to do the next one. I figure, why not? I already do everything in CAD. I'm nearly finished with the design.

The next one will be a 10+1 with a dealer cutout. It's 112" as designed right now (very large, I know). Tables this large are typically not recommended, but for this table I plan to have a dedicated dealer. This will provide 10 players with 23" of seat space, plus a 26" dealer cutout. I'm most excited about it just because I won't have a hand cut much of anything.

I have also had a dozen or so people from my poker tournaments ask me to make them a table. I've directed them to @T_Chan, and @bsdunbar1 as I believe these are best left to the professionals. More to that point, @bsdunbar1 was gracious enough to answer my noob questions and confirm my build approach. @T_Chan came through clutch and was able to ship me a Shuffle Tech he had in stock in time for my tournament. Huge thanks to these two and the community in whole.

Thanks for following! Any pointers are very welcome, and appreciated.
 

Attachments

  • 20230326_184444.jpg
    20230326_184444.jpg
    131.7 KB · Views: 59
Last edited:
I have also had a dozen or so people from my poker tournaments ask me to make them a table. I've directed them to @T_Chan, and @bsdunbar1 as I believe these are best left to the professionals.

Looks to me like you're doing a pretty good job yourself - and if I'd just got myself a CNC machine it would take some stopping me from making a few more. Obviously depends on whether you have the time but the CNC is a massive help there.
 
I’m at a loss for words on how impressive this is, all the previous tables were great, but this is just WOW! If you’re investing this much into the tools to make these tables no reason not to sell them to people your local with!
 
First cup holder test print under way. Only at 20% infill for the test. Even at only 20% it'll probably be strong enough for end use. It's really all about wall thickness.
20230417_101745.jpg
 
Wow, this looks amazing.

How wide is your rail? Im thinking of going wider than the standard 4.5"....

Have you used a shuffle tech before? Any comments on durability, quality of shuffle etc.
 
How wide is your rail? Im thinking of going wider than the standard 4.5"....
This one is 6". You need a minimum of 5.5 if you're going to do cup holders. I was worried it would feel too wide, but I like it.

Have you used a shuffle tech before? Any comments on durability, quality of shuffle etc.
I have two ST1000's. They are a game changer (mostly no pun intended).

One of them did come with defects and I'm working on getting that fixed. I will update you on the customer service side of things once I have that resolved. Overall, they work wonderfully hence why I have two.

If my tournament grows to a consistent three tables, I will get a third. Someday, when I grow up, I will look into picking up DM2's, but for now these are fantastic.
 
First of all, nice work! For a first, second and third attempt, you have made finished products that look like you have been doing it for years! Obviously a lot of attention paid to the details.

A few questions:
  1. You mention that you are using CAD. What program are you using? (I am just starting to learn FreeCAD, and am on the steep part of the learning curve, so I might have a question or three about how to set up a superellipse outline).
  2. You mention that you bought a CNC machine. What kind? (I was looking at the Maker Made M2, and am curious how accurate the cuts are, how much of a PITA it is to set up, etc)
  3. Which open cell foam did you use for the playing surface, and how is it after a few weeks compared to the Volera?
  4. What were the table dimensions (overall width and length, not including the padding on the rail)?
Many thanks!
 
First of all, nice work! For a first, second and third attempt, you have made finished products that look like you have been doing it for years! Obviously a lot of attention paid to the details.
  1. You mention that you are using CAD. What program are you using? (I am just starting to learn FreeCAD, and am on the steep part of the learning curve, so I might have a question or three about how to set up a superellipse outline).
Thanks for the kind words.

I use SolidWorks and its peripheral tools. I would stay away from the "free" CAD tools. Many companies now offer a "maker" license that has nearly all the benefits of a $10k CAD license without the cost if you're not using it professionally. Should you want to take it to a professional level you have a base knowledge in a CAD tool that is scalable and widely used. Check this out SOLIDWORKS Maker license. It's probably the best way you could get into CAD right now. Feel free to ping me if you have any questions.

2. You mention that you bought a CNC machine. What kind? (I was looking at the Maker Made M2, and am curious how accurate the cuts are, how much of a PITA it is to set up, etc)
I found a used Maker Made. It seems very simple compared to building a 3DP from scratch. I haven't set it up or used it yet, but it seems like it will do the job with a few mods.
3. Which open cell foam did you use for the playing surface, and how is it after a few weeks compared to the Volera?
I used the .250" version of this: 3/10" High Density Poker Foam (Open Cell)
I wanted the 3/10" but they were sold out.
Seems to be holding up great!
4. What were the table dimensions (overall width and length, not including the padding on the rail)?
Many thanks!
This is a 96" x 44" cut.
 
Finalized my new 3DP cup holder spacer rings. I'm very happy with the final fit result and fitment.

Here are some of the prototypes:
Cup holder spacer prints.jpg


I'm still finalizing my table #4 design, but I expect I'll start to cut parts in the next few weeks. As I mentioned it's going to be a 10+1 with a dealer cutout. I have several house/spring projects that are slowing down this next table, but I will put in a substantial push here soon.

I'll start another build thread as soon as I finalize the design!
 
Finalized my new 3DP cup holder spacer rings. I'm very happy with the final fit result and fitment.

Here are some of the prototypes:
View attachment 1128811

I'm still finalizing my table #4 design, but I expect I'll start to cut parts in the next few weeks. As I mentioned it's going to be a 10+1 with a dealer cutout. I have several house/spring projects that are slowing down this next table, but I will put in a substantial push here soon.

I'll start another build thread as soon as I finalize the design!
Dude your tables are awesome, are you running a huge game at home or building for an Elks Club somewhere. Either way very impressed !
 
It's just for a home game with a two table limit. I tend to full send everything.

Whenever I complete a new table I sell the extra one.
 
It's just for a home game with a two table limit. I tend to full send everything.

Whenever I complete a new table I sell the extra one.
Love it! I’m also the full send type, however I don’t posses half the skills as you lol. The next table will probably be just a more polished table mimicking the first. I had 10 show up to my inaugural game, and a lot more interest for second I’m hosting next Monday.

Looking forward to seeing your future post
 
I use SolidWorks and its peripheral tools. I would stay away from the "free" CAD tools. Many companies now offer a "maker" license that has nearly all the benefits of a $10k CAD license without the cost if you're not using it professionally. Should you want to take it to a professional level you have a base knowledge in a CAD tool that is scalable and widely used. Check this out SOLIDWORKS Maker license. It's probably the best way you could get into CAD right now. Feel free to ping me if you have any questions.
Thanks for the reply.

I'm not likely to try to expand my CAD/CAM experience beyond simple modeling of some poker table designs and possibly outputting some g-code to a low-tech CNC router, so scalability and transferring skills to a professional setting are pretty low on my list.

I looked at a bunch of different CAD/CAM software options. One or two of them had free "startup/small business" options, but you basically had to apply with a bunch of personal information, and reapply every year. SolidWorks wasn't on my initial search list. I did check out the website, and it seems that the Maker license is $99/year.

Given how much I will likely use the program, I'll probably stick with FreeCAD for now. I like the open source design, community support and of course the cost and ease of (not) licensing it.

I found a used Maker Made. It seems very simple compared to building a 3DP from scratch. I haven't set it up or used it yet, but it seems like it will do the job with a few mods.
Great score! Please keep us up to date about how it turns out.
I used the .250" version of this: 3/10" High Density Poker Foam (Open Cell)
I wanted the 3/10" but they were sold out.
Seems to be holding up great!
Thanks
This is a 96" x 44" cut.
Do you find the 96" length difficult to pitch cards to the ends of the table (self-dealt games), or to gather pots and cards to the centre? Is the 44" width as wide as you would want, or would a 46" or even 48" be workable? (My current table is 88x44, seems like it could be a tad bigger, but I want to get a few opinions before expanding the size too much).

Thanks, and once again, kudos on some awesome builds!
 
Thanks for the reply.

I'm not likely to try to expand my CAD/CAM experience beyond simple modeling of some poker table designs and possibly outputting some g-code to a low-tech CNC router, so scalability and transferring skills to a professional setting are pretty low on my list.

I looked at a bunch of different CAD/CAM software options. One or two of them had free "startup/small business" options, but you basically had to apply with a bunch of personal information, and reapply every year. SolidWorks wasn't on my initial search list. I did check out the website, and it seems that the Maker license is $99/year.

Given how much I will likely use the program, I'll probably stick with FreeCAD for now. I like the open source design, community support and of course the cost and ease of (not) licensing it.


Great score! Please keep us up to date about how it turns out.

Thanks

Do you find the 96" length difficult to pitch cards to the ends of the table (self-dealt games), or to gather pots and cards to the centre? Is the 44" width as wide as you would want, or would a 46" or even 48" be workable? (My current table is 88x44, seems like it could be a tad bigger, but I want to get a few opinions before expanding the size too much).

Thanks, and once again, kudos on some awesome builds!
The cards rip from one end to the other with ease. I attribute that to cloth and card choice.

Polyester speed cloth, and I found Bicycle Prestige (Fournier) to glide much better than Copag.

We use a dedicated dealer. They seem to have no trouble reaching cards and pots.
If self delt, the end to end hands would be a stretch.
My first two were 45 wide and I was worried this would feel too narrow, but I'm enjoying the slightly narrower table.
I like the larger tables for the player space. Hence why I'm going for an even larger table, but again that's for use with a dedicated dealer.
 
The top rail.. what's the overhang length from the diffuser? I'm building my table and used 1/4" and I'm nut sure it's enough. TIA
 

Create an account or login to comment

You must be a member in order to leave a comment

Create account

Create an account and join our community. It's easy!

Log in

Already have an account? Log in here.

Back
Top Bottom