My attempt at 3D printing racks (2 Viewers)

Wow these are great, thanks for sharing! My neighbor just got a printer and has been making mini's for our D&D game, might have to see if he'll try these out for me.
That's great! Let me know if you have any questions on the models, and post pics of what you print!
 
Here's an alternate, simpler design for card tray lids. Which style do you guys prefer?

IMG_20200423_193844572.jpg
IMG_20200423_193857055.jpg
IMG_20200423_193939918.jpg
IMG_20200423_194145840.jpg
IMG_20200423_194256395.jpg
 
Chip racks. This whole thread started 4 months ago when I started modeling a copy of the classic Paulson rack. Since then I've modeled a ton of stuff, bought another printer, and opened a web store. It seems like so much longer than 4 months with everything that has happened since then.

But I digress. Chip racks. I've modeled a lot of variations of them and shared the files here, but not a single one is in my store for sale. Why? Because of something that @Amish Rabbi sagely warned me about in this post on the very day I started this thread: "the worry I had with printing like @oneeyeddollar is the ribs from the layers wearing on the clay Chips because it’s very small abrasive layers."

He cleverly made a version of a rack with fancy laser-etched acrylic side panels that solved this problem. But I thought, with a fine layer height it should be smooth enough, and I continued designing and printing test racks the way I had been. Two problems though: printing with a fine layer height takes *forever* and it's still not smooth enough. Here's a close-up where you can see the little ridges from the layers.

DSC07903sm.jpg


I'm all about testing, so I took one of my shuffle stack racks printed with an 0.15mm layer height and spun some 36mm WSOP chips in it on my desk for a while to see what would happen. Would the little layers actually wear down the clay? Would the clay wear down the plastic? Or would nothing happen?

Answer: the plastic wins. See all the little green bits? And this was with the curves about as smooth as I could print them.

DSC07904sm.jpg


This is a problem, and it's fundamental to how these 3D printers work. It has to build the object up, layer by layer. You can make very smooth curves in the horizontal direction, but for vertical curves the smoothness is limited by the height of the layers and it will never be as smooth as I want it to be.

I tried printing the racks on their sides, but this just trades one problem for another. The rows are nice and smooth, but one side of the rack is now on the bottom of the print, and one side is on the top. The top side can't be printed over open air, so you have to add a lot of temporary supports under it and then break them off. This uses up a lot of plastic, adds time to the print, and you still wind up with a rough surface when you break the supports off. :tdown:

The next thing I tried is an epoxy coating for smoothing 3D prints called Smooth On XTC 3D. This works nicely, but it also has drawbacks. It adds time and cost to the process. And it tends to flow and pool before it dries completely. I've done a number of the shuffle stack racks with this coating, and the main problem is that it collects at the bottom and the chips on the ends don't sit flat. I also don't want to have to coat every rack that I sell, so this option was a no. :tdown:

So smooth to the touch!
DSC07905sm.jpg


And so uneven on the ends...
DSC07906sm.jpg


I really liked Amish Rabbi's solution to the problem, but I wanted something that I could make faster and easier for the store. I don't have a laser, and I didn't want to assemble the sides with screws. So I racked ;) my brain for a while and had another idea: the two-part modular chip rack. This would let me print each section in the ideal direction for smoothness, speed, and the least wasted material for supports. And it wouldn't require tedious post-processing like the coating or bolting things together. I made a few miniature racks for testing and it was looking good! Time for a full-sized mockup print.

Here are the two parts in the direction that they are printed. This allows me to make nice smooth curves in the horizontal direction, just like the way I print my Racker Stackers:

DSC07908sm.jpg


Much smoother curves! I just have to deal with the occasional little "zits" that form in the surface (these can be shaved down with an X-acto if they're too big).

DSC07909sm.jpg


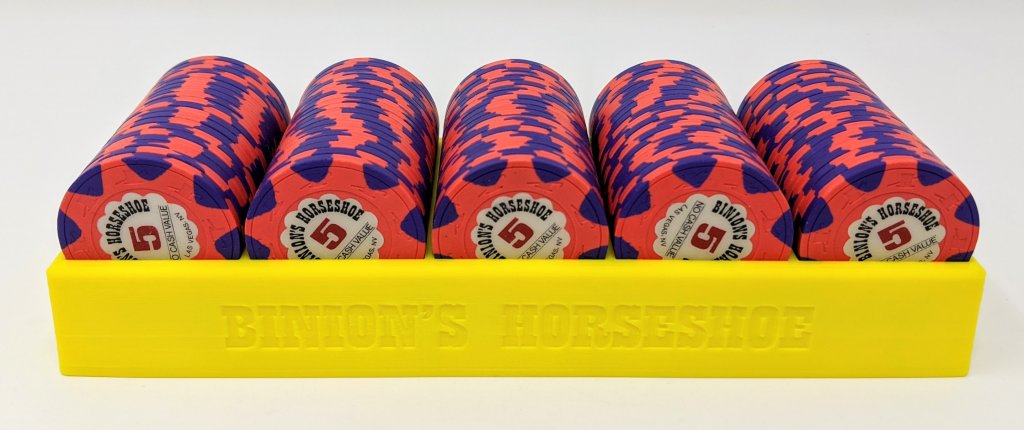
The insert then drops into the frame. Here are some more shots of it together and with some of the 8V China clay chips (this rack is sized for 71mm long rows to fit these thicker chips).

DSC07907sm.jpg

DSC07910sm.jpg


The diamond-shaped cross braces help the two pieces lock together and provide a lot of stiffness to the frame:
DSC07911sm.jpg

DSC07916sm.jpg


Same height and base dimensions as a Paulson 66.7mm rack for easy stacking and compatibility with cases and birdcages.
DSC07912sm.jpg


My plan then was to just glue the two parts together to make a finished rack. But @ruskba had the idea: what if the racks were modular and snapped together? You could take the outer frame and swap out the insert for different size chips, for example. So I did a test print where I took that same frame for the 71mm wide racks and printed an insert for 66.7mm wide rows instead. To do this, I just built in a spacer along one side on the bottom of the print, so all the surfaces are still smooth.

DSC07913sm.jpg

DSC07914sm.jpg


71mm wide frame with 66.7mm insert with some Samurai $500s:
DSC07915sm.jpg


I haven't designed the parts to snap together yet, but it's certainly an option if there's a demand for it. Otherwise I would just print the frame in the width to match the insert and skip the spacer on one side, then glue it together.

The pictures also show how it looks if you do a 1-color or 2-color rack. There might be times when you'd want to do 2 colors to match the theme of your set, or maybe they could be color-coded for different sizes, whatever you want.

I'm liking this design a lot, and it's easy to print with almost no filament wasted on supports, which keeps the cost lower. The curves are nice and smooth and do not have any edges that run perpendicular to the chips, so wear should be minimal. I don't have to do any time-consuming processing after the print except gluing the two parts together. It's heavy duty and should stand up great to normal use. It's easy to modify the design for different size chips and make variations for 43, 48, 50mm chips, etc. I think this one is a winner, but I'd love your feedback and suggestions. Would you have any use for the snap-together design with swappable inserts? Or would you be more likely to buy single-purpose glued-together racks?

I haven't calculated a price for this yet, but I will probably have to price it higher than a typical acrylic rack in order to make it cost effective to carry these in my store. As I've said all along, 3D printed racks will not be a great substitute for the acrylic racks in the near future. Where it really shines is for creating unusual rack sizes that you can't buy elsewhere, or if you really want colored racks instead of clear. Also if you have a printer yourself or a friend who will print them, you can do it for just the cost of the plastic, electricity, and time. I'll share the files here too once they're done for those who want to print their own.

Final note: I am totally working on the mixed game dice too! Seriously. The design is being refined and optimized, but it's coming along nicely. :tup:
 
good solution, you are sacrificing print time for post processing time though. you could easily print the fronts/backs and the middle bit with registration pins (tapered squares). little bit of glue in them, inset and hold for a minute then repeat on the other side. I glue magnets in all my tile trays and it takes minimal time.

Would be worth looking at the through put time on the printer that way. it also makes it much easier to emboss a custom logo in the trays
 
I've been printing racks for my 1200 chip 8V limit set and refining the rack design as I go. The bottom rack is flat on the bottom. I'll have a layer of those on the bottom of an Apache case, then 6 regular racks stacked on top. I'll be sharing the model soon, and I'll put the 71mm racks for the 8V China Clays in my store first. Then I'll move on to racks of other sizes.

These things stack like bricks!

IMG_20200508_213250946.jpg
 
I've been printing racks for my 1200 chip 8V limit set and refining the rack design as I go. The bottom rack is flat on the bottom. I'll have a layer of those on the bottom of an Apache case, then 6 regular racks stacked on top. I'll be sharing the model soon, and I'll put the 71mm racks for the 8V China Clays in my store first. Then I'll move on to racks of other sizes.

These things stack like bricks!

View attachment 455459
We’re about to become good friends with these 71mm racks... ;-)
 
36mm chip racks are now modeled and I'm doing test prints. Here is the first one:

IMG_20200519_072626271.jpg
IMG_20200519_072649156.jpg
IMG_20200519_072703099.jpg


They fit nice and snug!

I've created two versions of this rack, and I'm test printing the second version now. The one in these pictures is what I call the "Paulson normalized" version. The footprint of the rack matches the common Paulson 66.7 rack. This allows it to stack with other 39mm chips, for instance if you have a mixed set of 39mm chips with 36mm quarters or something like that. The insert has smaller diameter rows and a spacer on one side to fit the 36mm chips tight. The frame is actually the same as the one I designed for the 71mm racks for the 8V China Clays, which has the same dimensions on the bottom as a Paulson rack.

The other version I modeled is what I call "direct fit" to steal a term from Air-Tite. The whole rack is shrunk down to fit the 36mm chips, so it won't stack on normal size racks. If you have a set that is all 36mm chips and want to have smaller racks that fit them snug, then this would be the best option.
 
The width/length wouldn't make much difference, as we already know the larger rack will fit in a birdcage. However, I recall hearing that 36mm chips in 39mm racks will fit 6-high inside a standard birdcage.

Wondering if there is a height difference between the two racks as compared to standard 39mm racks (and if you could fit 6-high in a bird cage).
 
The width and length can make a difference in some cases, such as putting them in an Apache case or just stacking different sized chips together.

As for the height, that's a function of the chip diameter and the rack thickness. I design my racks so the thickness under the chips is 3mm just like the Paulson and other good quality racks. The cheap racks like Brybelly tend to be thinner there.
 
Will you be making these in one corner will we be able to pick colors? When will these be ready to sell?
I'll have it set up in my store so that you can pick the colors individually for the two parts of the rack, so you can have them match or not. I've printed most of my examples in two colors just to highlight the two parts. I hope to get the 71mm wide and 36mm diameter racks in my store soon! I should have time with this 3-day weekend coming up. I've just been really busy with work lately and a home improvement project on the weekends (which is almost done!).
 
What if you sanded it? Would it be smooth enough? I know it’s not scale-able for your operation, but just curious if it would work.
Sanding would definitely help, but the plastic will change color. Some of the sanded parts will look white or lighter, and it generates dust that gets stuck in the little gaps between layers. I tried sanding a Racker Stacker that printed with a lot of zits. It was smoother, but it looked like crap, so it went into my Factory Seconds box. For the inside of a rack you might not care about the appearance though.
 
Would you be able to put a rack upside down on top? Basically, to make it look like a bud jones box? I found Bud Jones boxes doesn’t work with the 36mm chips because of the height of the chips.
I haven't tried to print any racks with lids quite like a Bud Jones box. I actually don't have any of those to check out, but it looks like they are very thin, and it might be too fragile to 3D print an exact copy of those. I have done a similar thing where I've printed racks that are flat on the bottom, and you can flip it over to make a lid. However the sides of the chips are still exposed, and the top and bottom racks do not touch, so all the weight is still on the chips. I know some people like Matsui and Bud Jones boxes because they carry the load instead of the chips.
 
I haven't tried to print any racks with lids quite like a Bud Jones box. I actually don't have any of those to check out, but it looks like they are very thin, and it might be too fragile to 3D print an exact copy of those. I have done a similar thing where I've printed racks that are flat on the bottom, and you can flip it over to make a lid. However the sides of the chips are still exposed, and the top and bottom racks do not touch, so all the weight is still on the chips. I know some people like Matsui and Bud Jones boxes because they carry the load instead of the chips.
for 36mm chips you probably have enough room on the ends for magnetic lids and bottoms :D


.... I use magnets for everything :p
 
Sanding would definitely help, but the plastic will change color. Some of the sanded parts will look white or lighter, and it generates dust that gets stuck in the little gaps between layers. I tried sanding a Racker Stacker that printed with a lot of zits. It was smoother, but it looked like crap, so it went into my Factory Seconds box. For the inside of a rack you might not care about the appearance though.

Do you still get the zits if you print it in vase mode?
 
I don't know, but I would be worried about strength with only one wall. I've experimented with reducing the outer wall flow a little bit and that seems to help some.

I'm still a rookie. Just now learning that vase made only has one wall. Which, of course, makes sense lol.
 

Create an account or login to comment

You must be a member in order to leave a comment

Create account

Create an account and join our community. It's easy!

Log in

Already have an account? Log in here.

Back
Top Bottom