-
PCF is an eBay Partner. If you make a purchase through one of our links, we may earn a commission at no extra cost to you. Thank you for your support!
You are using an out of date browser. It may not display this or other websites correctly.
You should upgrade or use an alternative browser.
You should upgrade or use an alternative browser.
@markleteenie Poker related builds (1 Viewer)
- Thread starter markleteenie
- Start date
OP
OP
markleteenie
4 of a Kind
I'm pretty excited, I got my Chanman cloth today! Leaving it to "relax" overnight. I'll iron out any wrinkles tomorrow after work and then felt and re-assemble the table. Light is a little low, so the color is off in the picture.
Should be a pretty decent post tomorrow, if all goes well!


Should be a pretty decent post tomorrow, if all goes well!
Last edited:
OP
OP
markleteenie
4 of a Kind
Full size poker table (rebuilt)
Sorry no build pictures, but here is me reassembling it completed.
It started like this:

Where the legs/pedestals used to be free standing, I bolted them to the base for stability. A lot of bolts.


Removed the old speed cloth, added 1/4" closed cell foam, and then a Chanman semi-custom cloth.


Bolted down the railing, with a lot of bolts...

I built a brand new rail - 5" wide, with new 1" HD foam, and new Whisper Vinyl.
Also added a 3/4" raised rail, with a white birch veneer and everything wood stained and sealed.


Sorry no build pictures, but here is me reassembling it completed.
It started like this:
Where the legs/pedestals used to be free standing, I bolted them to the base for stability. A lot of bolts.
Removed the old speed cloth, added 1/4" closed cell foam, and then a Chanman semi-custom cloth.
Bolted down the railing, with a lot of bolts...
I built a brand new rail - 5" wide, with new 1" HD foam, and new Whisper Vinyl.
Also added a 3/4" raised rail, with a white birch veneer and everything wood stained and sealed.
WhiteMamba1646
4 of a Kind
Well done sir! Well done!
1A25R
Flush
nice rebuilt
OP
OP
markleteenie
4 of a Kind
Just finished my secondary table with folding legs! Now I'll be able to run two tables!
Found this old table on Craigslist for $20 that I was going to re-purpose. Plan was to reuse the base and the rail if possible, but change out the felt. I'm proud of the new "felt" I will be using....more on that later...

After painstakingly taking it apart, it turns out, only the folding legs were worth re-using.


So I went out and bought a couple sheets of plywood. I screwed them together, so I only had to cut the outside once.


Measured out a 4" rail - 2" will be overlapping the playing surface/base board below.


Pieced together leftover High Density rail foam from my other poker table and heads up poker table builds.
Underneath, on the base surface, I used extra 1/4" closed cell foam too, so all the foam was "free."
I took my time and really matched the foam up together and at diagonals, so the seams wouldn't be as easily noticeable.
I also attached a latch system to make the rail extremely secure, yet easy to dismantle, so that I can remove it and the playing surface for storage/transport.

Found this old table on Craigslist for $20 that I was going to re-purpose. Plan was to reuse the base and the rail if possible, but change out the felt. I'm proud of the new "felt" I will be using....more on that later...
After painstakingly taking it apart, it turns out, only the folding legs were worth re-using.
So I went out and bought a couple sheets of plywood. I screwed them together, so I only had to cut the outside once.
Measured out a 4" rail - 2" will be overlapping the playing surface/base board below.
Pieced together leftover High Density rail foam from my other poker table and heads up poker table builds.
Underneath, on the base surface, I used extra 1/4" closed cell foam too, so all the foam was "free."
I took my time and really matched the foam up together and at diagonals, so the seams wouldn't be as easily noticeable.
I also attached a latch system to make the rail extremely secure, yet easy to dismantle, so that I can remove it and the playing surface for storage/transport.
Last edited:
OP
OP
markleteenie
4 of a Kind
I forgot to mention I used T nuts and bolts to fix a handle to the underside to carry it. The handle locks out at 90 degrees too.
Picking this table up is a breeze.


Went to Joanns and got a fun colored vinyl. Decided to mix it up from the standard black and brown. My other table is a classic brown colored rail.

Close up of the latch system in action.


Table assembled....

but it's missing something....
Picking this table up is a breeze.
Went to Joanns and got a fun colored vinyl. Decided to mix it up from the standard black and brown. My other table is a classic brown colored rail.
Close up of the latch system in action.
Table assembled....
but it's missing something....
OP
OP
markleteenie
4 of a Kind
Very nice! Love the repurposing of the table topper.BLAM!
@Tommy I have a PCF table too!Oval PCF topper, for the win! Soon as I saw that these were accidentally produced, I knew my "miscut" would be turned into this lovely project!!
View attachment 387309
Kyle
Full House
Nice work on all of these tables!
sheikh617
4 of a Kind
So sweet! I want a poker chip tray lol
FordPickup92
Royal Flush
Awesome!! Looks great!
OP
OP
markleteenie
4 of a Kind
Thanks everyone! If there was an orange to match the logo, I might've gone that direction for the rail!  But I really like the dark red/burgundy I chose.
I forgot to mention the dimensions:
I'll try to take a picture of it later, but the reason I designed it to overlap is so it can also use cup holders that slide under the rail.
But I really like the dark red/burgundy I chose.I forgot to mention the dimensions:
- topper is 70x35
- rail is 4" wide with it overlapping the topper by 2" on all sides
- thus, playing area 66x31
- thus, entire table 74x39.
I'll try to take a picture of it later, but the reason I designed it to overlap is so it can also use cup holders that slide under the rail.
Last edited:
OP
OP
markleteenie
4 of a Kind
SRA Case - lining replacement project
Just ordered a brand new SRA case to transport poker chips.
https://www.amazon.com/gp/product/B00ORYBCD4/
Other people have experience with this case being able to snuggly fit 8 racks with no chip movement. When I closed the case and gently shook it, I could hear chip movement and I didn't even dare to lift it up in the carrying position. So this is either not the right case, or the dimensions/foam has changed slightly since others have purchased it.
I was pretty disappointed but I was going to keep it. The thin foam lining wasn't exactly aligned, and when I tried to readjust it, it completely tore.
It appears they used really cheap adhesive foam. Tsk tsk.
I could have A) returned it. B) lived with a tiny rip in the foam. or C) remove and replace the foam.
Let's try to salvage it!
It took me a couple of hours to scrape out the foam and glue with a box cutter.
Last edited:
Love this - I had the same idea but never got around to doing it. I'm thinking of seeing if I can get a topper to fit on a Barrington folding table since I have two that I don't need!@Tommy I have a PCF table too!
OP
OP
markleteenie
4 of a Kind
SRA Case Lining Replacement continued:
Using left over 1/4" closed cell foam and Whisper Vinyl from my other builds, I cut the foam into a bottom layer and another layer to wrap around the perimeter, for protection on all sides. This first couple of fits were pretty rough, but I corrected them and then 3M glued the vinyl around the foam into a sort of tray and test fit it in the bottom.


Using left over 1/4" closed cell foam and Whisper Vinyl from my other builds, I cut the foam into a bottom layer and another layer to wrap around the perimeter, for protection on all sides. This first couple of fits were pretty rough, but I corrected them and then 3M glued the vinyl around the foam into a sort of tray and test fit it in the bottom.
OP
OP
markleteenie
4 of a Kind
Built the foam tray and hot glued the edges to the inside of the case to keep it from bowing slightly inward.

Did the same for the top.

Using 4 bud jones 1/2 trays in the bottom (I had height issues when trying to stack 2 Paulsons high) and then 4 Paulson racks on top, it fits perfectly with no wiggle.

But it’s really hard to get the first rack out of the bottom of the case. So I cut a scrap piece of real leather to go underneath and around one entire column, so that I can lift out two racks (one from each level) in more motion. Getting the other trays is easy once a rack is gone.
I figured real leather would be classier than using a scrap of whisper vinyl, since you would see the white underside. The real leather is a really close match.


And now it’s good to go!
...but I probably won't be buying another one of these cases...if this is the trouble I have to go through.
FTR - I am very pleased with this case now that the inner lining's been replaced and it's been classed up.

Did the same for the top.
Using 4 bud jones 1/2 trays in the bottom (I had height issues when trying to stack 2 Paulsons high) and then 4 Paulson racks on top, it fits perfectly with no wiggle.
But it’s really hard to get the first rack out of the bottom of the case. So I cut a scrap piece of real leather to go underneath and around one entire column, so that I can lift out two racks (one from each level) in more motion. Getting the other trays is easy once a rack is gone.
I figured real leather would be classier than using a scrap of whisper vinyl, since you would see the white underside. The real leather is a really close match.
And now it’s good to go!
...but I probably won't be buying another one of these cases...if this is the trouble I have to go through.
FTR - I am very pleased with this case now that the inner lining's been replaced and it's been classed up.
Last edited:
OHWebs
Sitting Out
Full size poker table (rebuilt)
Sorry no build pictures, but here is me reassembling it completed.
It started like this:
View attachment 317372
Where the legs/pedestals used to be free standing, I bolted them to the base for stability. A lot of bolts.
View attachment 317373View attachment 317375View attachment 317376
Removed the old speed cloth, added 1/4" closed cell foam, and then a Chanman semi-custom cloth.
View attachment 317371View attachment 317377
Bolted down the railing, with a lot of bolts...
View attachment 317378
I built a brand new rail - 5" wide, with new 1" HD foam, and new Whisper Vinyl.
Also added a 3/4" raised rail, with a white birch veneer and everything wood stained and sealed.
View attachment 317379View attachment 317381
View attachment 317379
This thread is great! Good job and thanks for sharing!
Quick question - how far is the betting line from the rail on this table?
OP
OP
markleteenie
4 of a Kind
Thanks! That one is 8".Quick question - how far is the betting line from the rail on this table?
OP
OP
markleteenie
4 of a Kind
Next project: small craps table.
Inside dimensions are 2' x 5'.
Going to have pyramid bumpers on both ends and a chip area for 1200+ chips.
Either be for 6 or 8 shooters. One dealer.


Inside dimensions are 2' x 5'.
Going to have pyramid bumpers on both ends and a chip area for 1200+ chips.
Either be for 6 or 8 shooters. One dealer.
JeepologyOffroad
Royal Flush
Badass
sheikh617
4 of a Kind
Sick lol
davethesave
3 of a Kind
Loving this thread!
OP
OP
markleteenie
4 of a Kind
More progress. Was able to get a little bit done the morning.
Had a moment of inspiration and found corrugated plastic to conform to the curve and make the pieces more light weight than a kerf cut piece of wood. Used Truss screws to grip more material like a washer while keeping it low profile.
Also drilled out 4 x 3/8" bolts with wingnuts at the 4 connection points.


Messing around with a potential layout and setup the pyramid rubber to test!


Had a moment of inspiration and found corrugated plastic to conform to the curve and make the pieces more light weight than a kerf cut piece of wood. Used Truss screws to grip more material like a washer while keeping it low profile.
Also drilled out 4 x 3/8" bolts with wingnuts at the 4 connection points.
Messing around with a potential layout and setup the pyramid rubber to test!
davethesave
3 of a Kind
Hi all, @markleteenie has been talking to me about my possible rebuilds... Can someone clarify how a rail may be attached to the table without showing screwheads on the underside of the table?
Is it possible that the rail was wrapped and stapled AFTER the rail was screwed to the table? Meaning the screwheads are hidden under the cushion?
Can anyone confirm as I am trying to avoid ripping staples out.
Is it possible that the rail was wrapped and stapled AFTER the rail was screwed to the table? Meaning the screwheads are hidden under the cushion?
Can anyone confirm as I am trying to avoid ripping staples out.
stonker
Two Pair
yes it is possible. I replaced the playing surface years ago on a store bought table. The vinyl for the rail was stapled on top of the table first. the rail wood was screwed down from the top and then the vinyl was wrapped and stapled to the bottom of the table. Post some pics of the bottom so we can see what you’re dealing with.Is it possible that the rail was wrapped and stapled AFTER the rail was screwed to the table? Meaning the screwheads are hidden under the cushion?
davethesave
3 of a Kind
yes it is possible. I replaced the playing surface years ago on a store bought table. The vinyl for the rail was stapled on top of the table first. the rail wood was screwed down from the top and then the vinyl was wrapped and stapled to the bottom of the table. Post some pics of the bottom so we can see what you’re dealing with.
BRUTAL!
So essentially what you are saying is I will need to preform staple surgery to open up the rail vinyl, detach it, then (hopefully) reattach the vinyl? …. lucky for me I guess I have the time now!
( will post pics of the undersides of the tables backs once the weather warms up)
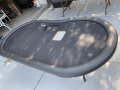
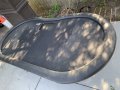
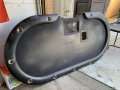
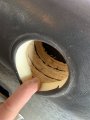
These pics are of 3 different tables... 1. shuffler cut out. 2. decent shape. 3. shuffler cut out, raised rail, ruined cloth. (photo of cupholder from this table)
Attachments
Last edited:
davethesave
3 of a Kind

OP
OP
markleteenie
4 of a Kind
Finished building the dealer cut out. Wood filler, sanded. Cut out and fit the plastic side walls. Prepping it to test a wood stain on it.


One Eyed Dollar
Flush
What kind of pocket hole jig do you have? I need to get one someday. I just need a project to justify buying one. 