BUILDING A ROULETTE TABLE FOR THE KEY WEST'S 32-INCH PAULSON WHEEL
or, "How a wayward pizza and some misguided prisoners helped me get a roulette table"
or, "How a wayward pizza and some misguided prisoners helped me get a roulette table"
The photos:
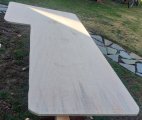
The table top, cut from a 3/4-inch 8' x 4' plywood, top (left) and bottom (right). 2 x 4s were centered, glued and bolted down, and the bolts counter-sunk. They'll sit on top of each pedestal, and the pedestals' original screws go upward into the 2 x 4s. The pad got an initial trimming and glued with spray adhesive, and odds and ends were used to hold down corners before another, tighter trim.
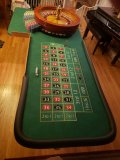
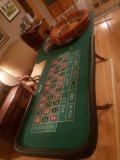
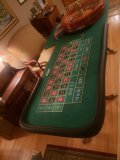
The layout was added to the table, (left) and here still needs some tugging, pulling and stapling. Since time was short, I added 10 feet of "Perfect Padded Rail," bought online. It's a simple solution that can be easily removed later when I get ambitious to do a lighted, raised rail. Center and right: Still a work in progress, with some planned adds when hardware arrives, but we're getting there. Finished size: Length: 8' / Width: 46" at the wheel, 33" along the playing area (numbers) allowing 6.5 inches of space on each side and at the bottom of the table for player chips. Shown with 1,400 Key West roulette chips in seven colors.
The story:
In 2019, I was fortunate enough to buy a 32-inch European (single-zero) roulette wheel made for Paulson by TCS John Huxley, from our friend, @Tommy. It's gigantic and heavy, weighing in at about 180 pounds. Tommy helped me lug it into my basement. Without a suitable (and sturdy) roulette table, it languished down there ever since, getting uncovered for only the occasional online contest.
About two weeks ago, my wife casually said, "Don't forget we're having a casino party for my work friends on December 4th, and I told everyone we're playing roulette." Like all husbands, this is the first I had heard of this, so I began to panic. I had two weeks to come up with a full-size roulette table strong enough to hold up the anvil that is my wheel.
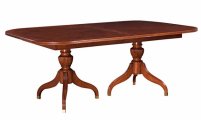
Enter my aunt's old and formerly cherry hardwood dining table. She gave it to me in 1995, when she downsized her house in South Philly and I was moving to an apartment with some roommates. The table was from early 1900s Philadelphia, and had two mighty pedestal legs holding firm to a large table top that was mirror-polished cherry. You could see your reflection in the finish.
At least until "The Pizza."
Late one Saturday night, one of my roommates ordered a pizza delivered to our apartment. It arrived, hot and fresh. And hot. And he put it on the cherry hardwood tabletop. Did I mention it was hot?
Yes, it permanently marred the finish with a white, filmy bubbling mess in the shape of that pizza.
"What can I do?" I thought. A coworker suggested using his contact with our state's Prison Industries, where inmates learn a trade by doing work like refinishing furniture.
"Perfect," I thought. We loaded the table into my truck and off it went to the prison, 60 miles away. Two weeks went by, and I received word that the table was "finished." (As you'll see, they were right.)
What came back to me was a table, but it looked like my beautiful cherry table had been skinned alive, and was now a sort-of red oak or light brown finish -- the color you always get when you use cheap stain. It turns out that the prison didn't have cherry stain, so they grabbed a can of something they thought was similar and went to work. The table was effectively ruined, but it wasn't their fault. The table sat in storage ever since.
But the pedestal legs would be the perfect solution. Centering one directly below the center of the wheel was the answer. Off I went to the giant hardware store for some 3/4-inch plywood. Intending to do this build for some time, I already had a single-zero layout and some table hardware, like the money drop box and paddle.
Most of the drawing, measuring and cutting took place during a long first day. I cut out the shape of the table, sanded, then measured and glued the 2 x 4s to the bottom of the table. Letting the glue dry overnight allowed me to flip the table onto the patio so I could measure and draw the exact location of the 2 x 4s under the table (since I couldn't see them), then screw bolts down through the tabletop and into the 2 x 4's and counter-sink them.
Overall, the table took about 12 hours of time spread over five days. The tools used were a drill, jigsaw, tape measure, ruler, carpenter's square, pencil, hand saw (for the 2 x 4s), sandpaper, large staple gun and staples, spray adhesive and shears.
It's still a work in progress, and some table hardware has yet to arrive. (The money drop box frame is on the way this week.) I haven't selected finials yet, but they'll be an easy add. I'm finishing some nice wood trim, which will extend from the hook to the padded rail on the dealer's side to prevent chips from falling off the table when mucking.
My table has a "left-handed" layout, meaning when the croupier stands at "the hook," the wheel will be nearer to his or her left hand. I had to request a left-handed, single-zero layout that was custom-printed over a year ago. It's a dark green "Monte Carlo" layout with a nice background design in the material.
Finally, kudos to my awesome wife for giving me this deadline, and for helping lug the wheel up the stairs. It was an engineering feat in itself.
Issues I found / things I learned doing this:
- Draw your table on the plywood first. Make sure your "hook" is on the correct side for your layout -- right- or left handed --before attaching anything to it. If it's not, you'll simply need to flip it before continuing.
- Centering one of the pedestals directly under the center of the wheel was key to this project due to the weight of the wheel.
- Plywood is heavy and expensive. Nice, thick plywood is very heavy and really expensive.
- You think you can't do this, but you really can. It won't be a pro casino table like a T Chan, but it will still look good.
- Take your time. Take breaks. I only had to go to the emergency room once.
- Doing the project alone is harder. I'd recommend getting a friend who wants a table, then build two together.
- Wear gloves when you can. The work tears up your hands.
- If you are adding a drop box, make sure your table and layout has enough room outside the playing field, so the plunger and frame doesn't cover any part of the numbers.
- You can't and won't finish in a day. Glues need to dry overnight. This table involved some daily work over five days.
- All tolled, I spent about $400 doing this table. (Plywood, screws, glue, pad, layout, padded rail and hardware. )
-- Dennis
Attachments

Last edited:
")