Felt_Lizard
Full House
Sometimes it happens.
You cleaned them with the wrong chemical.
The chips are many decades old.
You left them in sunlight.
The ultrasonic got them.
The dog peed on them.
A higher power decided to punish you.
Etc etc....
The chips are now dull and faded, a shade or two lighter, and have lost that crisp luster. It's even a little difficult to see the original mold definition.
Whatever "it" was that happened to the chips, it removed media from the chip. It removed some pigments and likely some of the super fine crystalline structure straight out of the clay. Microscopically, you've turned your chips into Swiss cheese. The chips are ever-so-slightly more brittle and therefor weaker now. They are also vastly more prone to more wear and stains. And it is impossible to return those same stripped elements back into your faded beauties.
BUT....what if we could find something to just fill those holes and allow the surrounding remaining media to reflect their colors through the filler? It would re-strengthen the chip, protect and vastly improve it's appearance. What if we went one step further and we could easily add some (COLOR) into that filler before applying it? It would have some strong surfacant to get capillary action-to be able to penetrate into the tiny apertures (holes you made) in the surface of the chips. Needs to dry hard and ideally dry fast.
This *exact* thing is at your general department store. Floor polish. Yeah. Modern floor polish is liquid acrylic polymer(clear plastic) and some water, along with a little soap to get the the stuff to penetrate into cracks and crevices and a drying acellerant. It fills in scratches and abrasions by design, dries hard and fast, returns luster like champ, and looks great.
Materials needed:
1. Wieman high traffic Hardwood Polish and restorer (That's what I used, but I suspect most UNCOLORED floor polish is almost identical, composition wise). If it won't damage wood, it's just fine for your chips. 32 oz=10$ or less USD.
2. Acrylic Artist Inks-You can get sets on Amazon for 30-40$ USD. Liquidtex, Dr PH Martin, or Daler-Rowney FW all offer sets of acrylic inks. You'll likely need a set of inks, not just one color to blend them to achieve your specific chip color.
A package of little plastic shot glasses. They are also in your general department store or liquor store. Less than 5$ USD.
Brushes-Get a variety of small sizes. A brush that is 1/2 inch wide is too big, to give you an idea of size. Multi-packs are cheap.
Tweezers (you can get pvc, rubber, silicone or plastic tipped ones.....ew-la-la!) Spend whatever you want....
Paper towels or cotton swabs.
Small coins (pennies, dimes etc)- However many you need for each batch you're comfortable doing in a sitting)
Steps:
Remember: Realistic expectations: Nothing is perfect. Your goal is to get very close to the original color and luster. If you are patient and start slow....you will get so close that when you are finished-a casual or even medium level inspection won't reveal the difference.
Make sure the chips are clean and un-oiled. I'll repeat: UN-OILED. That polish won't work on oiled surfaces, so don't try it.
Decide if the chip fade is so slight that just straight floor polish will get that luster back and slightly darken the chips.
Take out one of your little shot glasses and pour it *1/2 to 3/4 OF AN INCH* deep of floor polish. That's probably enough for a rack of 100 chips. A little goes a long way.
Now decide if you need a few drops of ink in the polish to get those chips just a little richer and more saturated to get'em back to looking new. When mixing, remember that the polish will dry lighter in color than the liquid appears. Consider using a small part (the rolling edge?) of a single faded chip to test your colored polish. If a couple of drops of ink isn't enough after the first test, add a couple more, and keep testing until you are satisfied. You can probably magic eraser it off the test chip once the test is complete and your mix is finalized.
Have paper towels or cotton swabs (Q-tips) right next to your working area for dabbing up acrylic that you mis-applied.
Holding the first chip with the tweezers, you're ready to start carefully and slowly brush painting your chips with the floor polish. The polish is very thin, almost the consistency of water and milky white. Use a small brush that allows good control and doesn't drown the chip in polish. Until you get the hang of it, less is better. You want a very, very thin coat of polish on the faded areas. You don't want deep standing pools of polish on the chip. You will notice that sometimes you'll coat an area, but the polish will pull back and reveal a dry area. Just slowly and gently re-brush the area and the polish will grab and coat that spot. Keep the polish off the inlay, but brush it as close to the inlay as you're comfortable. You'll get good at it very quickly and soon you'll push up to the edge of the inlay with confidence. If a little acrylic gets on the inlay (or any unintended area), just quickly dab if off with a paper towel or cotton swab.
If you added ink to the polish, obviously you will only coat the areas on the chip of that color, which may mean you have to paint around edgespots and the inlay. That's ok, you'll get good at painting right up to the edges of the edgespots too. Start slow.
To dry them, place the chips flat with the inlays perfectly centered on pennies or dimes (or whatever small coins are handy) so the coated areas don't touch anything while drying. 10 to 20 minutes if you paid attention and used thin coats. Don't be stupid and try to hurry the drying process with a heater or hairdryer or some dumb stuff. I can think of at least a dozen reasons why shortcutting the drying phase will fvck you.
After you've coated the faded areas with colored polish, but still have other areas of the chip that didn't fade but lost luster, then after the colored polish dries, go back and paint the other areas with uncolored polish. Again...a very thin coat. Slightly overlap colorless polish over the top of dried colored polish areas. The transition will be invisible when dry, and you won't lose any of the color of that first coat.
Don't forget the rolling edges...
Good luck, players......
Pros:
Cheap
Non-toxic
Easy to work with and apply
Dries very fast (10 to 20 minutes, because you are applying THIN, damn you! )
Acrylic inks can be added before application
Super durable once applied
Won't weaken or negatively react to the chips
Actually strengthen and protect the chips from future abrasion/scratches and stains
Chips will be less absorbent, less likely to soak up oil/grease/beer/ etc etc
Cons:
NOT for chips that were oiled or still have oil in them. IF they have dried out completely, then go ahead.
For a while, the chips will have less friction when stacked/rubbed together. They are noticeably more slippery and slightly shinier until you get some light wear/shuffling on the chips. It won't take much.
Not for inlays...
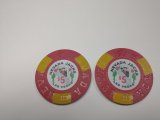
PICTURES:
In both cases below, the left chip is in mint untouched condition. The right chip had faded during ultrasonic, but was then treated with acrylic.
As you can see, the color and luster has been fully restored. The treated chip is ever so slightly shinier, but this will resolve over time with a little shuffling or table wear.
Perhaps a larger implication of this project is that liquid acrylic MAY SOON REPLACE OIL. The acrylic is almost as cheap, can be applied the exact same way (lightly soaked cloth, sparingly applied, only along the rolling edge of the chips, and allowed to dry 5 minutes before going back in the racks), but won't "dry" out, will protect that edge, and actually provides more "pop" and an even more candied appearance. Oil must be reapplied, no matter the level of wear the chips get. Acrylic will last far, far longer on frequently used chips, and will seemingly last FOREVER on chips that never leave the racks.
NOTE: Acrylic can only be applied to unoiled chips. For chips previously oiled, they need to be *completely* dried out.
You cleaned them with the wrong chemical.
The chips are many decades old.
You left them in sunlight.
The ultrasonic got them.
The dog peed on them.
A higher power decided to punish you.
Etc etc....
The chips are now dull and faded, a shade or two lighter, and have lost that crisp luster. It's even a little difficult to see the original mold definition.
Whatever "it" was that happened to the chips, it removed media from the chip. It removed some pigments and likely some of the super fine crystalline structure straight out of the clay. Microscopically, you've turned your chips into Swiss cheese. The chips are ever-so-slightly more brittle and therefor weaker now. They are also vastly more prone to more wear and stains. And it is impossible to return those same stripped elements back into your faded beauties.
BUT....what if we could find something to just fill those holes and allow the surrounding remaining media to reflect their colors through the filler? It would re-strengthen the chip, protect and vastly improve it's appearance. What if we went one step further and we could easily add some (COLOR) into that filler before applying it? It would have some strong surfacant to get capillary action-to be able to penetrate into the tiny apertures (holes you made) in the surface of the chips. Needs to dry hard and ideally dry fast.
This *exact* thing is at your general department store. Floor polish. Yeah. Modern floor polish is liquid acrylic polymer(clear plastic) and some water, along with a little soap to get the the stuff to penetrate into cracks and crevices and a drying acellerant. It fills in scratches and abrasions by design, dries hard and fast, returns luster like champ, and looks great.
Materials needed:
1. Wieman high traffic Hardwood Polish and restorer (That's what I used, but I suspect most UNCOLORED floor polish is almost identical, composition wise). If it won't damage wood, it's just fine for your chips. 32 oz=10$ or less USD.
2. Acrylic Artist Inks-You can get sets on Amazon for 30-40$ USD. Liquidtex, Dr PH Martin, or Daler-Rowney FW all offer sets of acrylic inks. You'll likely need a set of inks, not just one color to blend them to achieve your specific chip color.
A package of little plastic shot glasses. They are also in your general department store or liquor store. Less than 5$ USD.
Brushes-Get a variety of small sizes. A brush that is 1/2 inch wide is too big, to give you an idea of size. Multi-packs are cheap.
Tweezers (you can get pvc, rubber, silicone or plastic tipped ones.....ew-la-la!) Spend whatever you want....
Paper towels or cotton swabs.
Small coins (pennies, dimes etc)- However many you need for each batch you're comfortable doing in a sitting)
Steps:
Remember: Realistic expectations: Nothing is perfect. Your goal is to get very close to the original color and luster. If you are patient and start slow....you will get so close that when you are finished-a casual or even medium level inspection won't reveal the difference.
Make sure the chips are clean and un-oiled. I'll repeat: UN-OILED. That polish won't work on oiled surfaces, so don't try it.
Decide if the chip fade is so slight that just straight floor polish will get that luster back and slightly darken the chips.
Take out one of your little shot glasses and pour it *1/2 to 3/4 OF AN INCH* deep of floor polish. That's probably enough for a rack of 100 chips. A little goes a long way.
Now decide if you need a few drops of ink in the polish to get those chips just a little richer and more saturated to get'em back to looking new. When mixing, remember that the polish will dry lighter in color than the liquid appears. Consider using a small part (the rolling edge?) of a single faded chip to test your colored polish. If a couple of drops of ink isn't enough after the first test, add a couple more, and keep testing until you are satisfied. You can probably magic eraser it off the test chip once the test is complete and your mix is finalized.
Have paper towels or cotton swabs (Q-tips) right next to your working area for dabbing up acrylic that you mis-applied.
Holding the first chip with the tweezers, you're ready to start carefully and slowly brush painting your chips with the floor polish. The polish is very thin, almost the consistency of water and milky white. Use a small brush that allows good control and doesn't drown the chip in polish. Until you get the hang of it, less is better. You want a very, very thin coat of polish on the faded areas. You don't want deep standing pools of polish on the chip. You will notice that sometimes you'll coat an area, but the polish will pull back and reveal a dry area. Just slowly and gently re-brush the area and the polish will grab and coat that spot. Keep the polish off the inlay, but brush it as close to the inlay as you're comfortable. You'll get good at it very quickly and soon you'll push up to the edge of the inlay with confidence. If a little acrylic gets on the inlay (or any unintended area), just quickly dab if off with a paper towel or cotton swab.
If you added ink to the polish, obviously you will only coat the areas on the chip of that color, which may mean you have to paint around edgespots and the inlay. That's ok, you'll get good at painting right up to the edges of the edgespots too. Start slow.
To dry them, place the chips flat with the inlays perfectly centered on pennies or dimes (or whatever small coins are handy) so the coated areas don't touch anything while drying. 10 to 20 minutes if you paid attention and used thin coats. Don't be stupid and try to hurry the drying process with a heater or hairdryer or some dumb stuff. I can think of at least a dozen reasons why shortcutting the drying phase will fvck you.
After you've coated the faded areas with colored polish, but still have other areas of the chip that didn't fade but lost luster, then after the colored polish dries, go back and paint the other areas with uncolored polish. Again...a very thin coat. Slightly overlap colorless polish over the top of dried colored polish areas. The transition will be invisible when dry, and you won't lose any of the color of that first coat.
Don't forget the rolling edges...
Good luck, players......
Pros:
Cheap
Non-toxic
Easy to work with and apply
Dries very fast (10 to 20 minutes, because you are applying THIN, damn you! )
Acrylic inks can be added before application
Super durable once applied
Won't weaken or negatively react to the chips
Actually strengthen and protect the chips from future abrasion/scratches and stains
Chips will be less absorbent, less likely to soak up oil/grease/beer/ etc etc
Cons:
NOT for chips that were oiled or still have oil in them. IF they have dried out completely, then go ahead.
For a while, the chips will have less friction when stacked/rubbed together. They are noticeably more slippery and slightly shinier until you get some light wear/shuffling on the chips. It won't take much.
Not for inlays...
PICTURES:
In both cases below, the left chip is in mint untouched condition. The right chip had faded during ultrasonic, but was then treated with acrylic.
As you can see, the color and luster has been fully restored. The treated chip is ever so slightly shinier, but this will resolve over time with a little shuffling or table wear.
Perhaps a larger implication of this project is that liquid acrylic MAY SOON REPLACE OIL. The acrylic is almost as cheap, can be applied the exact same way (lightly soaked cloth, sparingly applied, only along the rolling edge of the chips, and allowed to dry 5 minutes before going back in the racks), but won't "dry" out, will protect that edge, and actually provides more "pop" and an even more candied appearance. Oil must be reapplied, no matter the level of wear the chips get. Acrylic will last far, far longer on frequently used chips, and will seemingly last FOREVER on chips that never leave the racks.
NOTE: Acrylic can only be applied to unoiled chips. For chips previously oiled, they need to be *completely* dried out.
Attachments
Last edited:
")
