-
PCF is an eBay Partner. If you make a purchase through one of our links, we may earn a commission at no extra cost to you. Thank you for your support!
You are using an out of date browser. It may not display this or other websites correctly.
You should upgrade or use an alternative browser.
You should upgrade or use an alternative browser.
Detailed Table Build - Raised rail, LED strip, custom cloth (2 Viewers)
- Thread starter chkyrslf
- Start date
OP
OP
chkyrslf
Two Pair
Love that cloth design. Itll definitely look great in that space. Do you have a link to those diffused neon led's? I have similar strips running the ceiling of my basement but theyre only one color.
Thanks! This probably won't help you, as we have different stores here in Aus, but Bunnings is like Lowe's in the US.
https://www.bunnings.com.au/suntuf-1200-x-600-x-3mm-uv-diffuser-polycarbonate-sheet_p1010811
But it's an opaque polycarbonate sheet that is meant to diffuse sunlight...
OP
OP
chkyrslf
Two Pair
how much did the wood set you back? Was looking to make one with the old man and it seemed a waste to almost buy 3 massive planks of plywood and leave the majority of it.
@sharik224 Hey sorry I missed this one. Yeah so I splurged a little by getting the 3x sheets of plywood (some make do with 2), and I also bought structural grade stuff where many don't - so my cost wouldn't be indicative of the norm.
But mine were $90/sheet, so AUD$270, and then a few smaller sheets of 3mm and 6mm, so prob spent a bit over AUD$300 on plywood all up. I also made 2x tables, so...
That's not too bad considering you got two tables out of it and looking at what places charge for entry level fold-able ones .@sharik224 Hey sorry I missed this one. Yeah so I splurged a little by getting the 3x sheets of plywood (some make do with 2), and I also bought structural grade stuff where many don't - so my cost wouldn't be indicative of the norm.
But mine were $90/sheet, so AUD$270, and then a few smaller sheets of 3mm and 6mm, so prob spent a bit over AUD$300 on plywood all up. I also made 2x tables, so...
chuurs for the info
TheDirtMerchant
Two Pair
Are you saying to use a hot glue gun to hold down the vinyl instead of staples?pull the staples and use a heat gun. You’ll be glad you did.
And it'll be strong enough to hold and stay in place w/o staples?
No not a hot glue gunAre you saying to use a hot glue gun to hold down the vinyl instead of staples?
And it'll be strong enough to hold and stay in place w/o staples?
A heat gun, like a hairdryer, to soften the vinyl
OP
OP
chkyrslf
Two Pair
No not a hot glue gun
A heat gun, like a hairdryer, to soften the vinyl
I used a hair dryer on the main table vinyl (don't have a heat gun) - thanks for the tip mate!
Final update to come in a few days
 finally...
Updates?I used a hair dryer on the main table vinyl (don't have a heat gun) - thanks for the tip mate!
Final update to come in a few days
OP
OP
chkyrslf
Two Pair
Updates?
Sorry! All the pics are ready to go, I'll get them up later today
 (yes it's finished!)
OP
OP
chkyrslf
Two Pair
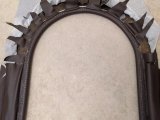
Alright, so started by upholstering the rail and to give it a bit of extra padding, I first added a layer of the closed cell foam leftover from the playing surface before adding the main open-cell foam.


Then put the main layer of foam on top. This one is a bit firmer than the foam used on the other table, and feels spot on for what I'm going for.


Then put the main layer of foam on top. This one is a bit firmer than the foam used on the other table, and feels spot on for what I'm going for.
OP
OP
chkyrslf
Two Pair
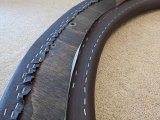
Laid the rail down on the sheet of vinyl, and stapled it up. Followed the usual approach of cutting slits to pull the inside taught and staple again (this bit is the suckiest of table making!  )
)


)
OP
OP
chkyrslf
Two Pair
You might remember on the underside of the rail, there is only 9mm to staple the inside of the vinyl in order to accommodate the light diffuser panel in its groove. Thanks to @xdan 's suggestion, I stapled over this first to get it set tight, and then came back and marked that groove's edge and ran a line of staples along that 9mm strip. Kind of like stitching. You can see that line in these pics.
I left it like this until the very end to allow the vinyl to kind of set and stick in this position before cutting the slot for the diffuser.


I left it like this until the very end to allow the vinyl to kind of set and stick in this position before cutting the slot for the diffuser.
Attachments
Last edited:
OP
OP
chkyrslf
Two Pair
Now onto the riser section, where I also want to wrap this in foam and vinyl so it's becoming like an extension of the rail upholstery (but a separate modular piece).


Then I took the carving knife around this section and cut it on a bit of an angle, as when it's pulled tight with the vinyl, I didn't want it bunching up as the rail has to mount flush on top of this piece (and this piece onto the base).


Then I took the carving knife around this section and cut it on a bit of an angle, as when it's pulled tight with the vinyl, I didn't want it bunching up as the rail has to mount flush on top of this piece (and this piece onto the base).
OP
OP
chkyrslf
Two Pair
OP
OP
chkyrslf
Two Pair
Following @bsdunbar1 's great suggestion, I wrapped the playing surface in a strip of ply to create a sharp edge when the felt is fastened, which will sit nicely against the diffuser strip.
I had to find a way to apply pressure, and after first using tape on the foam which pulled a little off, I had to come up with a system that pulled from the other side of the table. Looks like a bed that belongs in an asylum


Then laid out the felt and accurately measured the betting line to ensure straight and equidistant from all edges (one THOUSAND adjustments required!). Stapled, and cut flush.


I had to find a way to apply pressure, and after first using tape on the foam which pulled a little off, I had to come up with a system that pulled from the other side of the table. Looks like a bed that belongs in an asylum
Then laid out the felt and accurately measured the betting line to ensure straight and equidistant from all edges (one THOUSAND adjustments required!). Stapled, and cut flush.
Last edited:
OP
OP
chkyrslf
Two Pair
and now onto the final assembly!!


The rail/riser section was an extremely tight fit. It all came together fine pre-felt install, but that extra mm of material around was enough to make it a real press fit so I had to help it down with the help of a few clamps.

The rail/riser section was an extremely tight fit. It all came together fine pre-felt install, but that extra mm of material around was enough to make it a real press fit so I had to help it down with the help of a few clamps.

OP
OP
chkyrslf
Two Pair
Some action shots with chips and cards 


I have to give a massive shoutout and thank you to @T_Chan for the custom cloth, and @timinater for taking my rough mockup and turning it into a work of art that I love!
Thank you both!!
I have to give a massive shoutout and thank you to @T_Chan for the custom cloth, and @timinater for taking my rough mockup and turning it into a work of art that I love!
Thank you both!!
Last edited:
mosjef
Sitting Out
Hell yes. This turned out awesome!
- Joined
- Mar 16, 2022
- Messages
- 2,074
- Reaction score
- 3,855
- Rewards
- 290
Wow that came out great!
Amazing! Enjoyed following along immensely.
Similar threads
- Replies
- 8
- Views
- 684
- Replies
- 21
- Views
- 1K
- Replies
- 10
- Views
- 721
- Replies
- 0
- Views
- 319
- Replies
- 0
- Views
- 350