Cleaning Old Burt/ASM Chips (1 Viewer)

MegaTon44

Full House
Supporter
Joined
Feb 9, 2016
Messages
3,831
Reaction score
15,469
Location
Collegeville, PA
Hey All,

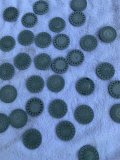
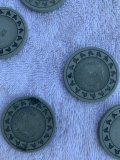
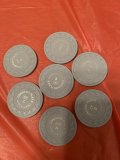
I just picked up an awesome old school 800pc Kings Inn set from @JFCJ. In addition, I snagged another 380 chips from @Spinettis Gaming and @Godzilla28 kindly sent me a rack for free. Thank you!

Now I have to figure out how to clean these brittle old chips. I know this has been mentioned many times, but wanted to aggregate some thoughts:
  1. Ultrasonic with Lundmark (my go-to) - Clearly a no as it will destroy the chips
  2. Ultrasonic with a squirt of Dawn - I was bored. Didn't do anything
  3. Dawn and toothbrush - probably safest option, but I'm lazy
  4. Soak + Magic Eraser - Is this too rough?
  5. Sterling's Magic? I read this before, but has anyone had experience using this to clean old chips?
  6. Say screw it - Leave em dirty and keep the vintage Reno character
This $5 chip (pic courtesy of chipguide) is the nastiest of the bunch. Mine generally look dirtier than this. I figure the mustard color could be a factor in the cleaning process.

33195 (1).jpg


Any thoughts would be tremendously appreciated.

Thanks!
Dan
 
2 thoughts...

1. Dawn and toothbrush is best bet...then Magic eraser if they are still nasty.

2. That's an awesome set! Congrats!
 
Last edited:
For chips like this I would not soak if paper inlay. Maybe test soak a few to see how it goes first. But yeah with dawn then magic eraser where needed is what I would do
 
Wow, Mr. Ceramic with another cool clay set! I thought you were in a "No buying mode," I guess you still have the sickness.

Here's the HHRs I cleaned up with Lundmark in the ultrasonic. Unfortunately I didn't record the specs of the cleaning, but I believe they were used with the standard temperature, possibly longer than the standard time. Maybe you can test out, but I know this set is much more valuable than mine. Also, mine are hot stamped and not inlays. Good luck!
 

Attachments

  • 23257B55-C427-4E09-BF0B-5BD871CAE018.jpeg
    23257B55-C427-4E09-BF0B-5BD871CAE018.jpeg
    259.8 KB · Views: 139
  • 752FC4C3-B3D9-49EF-9D61-4547DB493466.jpeg
    752FC4C3-B3D9-49EF-9D61-4547DB493466.jpeg
    194.4 KB · Views: 124
  • D5F4D3AF-98BC-4604-A9B7-F3F65810DA06.jpeg
    D5F4D3AF-98BC-4604-A9B7-F3F65810DA06.jpeg
    130.8 KB · Views: 128
Great score Dan

No chemicals with ASM/CPC...manual labour with dawn.
No soaking !

Magic eraser for heavy dirt & rolling edges.
 
That machine doesn't do anything ultrasonic right? Looks like a slightly oversized electric toothbrush. I'd be interested in seeing it in action in a video or before/after photos.
 
Thank you all for the guidance. I truly appreciate it. Forgive me when I say I heeded none of it because I am a lazy moron. I wanted to provide an update of what happened because I decided to take the ultrasonic route.

** These results are my own. Don't blame me if you ruin your chips **

Materials

  • Vevor 6L
  • Lundmark (fake) TSP
  • Tablespoon
  • Distilled Water (1 gallon)
  • Salad spinner
  • Bowl of clean water for rinsing
  • Roll of paper towels
Process
  • Poured in 1 gallon of distilled water
  • Turned on the ultrasonic and the temp was 25C (normal temp I'd do is 43C, but I was concerned about heat damage)
  • Added 2 tablespoons of Lundmark (would normally do 4)
  • Put in test barrel of warped chips for 60 seconds - no damage. Cleaned off Lundmark residue and hand dried
  • Did another 100 chips - no damage
Results

20210726_182949.jpg
20210726_183019.jpg

20210726_181519.jpg


As you can see, typical ultrasonic results. Much cleaner chips (nowhere close to perfect) at a fraction of the time. These chips are 40-50 years old and they could handle the "Ultrasonic Light" regimen described above. May take a Magic Eraser to help finish the job on a few tough chips.

Thanks all for the support. Please don't hesitate to share thoughts.
 
Last edited:
@MegaTon44 was there any chip material left in the US water? From all the posts that I've seen, people say that Lundmark will dissolve old Burt chips. Glad it didn't!
I found one sliver of a chip (likely from the agitation in the salad spinner), but otherwise no casualties. Colors look decent on the chips and not too dried out. May break out the oil to make them pop again, but I generally view this as a success.

Finished 400 in the same bath, which is my max before it gets too disgusting. Still have another 500 x $5s to clean and then I'll be all set

Thanks for the support all!

20210726_200611.jpg
 
I've got some BC Wills chips that need cleaning. I was all resigned to the fact that I couldn't use my ultrasonic and was going to do it with a good old dawn and scrubbing.

But then you had to go and post this. Pretty damn good results... Makes me really want to try the ultrasonic.

Off topic, is it weird that the dirty US water turns me on?
 
Please don't hesitate to share thoughts.
My thought - those chips are freaking awesome. I was eyeing them last week when I was looking for a cheap barrel of non-red fives. Love these so much - just such a cool, old school feel to them.
 
I have had problems before with other ASM chips with non-phosphate TSP in the ultrasonic. Perhaps I will experiment with a half-normal strength solution. I generally limit detergent exposure to 45-60 seconds before rinsing.
 
Thought I'd post my results here (sorry about the bad lighting, it was late at night). I decided to try to clean my filthy Gold Rush $5s with my U/S. I believe these were made by Burt for BC Wills...I was actually all prepped to do this by hand, and actually started the process. 5 chips took me like 30 minutes. So, when Dan posted his results above, I thought I would give it a try.

My original attempt was with Simple Green; either my temperature was too low (25c) or I didn't use enough, but after 60s, there was little to no change. So, I went with @MegaTon44's formula (substituting Red Devil for Lundmark). First chip came out with no damage, so I did the rest!
  • For the Large Greek inlay, there was no way I could have gotten the key recess clean without an U/S. I was using a small pick, and it was taking forever!
  • The U/S did 100% on the dirt/grime, and about 70% on the color transfer, so I still needed to use a Magic Eraser quickly on the faces after
  • I was shocked at their true color; they went from a fuckin-yuck-burgundy to a sexy-bold-red.
I think they came out great!

:vomit:
:wow:
1627481176502.png
1627481189805.png
 

Create an account or login to comment

You must be a member in order to leave a comment

Create account

Create an account and join our community. It's easy!

Log in

Already have an account? Log in here.

Back
Top Bottom