Barrington poker table thread (16 Viewers)

Would you recommend it for those reasons alone if not planning to use the LEDs?
You might not plan to use the LEDs, but I highly recommend it. Getting the warm white COB LEDs and dimmer is a game changer.

LEDs off:
1000035240.jpg


Warm white COB LEDs at about 30%:
1000035242.jpg
 
How are you attaching these to the non-ESPN tables?
You're not. You're installing the COB LED lights on top of the existing LEDs on the ESPN or Barrington LED table.

https://www.pokerchipforum.com/threads/barrington-poker-table-thread.30910/post-2353645

https://www.pokerchipforum.com/threads/barrington-poker-table-thread.30910/post-2352520

You might be able to put them on the rail on a standard table, not sure if anyone has tried, could be rough though. I'm just saying if you're on the fence between standard and LED, go with LED.
 
I received my new hole saw and finished the remaining 7 holes this morning.

Unfortunately, I ripped the vinyl a bit. For now I put some black gorilla tape over it. I’m not pleased with my self, but it could be much worse. Definitely happy I decided to do this, you’re upgrading from coasters to cup holders.
 

Attachments

  • IMG_9143.jpeg
    IMG_9143.jpeg
    122.5 KB · Views: 55
Congrats on your new cup holder! Bummer what happened to the vinyl. What happened? Did you just punch through it?

Don’t worry - with a drink or two, no one will even notice. ;)
 
Yea, I just went a tad too far with my saw on that one cup. 9 out of 10 isn’t bad, and the dmg is pretty minimal relative to the work.
 
Alright here is a pic of the finished work, upgraded jumbo cup holders. Shout out to all who have posted guides, pics, and recommended tools / cup holders. Very pumped for my next game Apr 12.
 

Attachments

  • IMG_9147.jpeg
    IMG_9147.jpeg
    186.1 KB · Views: 60
Alright here is a pic of the finished work, upgraded jumbo cup holders. Shout out to all who have posted guides, pics, and recommended tools / cup holders. Very pumped for my next game Apr 12.
Looks nice! Now make sure to just sit AT that spot with the rip and you'll never see it. Out of sight, out of mind. It blends right in.
 
Haha exactly. I mean, it’s a fold up table- it’s gonna get banged up. I of course wanna keep it in the best possible condition, but I also realize that due to the natural of it being foldable and moving around , it’s not gonna stay perfect. I think the bruise on my thigh from using the drill is worse than the rip in the vinyl lol
 
I ended up buying this hole saw that includes the arbor for just $26 off Amazon. I'm five holes in and everything is going great. The arbor sticks out enough to hit the wood placed underneath the table as I'm cutting, so when I finally get through the wood of the table it provides a stop before cutting through the vinyl armrest. I'm still taking my time and not pushing down too hard, so I don't tear the vinyl by mistake, but since the arbor sticks out a bit it does add a little extra protection if you will.

https://a.co/d/5W8KIDV

Hole Saw.jpg
 
So I finished my Barrington mods (for now) but still need to order a topper.

New LEDs, Dimmer, AA Battery Pack, and Jumbo Cupholders

COB LEDs

I wasn't the biggest fan of the blue LEDs and didn't like how they were so spaced out. I saw someone talk about the COB LEDs and how they are amost diffused already and ordered the warm white and couldn't be happier. The LEDs are very close together so you don't need to put something in front of them to diffuse them like I was trying to do with the old LEDs. Instead of ripping out the old LEDs, I actually just wedged the new LEDs right on top of the current ones. It worked out great.

I did have to cut the light strip and attach another tail end. Very easy to do but measure accurately before you cut! You don't have much leeway with the 16.4ft strip. And then used the Y connector that also came with the COB connector package.

Screwed and glued on some velcro, glued velcro to the battery pack, then buttoned up everything else. Happy with it.

COB LED Lights
COB Connector Package
Dimmer
Battery Pack

Jumbo Cupholders
I went with the jumbos after reading recommendations. Pried off the old ones with a vise grip, drilled a center hole down with a standard bit, then drilled from the bottom up with the 3 5/8in hole saw starting it the pre drilled hole. I got them all done but it was a bit of a struggle with the hole saw I bought. If I would do it again, I would get one that was deeper. This one barely made it through both pieces of wood.

Jumbo Cupholders
Hole Saw (buy a deeper one)

View attachment 1252914
Hey, I noticed that the link to the battery pack on Amazon isn't available. Is this the same thing ? https://www.amazon.com/AITIAO-Batte...5e-a276-bde72f74bcef&pd_rd_i=B09LTSNJTW&psc=1
 
thanks! curious, why would you need a 4-pack? Wouldn’t you only be able to use 1 pack at a time
I guess you could keep a few loaded up with batteries and swap them out for those really long sessions. :ROFL: :ROFLMAO:

Now that I think of it...how long do the battery packs last with these LED lights?
 
I guess you could keep a few loaded up with batteries and swap them out for those really long sessions. :ROFL: :ROFLMAO:

Now that I think of it...how long do the battery packs last with these LED lights?
Mine was at 7 hours and still going strong last session..now if I can just remember which pack I used, I'll be able to give you a number when those finally die. :LOL: :laugh:
 
I just finished mine last night with the guidance of this amazing group.

1. Remove the cup. I used a heat gun and it loosened up the glue and the cup just slid right out.
2. Find the middle of the cup and move a hair towards the table and drill a pilot from the top. No need to remove rail.
3. From the bottom, use your hole saw to cut through the wood.
4. Go easy as you will be cutting through 2 pieces of wood. I stopped after the first piece and then vacuumed out the dust to see where I was. Just so I didn’t saw all the way to the vinyl. The second piece of the wood is glued to the foam.
5. When I loosened the second piece of the wood I used a box cutter to trim the foam and be careful to not cut the vinyl.
6. I replaced some of the cut foam back to give it more cushion around the cup holder.
7. Pushed the cup holder into place and boom. Done!

I’m assuming you went with the 3-5/8” hole saw and jumbo replacement cup holders.

Hope this helps.
did you use these cupholders and this saw ? https://www.amazon.com/gp/product/B0789HG6NW?tag=pokchifor0d-20
https://www.amazon.com/gp/product/B0C6MN14B1?tag=pokchifor0d-20&th=1
 
OK, I finished cutting out all of the holes for my larger cupholders and everything went smoothly. I followed the excellent step by step guide by @greedyintern (thanks for the great explanation and photos).

One thing nobody mentioned, and it would keep me from doing the cupholder mods every again, is that whatever pressboard material Barrington is using between the plywood and the table felt smells like what I'd expect a camel's ass to smell like on a hot Sahara day. That, PLUS CRAP!

Glad it went well! Sorry I didn't warn you about the smell! Haha
 
I recently upgraded my cup holders after a couple of close calls of having drinks spilled onto the playing surface. The cup holders that come with the table are a joke (a very cruel and sad joke). If you're on the fence about upgrading yours, don't delay. Get them upgraded. They're a huge improvement.

View attachment 1289094

I was really encouraged by the posts by @dmoney and @greedyintern. Huge shout out to them and their guides. Those helped tremendously. This is dedicated to @Saoliver who asked for a video (in the thread - not to me personally) but this is as close to a video I could muster. I hope this is helpful. :)
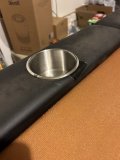
Items/tools:
View attachment 1289142

Step 1: Remove original cup holders

This step is pretty simple. Set the hairdryer on high heat and keep it approximately 1 inch away from the cup holder for about a minute. Most of the cup holders will only require a minute for the glue to loosen up. I only had a couple that needed more time. For those, I did it again for another minute.

View attachment 1289155


After the hairdryer, use the auto trim tool to pry the cup holder away from the loose glue. Work the tool around the cup holder while gently pulling the cup and glue apart.

View attachment 1289156


A couple of things to keep in mind when you remove the cup holder from the table:
  1. The cup holder will be hot from the hairdryer so wear your gloves.
  2. The glue will be very sticky so pull directly up and not to the side. Try not to get any on your the table/padding.

View attachment 1289157


Step 2: Mark the drill hole

Before you move onto this step, make sure all the glue has completely cooled off and dried.

This step is relatively easy but requires some concentration. The exactness of this step will ensure your new cup holders will be where you want them to be.

The original cup holders on my Barrington is measured at 3 1/2" across. You should double check yours if you're going to follow this step of my guide.

View attachment 1289168


The new cup holders measure 4" across.

View attachment 1289169


Since the size difference between the 2 cup holders is 1/2", we will need to mark the new center hole 1/4" away from the original center.

Here is a reference on how I calculated my center hole. I started the measure from the outer edge of the original cup holder. The idea is to mark the new center at the 2" mark.

View attachment 1289453


Here is a better visualization of this. The new center hole has to be 1/4" closer to the table and yet remain in center of the left/right side edges.

View attachment 1289461


I tried using a marker on the glue but found it difficult to accurately mark the exact location of the new hole. I decided to use a screw instead and that worked much better. The good thing about this is that I could move the screw easily to make fine adjustments as much as I needed. Once I've double (tripled!) checked my measurement I screwed in the screw to make a pilot hole. I didn't drill too deep - just deep enough to make a visible hole.

View attachment 1289462


Ultimately, I ended up with this outcome. I then took my 1/8" drill bit and drilled through the table using the pilot hole as a guide.

View attachment 1289471


Step 3: Drill out the new holes (from the bottom)

Flip the table upside down.

Before I drilled the hole with my hole saw, I drilled through the existing hole using the 1/4" drill bit. The reason for this is that the drill arbor is 1/4" so I wanted to make sure the arbor was aligned exactly to the new center. In retrospect, I suspect I could have used the 1/4" bit instead of the 1/8" bit in Step 2 and saved a step.

Drilling the hole was the worst part (for me). The hardest part was intentionally going slow and not hurry the process. The thing to note here is to stop drilling immediately after you've broken through to the foam. I was a nervous wreck trying not to over drill.

As you can see below, the foam is glued to the wood so I had to carefully separate the foam after I had drilled through the wood. Try to retain as much foam as you can in the original hole. This will help with the snugness of the new cup holder.

View attachment 1289474


Here is an "in progress" picture of the process. I really wanted to see the new cup holder put in so I did that one right away (it's rad). I was also doubting I did the math properly in Step 2 so I wanted to quadruple check it was right (it was). TRUST THE MATH!

I also wanted to show the new Barringtons have clearance for the holes without sawing any of the posts.
Please ignore my monstrosity of a drill. The nerds over at r/tools will ban me if they ever saw that thing.

View attachment 1289481


Step 4: Insert new cup holders and ENJOY

This step is easy and the most enjoyable. The new cup holders will be very snug (tight) in the new opening. I used a cardboard sheet to help me evenly apply pressure and knead the cup holder in. Think flattening pizza dough - same idea and motion.

Others mentioned having to tape their new cup holders with masking / duct tape to make them snug but I didn't have to do that. The foam and vinyl were enough to keep these cup holders very tight and snug. Oh, speaking of foam, trim away the excess foam that will be sticking out of the bottom after you're all done.

That's it! Enjoy your new rad cup holders!

Don't yell at me about my chairs. They're next to be upgraded!
View attachment 1289497
Quick question: So, you didn't ultimately need the `1/8 drill bit? I will be using this guide !
 

Create an account or login to comment

You must be a member in order to leave a comment

Create account

Create an account and join our community. It's easy!

Log in

Already have an account? Log in here.

Back
Top Bottom