I won't profess to know everything about anything or anything about everything; but what I do know is I often research and test subject matter to the fullest extent possible to find the best results.
Using a combination of advices from numerous poker minds, I set myself up to test oiling of chips in a variety of ways--from wipe n dry, to dip n drip and oil and water dont mix except with chip tricks. Yada yada.
Well, with a number of mixed results, I discovered that most methods left the chips looking great--at first--then left them lacking thereafter (usually within 1-5 days). A number of factors playing--oil type, drying method, application method, etc.
Well, after much testing using just basic Milano China Clays (which aren't supposed to take oil as well as CPC or Paulsons), I believe I have discovered the best way to oil those chips and keep them that way afterward. I named this method:
Compression Oiling. A mix of common methods with a touch of my own strategical experimentation and creativity.
Hopefully my step by step tutorial on Compression Oiling will help others who keep having trouble with their oiling, and it seeming like a waste of time. Yes, your oil and chips will dry out--unless you follow the instructions I'm about to present.
Without further delay, let's jump right in!
First, I am assuming by this point you have already removed the factory dust by wiping off your chips with warm water and a little Dawn dishwashing liquid--I used the pink hand lotion version as it helped tone down the clay smell also.
Here is the difference between factory shipped dust-covered chips next to unoiled cleaned chips with 2 oiled chips hiding within.
View attachment 53908
Bear in mind, most of the tests I conducted for oiling made the chips shine for about a day and then they returned to the "clean" matte color on the right. That suggests that most people who oil all their chips collectively probably won't notice the dullness a day later as the chips will still look clean compared to factory dust-covered. Be not deceived. Unless done right, the oil is probably gone a couple days later (as all my tests proved)--you just can't tell without a comparison. There is a significant difference beyond clean chips and clean oiled chips retaining their sheen.
Here is an example of clean chips next to oiled chips done right and still holding their shine nearly a week later and showing no signs of fading.
View attachment 53909
So, what do you need to get started after cleaning your chips?
You need a microfiber cloth, pure mineral oil (fragrance free), and chips! A flat surface covered with plain colorless paper towels is essential.
View attachment 53910
Some will agrue here and say to use a shoe polish applicator or water/oil dip, etc. for speed and ease. To each their own. I tried every method I could find and none of them worked better than what I am going to share, so more on that further in. Meanwhile, I will point out that if you want something done right the first time, and not having to do it over, then effort and time is required to make it so.
A wise man once told me, "Adam, how come there is never enough time to first do something right, but there is always enough time to do it over?"
Let's do this right, folks!
First thing I am going to tell you is the oil does not hurt your adhesive stickers on Milanos. I can't speak for other chip stickers or inlays yet (I'd be cautious if the sticker is paper made), but to test, I left a Milano chip submerged in oil for a week and there is no discoloration of the plastic label or loosening of its adhesive seal. Myth busted.
Next, oil can be a little liberal if you're using microfiber cloth. I start by filling the oil cap and then massaging it into the cloth to form an oil spread 3 times the chip size. Do not use the baby oil--it is filled with evaporative agents. Do not use wax--it is petroleum-based. Use pure mineral oil. Walgreens has an excellent version shown above.
View attachment 53911
View attachment 53912
The next step is something you wont read anywhere, and I had to learn it the hard way. I think it is the single most critical reason why everyone's oil keeps drying out. I will quickly trademark this rule as mine. We will call it the "Stibnite Seal n Shine©", all rights reserved 2016.
Working with polymers, seals, impregnators, densifiers, urethanes and other forms of coverants in my business, I am highly experienced when it comes to sealing off the microscopic pores of surfaces. One thing is for sure--in order to seal something with non-water based substances like oil, it requires compression. Wooden cutting boards, for example, must be press-oiled 2-5 times before they are sealed tight and ready to use.
In layman's terms, that means if you want this china clay chip sealed
right with oil, then you must add pressure to seal and lock it in. Sorry shoe polish applicators and oil-water dips--your oiling method won't stand the test of time on China Clays. Plus, water/oil mixtures apply unevenly and leave a splotchy appearance on the chip faces. That said, however, because the higher end clays are more porous, those methods are more effective overall than they are on china clays, but compression oiling WILL still be far better and provide a uniform and lasting covering and seal.
What is compression oiling? Well, it is quite simple. It means you add pressure while oiling. Using one hand, hold the oiled microfiber cloth with three fingers and using the other hand, spin a single chip between your thumb, index and middle finger firmly--applying surrounding pressure to both faces and edge at the same time. You WILL feel the chalky substance peeling off (yes, AFTER having washed the chips already), and once the edge feels smoothened from both pressure and oil, it is done. Set it on the paper towel.
View attachment 53913
View attachment 53914
View attachment 53915
View attachment 53916
Now, you've done this rack of 100 chips and the hard part is next. You must wait 24-48 hours. Air drying is the only way to let these seal and cure. Do NOT disturb them during the air dry process.
Now, to show you why compression is important during oiling, take a look at how much rough surface came off onto the microfiber rag during compression oiling AFTER these chips had been soap washed and dryed from the factory dust.
View attachment 53917
Compression oiling smoothens the surface and edges and forces the oil deep into the pores of the clay that oil layering or dipping cannot achieve. It also makes them much better for shuffling, etc.
The next step is another factor you wont see in the instruction manuals of chip oiling. If you use plastic trays, then you should know that they, too, are porous microscopically. Yes, get that rag out and oil the inside of your trays also, and let them air dry for 1-2 days along side of your chips. You'll be glad you did, as the charge from the plastic can withdraw active oils from within the clay. Oops! Who'd thought their plastic trays were drying out their chips? Just seal them the same way.
View attachment 53918
Now, after waiting a day or two, your anticipation is getting the best of you. Time to get those chips off of the paper towels and dry off the adhesive sticker. Do not wipe the edge and face of chips dry with the microfiber towel as this just needlessly dulls the chip and sucks out the oil--defeating the whole purpose for air drying. Just grab the chip and quickly swipe the sticker dry and clean only. I hold the chip on the edges and make a small central swirling motion with a pinch of the thumb and index finger to clean the sticker on both sides, and done. Then start putting your chips in stacks of 10. The oil should be properly air dried by this point anyhow. The oil on the sticker, however, will still be moist enough to wipe away since the sticker on Milanos is non-porous.
View attachment 53919
View attachment 53920
Adhesive sticker is clean and intact!
Now, you have many oiled chips in stacks of 10 sitting there. Grab a stack and place it on your oiled microfiber cloth within your hand. Hold them evenly and firmly in place and roll the edges only--avoiding faces and stickers. The edges are far more porous and truly require this second coat, but the second coat does not require compression. During this step I did not re-oil the rag, but used the leftover, nearly dried oil from the day prior. No need to make this coating heavier than a simple brisk.
View attachment 53921
Now, place the chip stacks right into the rack, as is, to air dry for another 12-24 hours. After air drying, take them out one last time and there will be a line of settlement oil that didn't absorb left on two sides of the chips where the rack made contact on the edges. Just use your fingers and wipe it away or massage it into the chip. Do not wipe them off with the microfiber. The trace amount is so insignificant that your skin will absorb it even if you just bust them out and play them at this point.
View attachment 53922
View attachment 53923
Congratulations. Your chips are ready to play. Place them back into the racks and call your friends and enemies over.
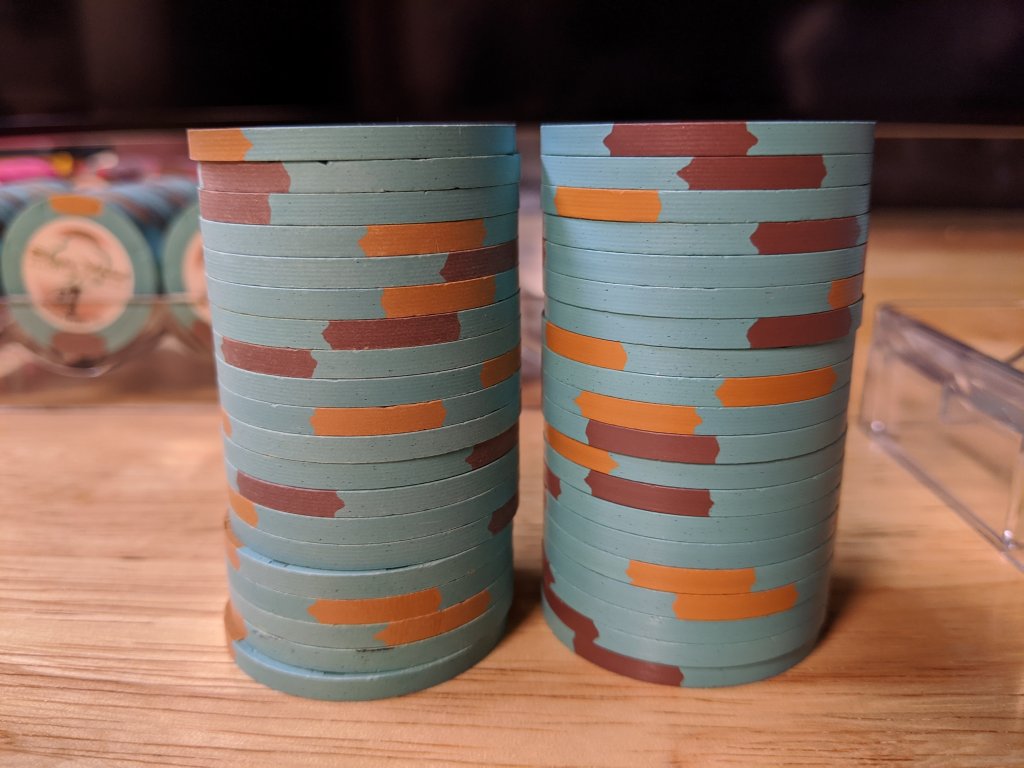
After nearly a week, you can see clearly that these chips are holding their shine both in play and out of play.
View attachment 53924
Unplayed compression oiled reds 6 days old next to clean unoiled reds.
View attachment 53925
Oiled blacks oiled and played for 6 days and holding their shine without any signs of wear.
In conclusion, Compression Oiling is the way to go in my book. I am currently applying this method to the 1000 lot and looking forward to the difference it makes to these Milanos.
I hope you found this information and guide helpful to your oiling process.
Oiling Chips Done Right!
Update: September 5, 2016 (Two week mark)
After two weeks of rigorous play, these racks which were finished back on the 21st of August still look amazing. No chips have dried out or lost sheen. I used a more natural lighting and opposing background to capture the real look so they don't appear "too" shiney.
View attachment 54836
View attachment 54837
View attachment 54842
View attachment 54843
Also, the shuffling ability of these chips after proper oiling is pretty solid. I can smack two stacks of 20 with both hands at the same time. I can't achieve this with most casino chips consistently.
View attachment 54844
 i never tot of oilling