The Golden Lion ROARbranding (1 Viewer)

mipevi

Full House
Joined
Nov 6, 2014
Messages
2,752
Reaction score
5,474
Location
Finland
My first truly customized chips, back in 2007, was a tourney set of labeled super diamonds. I had recently joined the blue wall and read about some cardroom having tournament chips with green 25's, grey 100's, orange 500's and blue 1000's. It seemed like a pretty unique combination, and perhaps for that reason I decided to make my set using those colors as well. This was my first try at making chip artwork, with very little experience using Photoshop. I did open a design thread on CT and had some helpful folks try to steer me in the right direction, but I forget whether I heeded any of their advice or not... N00bs gonna n00b, I guess. :LOL: :laugh:

Sadly I don't have any good pics of the chips themselves, so this mock-up will have to do.

golden lion strikes again.PNG


The super diamonds were of course pretty bad, and labeling chips with zero recess didn't exactly help stacking either, but I loved how they looked and got hooked on designing. These were my multitable travel set for a while, but I ended up selling them once those games dried up. I really loved the chip colors on the table though, and always had aspirations of redoing this set with better quality chips.

Then finally, over a decade later, the stars aligned! I spotted the necessary colors and quantities in @Tommy's Opus roulette chip sale, and after about a minute of serious contemplation of getting yet another tourney set, I went for it. I got enough chips for a two table T10k game.

0a28ba15-4209-4f27-b6ea-b7c4282eb0eb-jpeg.760504


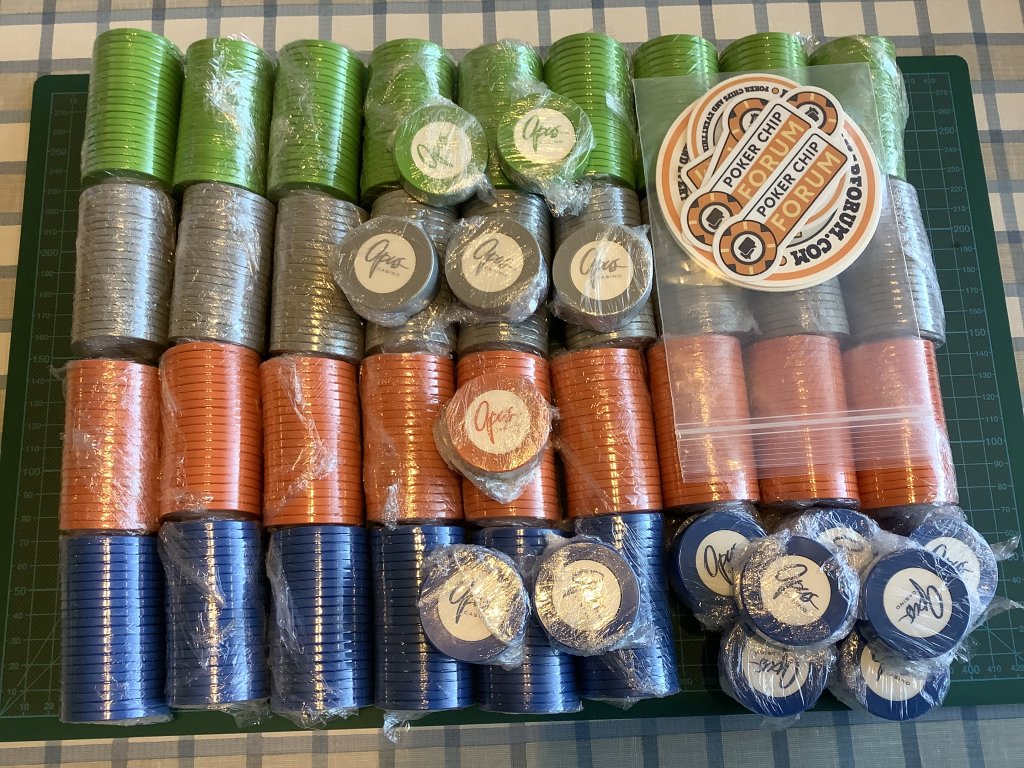
So now that I have the chips, I decided to redo the artwork, as it seems a bit outdated LOL. My idea with these is to create a classic Bud Jones style label with a glitter ring and a white center, and this is where I'm at now.

25.PNG
100.PNG
500.PNG
1000.PNG


I tried adding something grey in the background, like on the Borgata chips and all those they have previously inspired, but I think the lion and the text are a little too intricate for that, and I prefer the cleaner look. Happy to get any feedback you might have to give, though I'm not sure if I'm any better at taking directions in 2021 than I was back in 2007... :ROFL: :ROFLMAO:
 
I made a couple of small tweaks to the lion, and also modified the 1k denom. I think the artwork is ready now. :)

1000 new.PNG
 
Proceeding to a test print. Unfortunately the glitter pattern available (not shown on the mock-up) is bigger than on the BJ's, but after I've done my secret post-print shenanigans, hopefully it'll be good enough.

test.jpg
 
Test print somewhat succesful. The white circle should be 22mm in diameter as in my artwork, and I was assured it would be. Well, it came out only 21mm or a little over… The white is ok, not pure white like on Matsuis, but very close to BJ white and better than on a glitter Abbiati I have. In direct light and certain angles the white looks a bit transparent and you can kind of make out the glittery pattern underneath, but I may have a solution for that and it’s probably a non-issue during play anyway. Doesn’t come up well in the pic, but the red is a bit orangy, so I will probably change it to a deeper/darker red going forward.

Label size of 25mm is pretty snuck, can’t really go bigger because the cut isn’t a 100% smooth circle. The text size is fine even now, and should end up a bit larger on a 22mm white circle. I’ll make the necessary changes and put in the full order in a few days. :)

0BD12C76-30E9-459A-A26F-EBF12B6DF575.jpeg
 
Or I could get another test run with the 22mm white circle and a better red, and even try a full one inch cut… :unsure:
 
Are you printing your labels yourself? If not, how are you having them printed?

Any details you can share about your production process will be a big boon to the rest of us.

(oh, and btw, they look amazing! great work!)
 
I’m not sure your original design is dated. That was a classic design- you did well.

Glitter ring works nicely.

For the next iteration- did you consider different colors for the lion & text? It’s a golden lion, so you can’t really go crazy there, but curious if you tinkered with that.
 
Are you printing your labels yourself? If not, how are you having them printed?

Any details you can share about your production process will be a big boon to the rest of us.
I’m using a typical sticker printing service that’s located in Sweden, I’m sure there are plenty of similar companies around the world. My multiple queries and requests may have seemed odd/excessive to them, but as I’ve posted in another thread, when getting labels from such companies we need to be the experts (size, thickness, etc.) and even then there can still be issues as seen above LOL. I am looking to do some additional post print improvements myself, but that will take some time to figure out… Fingers crossed! :D

For the next iteration- did you consider different colors for the lion & text? It’s a golden lion, so you can’t really go crazy there, but curious if you tinkered with that.
Not really, I already had my heart set on a classic Bud Jones style glitter ring with the white center. Simple yet elegant, letting the glitter ring be what really catches your eye. With my next project though, relabeling a BG cash set, I’m ready to go looney tunes crazy. ;)
 
I think these chips can take a 1” label, so I am getting another small batch, using a darker red denom. Last time the cut wasn’t perfect, it seems to leave two small protrusions behind, so I expect a bit of trimming will be necessary to make the larger label fit nicely. Got my curved nail scissors for that. ;)

Unfortunately I am not able to get this material with a thicker lamination, so that the label surface would be closer to flush with the chip surface, which is of course preferred. On these chips the bare labels would still be pretty ok as the recess isn’t super deep, but BG chips are a different story, so might as well practice… An easy solution would be to double-label (triple for BG, at least LOL), like use a transparent label without any print underneath. I think the artwork would look better deeper within the recess though, so I will attempt to add a layer of varnish to make the labels thicker. I actually applied some layers of strong hairspray back in the day on the original Golden Lion labels to prevent them from sticking to each other, and I tested a bit with (acrylic) floor wax too… This time I’m trying out some artist level acrylic varnishes, after the label is applied, to kind of fuse the label into the chip recess in the process. So now my secret method is out and the pressure is on, we’ll see how it goes! :LOL: :laugh:
 
Last edited:
Forgot to mention another reason I’m considering the more labor intensive varnish instead of just double labeling. The supplier can do a gloss (UV protected) or matt lamination, with the gloss laminate being really the only option as the matt feels weirdly soft to touch (not something I want in a decal). However I would prefer a semi-gloss finish, the kind which is often seen on Bud Jones chips. I have gloss and matt varnishes that I can mix in any ratio I want, to get as close to the BJ look as I can.

I did think of modifying a gloss label’s surface with a very high grit sandpaper instead, might end up going that route for these chips and double labeling… I will fully test the options once I have all the labels. :)
 
The new print just arrived. Absolutely loving the darker red, goes much better with the golden glitter ring (more contrast). And the white center is now 22mm as it should be. However these were not cut to 25.4mm (1”) as requested, but the same 25mm as before. Sigh… :rolleyes:

26483ED8-C378-46C5-A0F1-1FD5CC4DAC05.jpeg
 
Last edited:
I guess if you want to get something done right… Well, I decided to order a hollow punch set. I’m just going to get the labels in a larger size and do the final cuts myself. :LOL: :laugh:
 
I didn't even know those glitter labels were even an option.
Yeah, there are a lot of options easily available nowadays (just you wait until I get to my BG relabel project LOL). There can be some issues with printing on foil, like the white color not being quite opaque enough, but the possibilities are very exciting.
 
I guess a small update for October is in order before the month is over. :)

I received the SAE hole punch set all the way from the US, but wasn’t able to get good cuts using a hammer as the stickers’ laminate proved too hard to push through in a single go. So today I bought a drill press vice that can be operated vertically as well, making it easy to position the sticker and punch inside. A quick test run and looks like it’s just what the doctor ordered! Next I will purchase all the stickers with an extra thick glitter ring and start cutting the ~1500 labels one at a time…

This project has clearly turned into me just being stubborn about making perfect relabels. Which I guess was to be expected. :ROFL: :ROFLMAO:
 
I guess it’s time for an update again? :rolleyes:

I wasn’t really sure if I should go for a satin finish, so this project has been sitting on the shelf waiting for me to make up my mind. In the end I’ve decided to stick with the glossy laminate the labels came with. The varnish satin finish would take forever to apply and dry, and it’s not quite as tough as I’d want. Decided not to sand the labels either, for durability’s sake. The thickness issue I’m solving by simply gluing the labels on adhesive plastic film before cutting.

Cutting the labels hasn’t really worked out quite as well as it could have, as the labels come out a bit larger than the punch size suggests. So I ended up getting more of them expensive, high quality French punches, this time in metric sizes. My 25mm punch makes the labels just very slightly too large for these chips, and the next size down is 24mm, results as pictured below. I could maybe live with it, but I did now order a Chinese 24.5mm punch to see if it would do the trick. So next update hopefully in 2-3 months, see you then! :ROFL: :ROFLMAO:

2827F6D0-4407-40FF-86AE-1E2A3B8978D9.jpeg
 
Test print somewhat succesful. The white circle should be 22mm in diameter as in my artwork, and I was assured it would be. Well, it came out only 21mm or a little over… The white is ok, not pure white like on Matsuis, but very close to BJ white and better than on a glitter Abbiati I have. In direct light and certain angles the white looks a bit transparent and you can kind of make out the glittery pattern underneath, but I may have a solution for that and it’s probably a non-issue during play anyway. Doesn’t come up well in the pic, but the red is a bit orangy, so I will probably change it to a deeper/darker red going forward.

Label size of 25mm is pretty snuck, can’t really go bigger because the cut isn’t a 100% smooth circle. The text size is fine even now, and should end up a bit larger on a 22mm white circle. I’ll make the necessary changes and put in the full order in a few days. :)

View attachment 778550
I dunno how I miss this tread previously but I liking the glitter label :love:
 
Sorry Mel, I’ve delabeled a good portion of them already. And after spending hundreds of eurodollars on equipment and labels, there is simply no turning back anymore.
 
The Chinese 24.5mm punch arrived early, and after a thorough cleaning I put it to work. It gets the job done, though it’s nowhere near the quality of the French punches. The resulting labels are a bit under 25mm, so there is still a gap, but it’s of course a much better fit than the previously posted label cut with a 24mm punch, and it gives us a bit more glitter to look at. I’d say the fit is very close to the original Gemaco decals, and I’m happy enough with it.

I added two layers of plastic film under the label, so the top of the label sits slightly within the recess, just below the chip surface. Three layers would risk a chip edge catching the label, and with the gap between label and chip a slightly recessed label surface looks better too IMO.

So now I have everything figured out, and just need to put in the work LOL. I’m also starting to work on my next relabel project, a BG cash set, so a Golden Lion pr0n showcase thread most likely coming in 2023. I just finished the first four chips though, so I will leave you with a pic of them. Thanks for coming along with me on this journey. :)

1E950C2F-A130-420A-8CB6-B61751D06225.jpeg
 

Create an account or login to comment

You must be a member in order to leave a comment

Create account

Create an account and join our community. It's easy!

Log in

Already have an account? Log in here.

Back
Top Bottom