Thought I’d share this solution to my table topper build… enjoy!
Goal: build a large table topper with a padded rail that can seat 8-10, but still be dismantled / broken down for easier storage, for less than $300 (USD)
Problem: the classic issue of how to attach speedcloth to a foldable table topper
Solution : build a folding oval table top with removable rail sections that, when in place, secure a removable Triton Speed Mat over the table surface
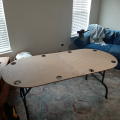
Final product:
(detailed build instructions with photos and supply list is below)


Supply list, tools, and build instructions w/photos:
1 sheet of 4 ft x 8 ft x 1/2 in. sanded plywood (NOT MDF)
1 sheet of 4 ft x 4 ft x 3/8 in. BC grade plywood sheathing (NOT MDF)
2 rolls of 24 in. x 72 in. x 1 in. cushion foam
1 can of 3M spray adhesive (61, 77, or 90 - it doesn’t matter which one)
2.5 yards of marine vinyl that’s 54 inches wide or wider
Several hundred 3/8 in. wide crown (or T50) x 1/4 in deep heavy duty staples
30 in. continuous hinge (aka cabinet or piano hinge) - discard the included screws— too long!
Size #8 x 3/8 in. long phillips flat head zinc sheet metal screws (enough for the hinge)
16 of 1/4 in.-20 zinc tee nuts
16 of 1/4 in.-20 zinc thumbscrews
32 of 1/4 in. x 1-1/4 in. zinc fender washers
Triton oval poker mat 35.5 in. x 77.75 in. (actual size is LARGER — 38 in. x 80 in.)
Electric stapler (a “must have”!)
Jigsaw
Circular saw with 80 tooth plywood blade — optional
Palm or orbital sander and 120 or 150 grit paper
Electric drill
3/8 in. drill bit
Phillips screwdriver tip for drill
Utility knife
Hammer
Pencil
Sharpie marker
Ruler
Flat head screwdriver (to pry up bad staples)
Pliers (to pull out staples)
Scissors
Set of sawhorses, or similar
Clamps (optional)
1) Lay the sheet of sanded plywood on the sawhorses and place the Triton mat on top… move the mat 4 inches away from one ”end” edge and from one “side” edge of the plywood. Trace the mat outline with a pencil. Remove the mat.
2) Drill a 3/8 in diameter hole in the middle of the ruler at the 4 in. mark. Lay the ruler on the plywood and line up the end of the ruler with the mat outline making sure the new 4 in. ruler hole is on the outside of the oval. Place the pencil in the hole. While using one hand to guide/slide the ruler along the mat outline (making sure to keep it lined up with the ), use the pencil to trace/scribe a larger oval around the original one from the mat. This new oval will be exactly 4 in. larger all the way around, and should come flush to one end and one side of the plywood. If your mat’s actual size is the same as mine, your large oval will be 46 in. wide and 88 in. long. You should now have what looks like an oval “race car track”. This outer track is what will support the padded rail that sits on top of it.

————
3) Determine and lightly mark the midpoints of the oval on all 4 sides and draw lines here that cross just the outer track. This will divide the track into 4 equal but mirrored arched sections. Use paper that is taped together to cover one of the sections and trace its outline. You will have just outlined 1/4 of the entire track. Trim the paper tracing but make it just a bit shorter by cutting an extra 1/4 inch off each end. You've just made a paper rail pattern that you’ll use to make the wooden bases for the sectional padded rails. The 1/4 inch trim off the ends allows for the thickness of the padding and vinyl to be added later.
4) Use the jigsaw the cut the sanded plywood only along the larger outer oval outline. This is now your table top.
5) Draw a line across the table that connects the previously marked midpoints of the 2 long sides. This will create a line that completely bisects the table in half across the board. For my table, each half oval now measures 44 in. x 46 in.
6) Use either the (optional) circular saw or jigsaw to cut the plywood into 2 equal oval halves along this line. The circular saw will give you a cleaner and straighter line where the two halves will be hinged, so it’s preferred.
7) Use the palm sander to smooth down all the cut edges, top and bottom… you can round the outer track edges, but don’t round the straight cuts across the middle as you want those edges to meet up nice and flat. Set these 2 pieces aside.
8) Place the 4 ft x 4 ft piece of BC sheathing plywood on the sawhorses with the C side up. The “B” side is the nicer/smoother side and the “C” side will have knot holes and be rougher. Lay your paper rail flush to 2 edges and trace the outline. Spin the tracing 180 degrees (don’t flip it) and get it as close to the first tracing as possible and outline it again. It should kind of look like double-J’s facing each other, one upside down to the other. Be sure you use up only half the plywood for this as you’ll need the other half for the other 2 rails! Now flip the paper rail over and repeat the 2 outlines on the other half of the plywood… those should look like double-“backward” J’s.

————
9) Use the jigsaw to cut out the 4 rails and sand the edges. Lay them out on the table top oval track with C side up. Mark each rail underside (B side) and it’s corresponding section of track with matching letters or numbers (A, B, C, D or 1,2,3,4). This will keep things matched up to the correct location as you move forward.
10) Clamp or hold a rail (C side up) lined up on its corresponding section of track and drill four 3/8 in. holes “through-and-through” both the rail and track below. Drill 1 hole about 3 inches in from either end and 2 more evenly spaced in between. It’s critical that you make sure the rail stays lined up with the track outline, and each of the holes stay lined up as you drill. Repeat this for the other 3 rails. Sand the holes smooth.
11) Keeping all the rails C side up, hammer a tee nut into each hole until flush.
12) Keep the rails C side up and lay each of them out on top of the cushion foam. If you use diagonally opposite rails you can use the same double-J technique used before. Trace their shape onto the foam 1 inch wider than the actual wood, being sure to mark each tracing with the corresponding rail letter or number. You should easily get 2 rail pads traced per roll of foam. Use the utility knife to cut out the foam and put it aside.
13) Spray the C side of each of rail with spray adhesive. Flip its corresponding piece of foam over so it’s facing the opposite direction and carefully flip the rail over and place onto the foam (sticky side down) ensuring that there is still 1 inch of foam overhang on all sides. Press firmly and allow to set.


————
14) Place the marine vinyl face down and place the padded rails on top with foam side down. Use a pencil to trace an outline onto the vinyl backing at least 3 inches wider than the foam on all sides. Lay out all the rails to make sure you can fit them all on the vinyl before cutting.
15) Now the tricky part… wrap the vinyl up and over the edge and staple in place while keeping tension on it so it wraps the foam over the edge of the wood. This is pretty critical as not only will make the edge of the rail more comfortable, but it’s needed to add the extra width to the rail do it overlaps the mat once assembled. I found it easiest to start on the straight end, doing a few staples first on one side, then switching to the opposite side. I continued alternating sides all the way down, but found the curved sections easier to do if I first did a small bit of the inner curve before doing the matching outer curve. NOTE: you’ll have to notch the vinyl every few inches on both sides of the curve. The notch on the inner curve allows the vinyl to fan out, while on the outer curve it allows you to overlap and gather edges. Check the other side often for folds and wrinkles and be prepared to remove and redo staples as needed to keep the tension tight and vinyl smooth. Work on the ends of the rails last, tucking and folding the edges over and onto the bottom to staple in place. When done, trim off the excess vinyl with the utility knife. Picture below is before trimming.

16) Place both halves of the main table together, face down and aligned. Center the continuous hinge over the center cut and attach using the 1/4 inch screws. NOTE: the screws that come with the hinge are likely too long and will come out the other side (the table top). Use the shorter screws listed. Flip the table over so it’s face up.
17) Final assembly: Use the Sharpie to darken the Triton mat outline on the table and lay the mat in position on top. Also darken your rail and corresponding location labels. Lay the rails on the table in their proper spots—the extra foam padding and vinyl of the rail pads should cover the mat about a 1/2 inch all the way around and hold it in place. Secure each rail from the bottom with 1 thumbscrew and 2 washers at each hole (I found the washers needed to be double thick to prevent the end of the bolt from coming up through the rail bottom and into the pad). The rail pad fits snug enough to the mat that cards can’t get underneath.
18) Call your pals and play some poker!
Goal: build a large table topper with a padded rail that can seat 8-10, but still be dismantled / broken down for easier storage, for less than $300 (USD)
Problem: the classic issue of how to attach speedcloth to a foldable table topper
Solution : build a folding oval table top with removable rail sections that, when in place, secure a removable Triton Speed Mat over the table surface
Final product:
(detailed build instructions with photos and supply list is below)
Supply list, tools, and build instructions w/photos:
1 sheet of 4 ft x 8 ft x 1/2 in. sanded plywood (NOT MDF)
1 sheet of 4 ft x 4 ft x 3/8 in. BC grade plywood sheathing (NOT MDF)
2 rolls of 24 in. x 72 in. x 1 in. cushion foam
1 can of 3M spray adhesive (61, 77, or 90 - it doesn’t matter which one)
2.5 yards of marine vinyl that’s 54 inches wide or wider
Several hundred 3/8 in. wide crown (or T50) x 1/4 in deep heavy duty staples
30 in. continuous hinge (aka cabinet or piano hinge) - discard the included screws— too long!
Size #8 x 3/8 in. long phillips flat head zinc sheet metal screws (enough for the hinge)
16 of 1/4 in.-20 zinc tee nuts
16 of 1/4 in.-20 zinc thumbscrews
32 of 1/4 in. x 1-1/4 in. zinc fender washers
Triton oval poker mat 35.5 in. x 77.75 in. (actual size is LARGER — 38 in. x 80 in.)
Electric stapler (a “must have”!)
Jigsaw
Circular saw with 80 tooth plywood blade — optional
Palm or orbital sander and 120 or 150 grit paper
Electric drill
3/8 in. drill bit
Phillips screwdriver tip for drill
Utility knife
Hammer
Pencil
Sharpie marker
Ruler
Flat head screwdriver (to pry up bad staples)
Pliers (to pull out staples)
Scissors
Set of sawhorses, or similar
Clamps (optional)
1) Lay the sheet of sanded plywood on the sawhorses and place the Triton mat on top… move the mat 4 inches away from one ”end” edge and from one “side” edge of the plywood. Trace the mat outline with a pencil. Remove the mat.
2) Drill a 3/8 in diameter hole in the middle of the ruler at the 4 in. mark. Lay the ruler on the plywood and line up the end of the ruler with the mat outline making sure the new 4 in. ruler hole is on the outside of the oval. Place the pencil in the hole. While using one hand to guide/slide the ruler along the mat outline (making sure to keep it lined up with the ), use the pencil to trace/scribe a larger oval around the original one from the mat. This new oval will be exactly 4 in. larger all the way around, and should come flush to one end and one side of the plywood. If your mat’s actual size is the same as mine, your large oval will be 46 in. wide and 88 in. long. You should now have what looks like an oval “race car track”. This outer track is what will support the padded rail that sits on top of it.
————
3) Determine and lightly mark the midpoints of the oval on all 4 sides and draw lines here that cross just the outer track. This will divide the track into 4 equal but mirrored arched sections. Use paper that is taped together to cover one of the sections and trace its outline. You will have just outlined 1/4 of the entire track. Trim the paper tracing but make it just a bit shorter by cutting an extra 1/4 inch off each end. You've just made a paper rail pattern that you’ll use to make the wooden bases for the sectional padded rails. The 1/4 inch trim off the ends allows for the thickness of the padding and vinyl to be added later.
4) Use the jigsaw the cut the sanded plywood only along the larger outer oval outline. This is now your table top.
5) Draw a line across the table that connects the previously marked midpoints of the 2 long sides. This will create a line that completely bisects the table in half across the board. For my table, each half oval now measures 44 in. x 46 in.
6) Use either the (optional) circular saw or jigsaw to cut the plywood into 2 equal oval halves along this line. The circular saw will give you a cleaner and straighter line where the two halves will be hinged, so it’s preferred.
7) Use the palm sander to smooth down all the cut edges, top and bottom… you can round the outer track edges, but don’t round the straight cuts across the middle as you want those edges to meet up nice and flat. Set these 2 pieces aside.
8) Place the 4 ft x 4 ft piece of BC sheathing plywood on the sawhorses with the C side up. The “B” side is the nicer/smoother side and the “C” side will have knot holes and be rougher. Lay your paper rail flush to 2 edges and trace the outline. Spin the tracing 180 degrees (don’t flip it) and get it as close to the first tracing as possible and outline it again. It should kind of look like double-J’s facing each other, one upside down to the other. Be sure you use up only half the plywood for this as you’ll need the other half for the other 2 rails! Now flip the paper rail over and repeat the 2 outlines on the other half of the plywood… those should look like double-“backward” J’s.
————
9) Use the jigsaw to cut out the 4 rails and sand the edges. Lay them out on the table top oval track with C side up. Mark each rail underside (B side) and it’s corresponding section of track with matching letters or numbers (A, B, C, D or 1,2,3,4). This will keep things matched up to the correct location as you move forward.
10) Clamp or hold a rail (C side up) lined up on its corresponding section of track and drill four 3/8 in. holes “through-and-through” both the rail and track below. Drill 1 hole about 3 inches in from either end and 2 more evenly spaced in between. It’s critical that you make sure the rail stays lined up with the track outline, and each of the holes stay lined up as you drill. Repeat this for the other 3 rails. Sand the holes smooth.
11) Keeping all the rails C side up, hammer a tee nut into each hole until flush.
12) Keep the rails C side up and lay each of them out on top of the cushion foam. If you use diagonally opposite rails you can use the same double-J technique used before. Trace their shape onto the foam 1 inch wider than the actual wood, being sure to mark each tracing with the corresponding rail letter or number. You should easily get 2 rail pads traced per roll of foam. Use the utility knife to cut out the foam and put it aside.
13) Spray the C side of each of rail with spray adhesive. Flip its corresponding piece of foam over so it’s facing the opposite direction and carefully flip the rail over and place onto the foam (sticky side down) ensuring that there is still 1 inch of foam overhang on all sides. Press firmly and allow to set.
————
14) Place the marine vinyl face down and place the padded rails on top with foam side down. Use a pencil to trace an outline onto the vinyl backing at least 3 inches wider than the foam on all sides. Lay out all the rails to make sure you can fit them all on the vinyl before cutting.
15) Now the tricky part… wrap the vinyl up and over the edge and staple in place while keeping tension on it so it wraps the foam over the edge of the wood. This is pretty critical as not only will make the edge of the rail more comfortable, but it’s needed to add the extra width to the rail do it overlaps the mat once assembled. I found it easiest to start on the straight end, doing a few staples first on one side, then switching to the opposite side. I continued alternating sides all the way down, but found the curved sections easier to do if I first did a small bit of the inner curve before doing the matching outer curve. NOTE: you’ll have to notch the vinyl every few inches on both sides of the curve. The notch on the inner curve allows the vinyl to fan out, while on the outer curve it allows you to overlap and gather edges. Check the other side often for folds and wrinkles and be prepared to remove and redo staples as needed to keep the tension tight and vinyl smooth. Work on the ends of the rails last, tucking and folding the edges over and onto the bottom to staple in place. When done, trim off the excess vinyl with the utility knife. Picture below is before trimming.
16) Place both halves of the main table together, face down and aligned. Center the continuous hinge over the center cut and attach using the 1/4 inch screws. NOTE: the screws that come with the hinge are likely too long and will come out the other side (the table top). Use the shorter screws listed. Flip the table over so it’s face up.
17) Final assembly: Use the Sharpie to darken the Triton mat outline on the table and lay the mat in position on top. Also darken your rail and corresponding location labels. Lay the rails on the table in their proper spots—the extra foam padding and vinyl of the rail pads should cover the mat about a 1/2 inch all the way around and hold it in place. Secure each rail from the bottom with 1 thumbscrew and 2 washers at each hole (I found the washers needed to be double thick to prevent the end of the bolt from coming up through the rail bottom and into the pad). The rail pad fits snug enough to the mat that cards can’t get underneath.
18) Call your pals and play some poker!
Last edited:


")