Curious if you have any posts on your builds?
I’ve posted to others table build threads in multiple places, but I’ve never done my own independent thread, no. Some of the table build threads have insanely detailed instructions that take you step by step through their entire build. I didn’t omit that amount of time to documenting any of my builds. I was kind of more inclined to finish the builds and play poker. Happy to answer questions of help if I can, however.
I have built dozens of tables and I’ve never done the same build twice. Every iteration, I think of something I’d done just a little differently either during the build or usually, after playing a few sessions. My most recent “main” table is the exception in 23 years of building tables. I wouldn’t change a thing about this build. But, it’s quite specific to my personal needs.
I selected this pic as it’s probably easier to see some of the specifics I’m talking about.

We use dedicated dealers. I did thicker padding for the dealer rail, which the Mrs likes a lot. The Deckmate orientation was off on the previous build. I’d never used one, so it was kind of a guess on the first attempt. It works, but this is much better for the dealer. It’s maybe not as nice cosmetically, but functionality is much improved. The dealer tray is a monster. Finally we don’t ever need to get up to get more chips. 600 chip capacity, plus what the players buy in for is lovely. I put “his and hers” drop boxes in this build. I generally sit in the 9 seat and play banker. Players buy chips and I have a dedicated drop box for the buy ins. The dealer has her own for tips. The shape is a teensy bit different in the table almost has mouse ears. That little adjustment is 17 inches of extra elbow room. That’s easily a whole person, if desired. Or just nicer for having some space to move. We’ve played 11 handed this thing is so big, but usually play 8. The extra room serves double duty when the side table breaks and some players want to join the main. We can squeeze in a few extras for a while until a few bust out.

Better pic for the shape.
I also raised the rail by 1/4”, which was due to how I chose to mount the LEDs. I used a full 3/4” sheet of plywood for the LEDs track level, in spite of the LEDs needing 1/2”. I then routed a 1/2” groove into that section so the LEDs simply snap into place and there’s a slim portion of wood underneath the LEDs to keep cards from wedging in underneath the rail. Now, they have a backboard if you will. I didn’t want the sheet of wood to show, so it’s painted black. The backboard also serves as an anchor for the slide under stainless steel cup holders. Having said that, we never use them. I have side table/carts all around the tables for guys to place their belongings/drinks on, which everyone prefers. Keeps the table clean. But, that was part of the design plans. Turned out to be a non factor.

Finally, I used 100lb foam on the rail for this one. I normally use the standard 70lb. I very much prefer the stiffer foam and it should hold up for decades. And I made the table height one inch over standard, because I’m tall and I like it. The chairs adjust, so it’s fine for shorter players, too. But, it definitely felt huge the first session we played. I’m used to it now and hate the feel of the softer foam and lower table height on my side tables.
You can see all kinds of cords in this pic, but that was due to construction. I mounted a power distribution box next to the Deckmate and the single cord runs throw the table and inside the legs, so it’s not tripped over. There are USB chargers on the underside of the table.
I did the artwork and had Gorilla Gaming print my felts. They did a great job.
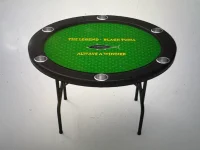
For comparison, this tables little sister.
Hope something in here was helpful! Feel free to hit me up in my PMs if you have questions.
-Jeremy


 I haven’t cracked the freight shipping thing, so up to now, I only build for local pickup, however. Sorry. If anyone can help me solve how in the world to get reasonable freight shipping rates, I’m down for building for whoever. Fully customized, of course.