Colquhoun
Straight Flush
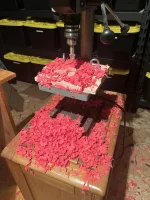
That recess looks perfect...nice and shallow.Love the idea of a clamp. I made my way through about a barrel tonight after the initial sacrifice of about 5 chips. I think the depth looks pretty good so far? I’ll knock down the center mark the bit leaves and try out a few labels.
I think I’ll add the additional piece before proceeding with anymore chips. The one takeaway I made was how important the size of the hot stamp being milled is. These horseshoe stamps literally max out the 7/8” bit and often leave traces of gold that I carefully remove afterwards……
View attachment 1612639
Regarding centering, I found that almost all Paulson chips are off-center. Actually, the mold is a bit off center, but the hotstamp is usually centered on the chip, which makes it look a little out of whack. Sometimes, I would put the chip in the jig perfectly centered and it would look a bit off when done.
It's a little back and forth game to get it right. Milling it perfectly in the center doesn't count if it doesnt look centered when done, right?

I also used an x-acto knife to scrape some of the hotstamp remnants off the chips that still had it.
Fun job, right?
")