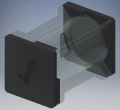
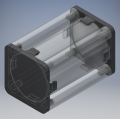
Poker Chip Tubes (3D printed) (2 Viewers)

Nex

Flush
Joined
Jan 25, 2017
Messages
2,174
Reaction score
3,337
Location
Club Hel, Downtown Megacity
This has been another side project I started around the same time as my cookie cutter project... and put it on the back burner for a good while after I was frustrated being unable to find any new ideas on how to design a connection for the tube caps to the tube itself which would not be so extremely brittle as the push-over clip design I was using back then. The clips would break off the cap after only one or two uses.

A couple of days ago, I remembered this project, and did another brainstorming session for connection design solutions. I believe I've come up with one now that is stable enough - it's a screw and clip combination. While I was working on the parts I also refined the tube, taking away a lot of unnecessary volume that would only waste filament and increase printing time.

The end caps have a pseudo "seal" that will plug about 1 mm into the tube to better keep lint out of the tube if you stow it away somewhere.

Impact / outside force resistance is questionable - I would avoid dropping them. But they will certainly keep chips nicely in order.

DSC_4007cr=2048t.jpg

(Above photo is showing a beta version of the tube - it doesn't yet have the cutouts in the rails.)
Custom 33 chip capacity, for samples of all my custom CPCs.

DSC_4099r=2048t.jpg

Smooth or textured surface finish

DSC_4096cr=2048t.jpg

DSC_4048r=2048t.jpg

Any color combination, any capacity (front left to right: 15, 8, 10 chips).
Also, Logo/Text embossing on caps.

DSC_4067cr=2048t.jpg


DSC_4093r=2048t.jpg

Nicely fills that little leftover space in your transport case that won't really hold another regular chip rack.

DSC_4032_4033mr=2048t.jpg

Window cap close-up. The 3D printed "transparent" window could also be replaced by a piece of overhead transparency for example if you want clear sight.

DSC_4085-4086panr=2048t.jpg

Left to right on the print bed: One 20 chip tube; four 25 chip tubes with another 25 chip tube on top; two 50 chip tubes. The other ones off the print bed are all 25 chip capacity, including the ones without caps.
Foreground right: tube caps with windows.
Background right: Tons of demo tube cap sets in different colors.

Production stats:
39mm Tube (20 chips capacity): 2h 28m print time / 17.53 grams PETG
39mm Tube (25 chips capacity): 3h 00m print time / 21.17 grams PETG
39mm Tube (50 chips capacity): 5h 45m print time / 39.51 grams PETG
Dual end caps: 1h 31m print time / 19.08 grams PETG
Measurings were done using my Prusa i3 MK3S unit and PrusaSlicer 2.0.0.

Dimensions:
39mm tubes: 50mm L x 50mm W max (center section: 42mm x 42mm)
43mm tubes: 54mm L x 54mm W max (center section: 46mm x 46mm)
Capacity 20 chips (including end caps): 78mm H
Capacity 25 chips (including end caps): 95mm H
Capacity 50 chips (including end caps): 179mm H

This presents a lot of nice options...
Any chip diameter? Check. Any chip thickness? Check.
Also, any capacity, for example for tournament starting stacks. Perfect fit for 8/8/4/7? You can have that. What if I want a bounty chip in there too? Sure thing.
With the maximum print volume of my printer, I can produce tubes that hold up to 60 chips.

I've embossed my monogram on the end caps, which could also be swapped out for pretty much anything that doesn't have too thin lines. Or of course no logo at all. Or a shallow recess for a label. Or a see-through window. Sadly it's impossible to simply import some 2D vector graphic... you have to manually retrace the lines, else you end up with unusable geometry :( So logos are hard to do, unless it's all straight lines. But at least adding simple text is easy.

Models:
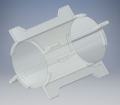
d04.pngd05.pngd06.png

Bonus - old crappy clip design:
d01.png
 
Last edited:
Wow, this is impressive! If you ever make and sell I would be in for some, price dependent!
 
  • Like
Reactions: Nex
Given the fairly long print times and me only having a single printer, I certainly can't make big quantities of these. Generally speaking though, I'd be up to make a few for other folks during times where my printer would only sit idle otherwise.
But I doubt the cost of making and shipping them around the world would be anywhere near acceptable.
I might give out the model files though if you also have a 3D printer.
 
  • Like
Reactions: H|Q
Oh that would be a neat idea. I was looking into a 3D printer myself.
 
There are issues with giving out the files for self-service printing though.

One, there's a myriad of different 3D printers out there, and there is a wide range of print quality among them. Even among different units of the same model, due to calibration. Getting a tight fit of printed parts requires very good accuracy and some tuning, both of the model files as well as the printer. With a different 3D printer, you might well end up with parts that either don't fit or have a too loose fit. Don't even get me started on nozzle diameters and materials...

Two, while the model files are parametric (I can just edit a number in a table, e.g. the number of chips a tube should fit, and the whole object will be rebuilt incorporating that change), in order to actually change these values you need Autodesk Inventor. You do your changes to the source file, then export the part as STL file which can no longer be modified like that. Only that STL file can be dropped into a slicer program to create a file a 3D printer can handle. Since Inventor is ridiculously expensive and if you're not into pirating, that would leave the job to produce the customized STL files to me.
 
Last edited:
There are issues with giving out the files for self-service printing though.

One, there's a myriad of different 3D printers out there, and there is a wide range of print quality among them. Even among different units of the same model, due to calibration. Getting a tight fit of printed parts requires very good accuracy and some tuning, both of the model files as well as the printer. With a different 3D printer, you might well end up with parts that either don't fit or have a too loose fit. Don't even get me started on nozzle diameters and materials...

Two, while the model files are parametric (I can just edit a number in a table, e.g. the number of chips a tube should fit, and the whole object will be rebuilt incorporating that change), in order to actually change these values you need Autodesk Inventor. You do your changes to the source file, then export the part as STL file which can no longer be modified like that. Only that STL file can be dropped into a slicer program to create a file a 3D printer can handle. Since Inventor is ridiculously expensive and if you're not into pirating, that would leave the job to produce the customized STL files to me.
Phew......... This is a rabbit hole I may not need in my life lol. I have a buddy who loves his and does all sorts of cool little items. He uses a sub reddit where people share files to publicly. Seems like a neat hobby, but I bet it can get pricey.
 
I would be sooooo in for some custom tubes for MSK buttons
 
Phew......... This is a rabbit hole I may not need in my life lol. I have a buddy who loves his and does all sorts of cool little items. He uses a sub reddit where people share files to publicly. Seems like a neat hobby, but I bet it can get pricey.

Well, of course you could buy a $6,000 printer with all the bells and whistles. But you can get equally good or even better print quality out of a much cheaper one as well if you calibrate and tune it correctly. Of course you will save yourself most of the tinkering with that 6k machine if you're lazy, but it's not the only way to great results. The learning curve with a printer that needs assembly, calibration and tinkering is steep though and moments of massive frustration are guaranteed.

My Prusa printer cost me €770. Bought it as a kit instead of pre-assembled to save money. I've managed to break a couple of printer parts since I got it, so add about 70 more for replacements... Also a bunch of cheapo spare nozzles, silicone socks for the heating block, some tools - another 60 or so. Makes about a grand.

Filament is fairly cheap if you search around a little, at least here in Europe, so I've stocked a metric fuckton in loads of different colors. But just as an example, you can get a kilogram of good-quality PETG (= much better material for mechanical applications than the widespread PLA) for about €25 here. If the pieces don't have to withstand too high temperatures or force, medium quality PETG for €20 per kilogram will also suffice. And since my Prusa has this nice spring steel sheet with PEI coating, I don't have to buy those expensive adhesion gels or painter tape other people need to get their prints to stick on their print beds. A bottle of regular window cleaner, a small spray can of isopropyl, and a tiny bottle of acetone is all I need - and I need so little of it that it lasts for ages.

All in all, much cheaper than chipping :p
 
Damn that's crazy. I think I'll save myself from what seems to be hours upon hours of messing around lol.
 
Currently printing more tubes and caps for additional photos.

Printing temperatures etc. have to be absolutely perfectly dialled for every different brand of PETG I use, or all I end up with is trash. The slightest sign of elephant foot syndrome on the prints already breaks everything. If I increase the model's tolerances, the caps will end up being too loose for materials where I already have found the perfect print settings for.

Two of four brands are working so far; currently testing print temperature variations for a third. I was long using print settings for it that seemed to produce perfect results already. Well... apparently not.

--

While the machine is busy printing, I'm refining my design for the tube caps with windows.

I already had a working first version, but problems were showing with the printed parts. It's a two-part assembly, the cap and a thin translucent window that gets pushed into a recess in the cap. Originally hoped the jamming effect alone would hold it in place firmly enough - nope.

Tried gluing the window border to the cap, but the area is so thin it's impossible to use so little glue that it doesn't squeeze out of the hidden corner and onto the visible part of the window. Looks like crap.

I'm now going for a three-part design, with an additional retention ring pushed into the recess after the window. This should also allow gluing, as the retention ring is broader and also on the inside of the cap, so even if glue gets squeezed out a little, it won't be visible unless you open the tube.
 
Half-Life test chamber colors.
Guess what this tube will hold...
SAMPLES! :ROFL: :ROFLMAO:

DSC_4030cr=2048t.jpg


Aaand... tube caps with windows, version two.

Three-part design allows for gluing the window in from the inside with no danger of it leaking out to where it would be visible and in turn making the whole thing look ugly.

DSC_4027cr=2048t.jpg


Unfortunately, 3D printed windows are more translucent rather than really transparent simply because of how the fabrication method works. It's still good enough to recognize chip colors and spots behind it, but most inlay text will be illegible.
 
Unfortunately, 3D printed windows are more translucent rather than really transparent simply because of how the fabrication method works. It's still good enough to recognize chip colors and spots behind it, but most inlay text will be illegible.
Instead of printing the windows, can you use something pre-made like a chip spacer and just size your window slot to fit?
 
These could be fantastic as shipping containers for valuable chips. They might be cost prohibitive compared to to other properly safe shipping boxes/containers. 3d printing really is neat. My son has one he's playing with all the time.

Ever tried to 3d print chip trays?
 
Instead of printing the windows, can you use something pre-made like a chip spacer and just size your window slot to fit?

Chip spacers are too thick for the current design of the tube caps... they are 8mm thick and half of it is for the clamps only. So 4mm depth left over... and then subtract the thickness of the slot and the holder ring.

I could make thicker caps, sure... but that would look like shit, in particular when mixed with non-window tube caps. And simply making all tube caps this thick would be a waste of material.

Of course you could take for example an overhead transparency and cut a circle from that. But cutting this accurately in a reliable way without resorting to using a marker... I don't know.

These could be fantastic as shipping containers for valuable chips. They might be cost prohibitive compared to to other properly safe shipping boxes/containers. 3d printing really is neat. My son has one he's playing with all the time.

Ever tried to 3d print chip trays?

Good point, but probably be a very rare case... spending a couple of bucks on such a tube just to ship one or a handful of chips.
Those high denom Jack Detroits might be candidates, or super old and rare single chips. Unless of course you can somehow get the buyer to pay for the tube :p

I haven't tried making chip trays yet and am not considering it either. There's plenty of cheap sources for chip racks that fulfill my needs. I'm not in the "barrel must fit perfectly without even a micrometer of give" camp so the china ones are already good enough for me. And there's even special racks for 43mm chips and other nonstandard sized chips from big manufacturers.

I only designed those tubes because I haven't seen anything comparable in the market. There is apparently no source for custom sized tubes that will hold exactly the number of chips you want (to avoid them rattling around in a half empty tube, and/or to fit into that little leftover space in your chip case that won't take another regular rack) - and there's no source for tubes with this level of sturdiness/impact protection* at all as far as I could see.

* I have not yet conducted drop tests or anything like that. This is only about the theoretical design, with those thick rails on the outside that should prevent direct contact of tube wall (and hence chips) and floor when accidentally dropped.
 
Could upload to a place like shapeways and have them print for you. You make a little cash and people could buy them. Not sure if the pricing would be worth it on these, but worth looking in to.
 
Could upload to a place like shapeways and have them print for you. You make a little cash and people could buy them. Not sure if the pricing would be worth it on these, but worth looking in to.

The key aspect of those tubes is their customizability. I've already explained the problematic with the parametrized design earlier in the thread - basically, it still involves manual work for any potential variation you could want. That would be thousands of files I'd have to manually save out. Even if I only have to change the values in a couple of text boxes and the software does the rest, that's still a load of stupid and mostly useless work. Also I'm not sure if those services can or will guarantee you a perfect fit of the parts. I doubt I have so fine-grained control here since I'm at their mercy to decide which particular printer model will produce this and that job. Also questionable if they have such a big selection of different colors available.

I didn't fetch a quote for those tubes on such sites, but I can remember that a while back I was looking at exemplary prices for some random 3D models where I roughly knew how long they'd take to print and how much material they would require. The markup was astronomical. Part of that was iirc due to the fact that they chose completely idiotic print settings for the purpose of said models, like 100% solid infill, which of course massively increases print time and material consumption. But they simply would't let you say I only want a low infill percentage 'cause it's just decoration and doesn't have to bear any weight.
 
Last edited:
I have a friend that sells Jeep switch panels on there and they come out great every time. Perfect snap in fit for the switches. But yes the price is fairly high.

I do love your design though. Very nicely done.
 
  • Like
Reactions: Nex
The circumstances might be different there... I guess one person would only ever need one of those panels for their Jeep? They might be more willing to spend a good lump of money on it if they knew that was all they would need.

For those tubes though... I think most people who would use them if they had them would want more than one of those tubes for their specific application. Say a guy who wants to nicely store his tournament starting stacks. Or provide a chip tube to keep rebuy chips and the live stack separated in cash games where people like to top off their stack after each round they lose a little. Ten or even twenty tubes. Even if you have a little space left in your chip case that won't take a full rack... you'd probably manage to get not just one, but two or three tubes in that space.

It quickly gets so costly that I believe most potential buyers would jump ship. Even when considering custom made stuff always carries a sizable premium.
 
How tough is it to modify the lids? If you had these made custom for your starting stacks (no windows) and printed a table/seat on the inside of the cap, instant random seating.

One-time work is adding a sketch with a text label to the model and then using that sketch to emboss a face of the solid.
For every variation of what that text label should read, it's just changing a value in a text box and saving away the generated file.

Interesting idea! That would really add a cool feature for tournament folks.
It likely will only work with caps printed in colors that are neither too bright nor too dark, else the embossing will probably be too hard to read. Silver and copper should be good candidates.
 
I know I would definitely be interested in some for tournaments.
 
  • Like
Reactions: Nex
I have always found snap fits too much of a pain in 3D printing; almost all my designs have replaced them with rare earth magnets

In my personal experience, it's not too bad once you have refined your print settings for each brand of filament you use, got the first layer calibration right (Prusa first layer calibration test print is crap, printing the first layer of a 100% rectilinear infill box is much better to dial it in just right because you can see how much overlap (or gap) there is between the infill and the perimeter), and have a halfway controlled room temperature. Simply have to avoid the elephant foot syndrome and use a printer with quality electronics.

Print with as low temperatures as you can without having the filament partially solidify inside the nozzle. Add maybe 5 or 7 degrees celsius on top to make it a little more robust, in case someone opens the door and lets a breath of cold air in. This approach got me to pretty much perfect print settings fairly fast without too many iterations of test prints.

The closing mechanism mainly is twisting the cap. The snap at the end of the turn is just for good measure to increase the resistance for the cap to unscrew itself a little. Could take a scalpel and scratch the four thin layers of filament off the cap if you end up not wanting it. Even correcting accidental elephant foot syndrome to turn an originally failed print into one that still fits is not too much work if you know where to cut.
 
My stuff is all done on a buddies prusa, he has the settings nailed down but it’s still just to much effort for me. I buy 200 3/8” rare earth magnets for $.10 a piece and forget about it. Works well for the things I sell on etsy and it has a “wow magnets!” Factor that people like
 

Create an account or login to comment

You must be a member in order to leave a comment

Create account

Create an account and join our community. It's easy!

Log in

Already have an account? Log in here.

Back
Top Bottom