Poker Chip Milling For Labels (1 Viewer)

@allforcharity you need to make a video on how you made your jig! It fits the chips so perfectly.

I'll describe it, it's easy.

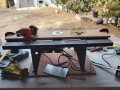
1) Take a long flat piece of board that's easy to drill through. Helps if it's light, and a bit flexible, but it needs to be FLAT. A part of a laminate floor tile would work, as long as the texture is smooth.

2) Glue, attach, or rest one side of the board on two short pieces of 90 degree angle corner trim OR router a shallow channel on the underside of the board; as long as there is enough clearance for the head of a bolt and washer.

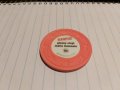
3) Drill a 3/8" hold through the board. Take your 3/8" drill bit and stick it in the hold you just drilled. Get a 2" diameter fender washer with a 3/8" hole and place it over the drill bit so that it rests on the board.

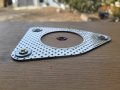
4) Take your 2" ID exhaust flange and place it so the fender washer fits snugly inside. Fix it down tight to the board by drilling through the guide holes and fastening the whole thing down with a pair of appropriately sized bolts/nuts/washers. The jig is now complete.

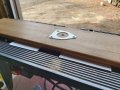
5) Take out the drill bit, but leave the washer inside the exhaust flange. Line up the jig with your 3/8" undermounted router bit so that it goes through the hole of the fender washer. It should now be just about perfectly centered. Fix your router edge guide to the edge of the jig.

6) Take out the fender washer from the assembly, and then adjust the height of the bit so that it just protrudes above the surface of the board. This, of course, will be your constant mill depth.
 
I'm glad that you found it interesting, and perhaps even helpful.

All in all, I'd bet that the drill press method is generally easier, and probably generally faster as well. But I suppose I am OCD just enough that I prefer to ensure a consistent milling depth for all my chips, and so I went ahead and did it this way.

Note that it is possible to mill bigger diameters by using the same method (and the same router bit), just use a wider diameter exhaust flange. Or anything else that has a very accurate inner diameter that can be fixed down onto the flat surface easily. A 2 1/8" ID flange should allow you to do a 1 1/8" recess, which if centered correctly should be perfect for an RHC chip. However, I would recommend you always experiment with your measurements using some throwaway chips, though it might be more beneficial to test on a clay base rather than a plastic base. YMMV.
 
Hm... tried to do some math. If the drill bit is ø3/8" (0.9525 mm) and the exhaust flange is ø2" (50.8 mm), then the THC chip (ø39.2 mm) would have a milled recess of about ø0.835" (2.12 mm) which is less than ø7/8" (~2.22 mm, standard Gear label size). Is this correct or are some of the dimensions a bit "wobbly" allowing for a large enough recess?
 
Last edited:
Hm... tried to do some math. If the drill bit is ø3/8" (0.9525 mm) and the exhaust flange is ø2" (50.8 mm), then the THC chip (ø39.2 mm) would have a milled recess of about ø0.835" (2.12 mm) which is less than ø7/8" (~2.22 mm, standard Gear label size). Is this correct or are some of the dimensions a bit "wobbly" allowing for a large enough recess?

Okay, let's think of it this way. Center the 1 1/2" chip in the 2" flange. It has movement of 1/4" (or 2/8") in every direction. The bit diameter is 3/8". Going 2/8" in opposite directions will add 4/8" to the milling diameter. So 3/8" + 4/8" = 7/8".
Now, it turns out that the ID of the exhaust flange is ever so slightly bigger than 2" ID, so I happened to mill out 15/16" diameter, which is still fine for 7/8" labels (and 15/16" labels, which I am now leaning to do).
 
But the chip (well, at least the Flamingo THC I measured) is slightly larger than 1 1/2", that's why I don't get it.

@Gear - correct, I should have put quotes around standard, or omitted your name :)
 
But the chip (well, at least the Flamingo THC I measured) is slightly larger than 1 1/2", that's why I don't get it.

@Gear - correct, I should have put quotes around standard, or omitted your name :)

Well, whatever I did, it worked. I have a few extra 15/16" laminated labels from another project, and I did a test fit, and it fit perfectly.
 
Re-milled my 220 chips that were inlay-removed in order to get recess diameter matched with all the rest of the chips. Just finished cleaning/oiling all 3080 of them. Sometime this holiday weekend I'll be putting up the first of many design discussion threads regarding the roulette set composition and art, and would love to hear the opinions of the PCF members who are James Bond fans.
 
After seeing this thread about 1 week ago I decided to give it a go. The process works really well and especially if you can do it outside. Once the weather warms up I have 102 Paulson pink starbursts plus 49 BCC chips I want to mill. I also have about 400 roulettes I want to do as well.
The most difficult part was getting the height of bit correct. As you can see from the pics it was trial and error. Once I had my correct bit height the amount of chip to come off almost doesn't look deep enough. However I did stick one of gears sample labels on and I think the depth is about perfect. The only labels I have are 7/8" and from the pic you can see there is some overlap. But a 3/4" label should work ideal with a 3/8" bit. Thank goodness I had a few Desert Palms to practice on.Fun process but it just takes patience to find the correct depth. More pics to come when I can run everything.
Thanks Tommy for finding this video and thanks to Allforcharity for refining the process.
 

Attachments

  • router 1.jpg
    router 1.jpg
    155.5 KB · Views: 189
  • router 2.jpg
    router 2.jpg
    122.9 KB · Views: 191
  • Router 3.jpg
    Router 3.jpg
    98.6 KB · Views: 167
  • router 4.jpg
    router 4.jpg
    160 KB · Views: 168
  • router 5.jpg
    router 5.jpg
    58.2 KB · Views: 173
Yes, you definitely don't want to go too deep. Really, you're trying to take off enough of a sliver to get your (presumably laminated) sticker in without creating spinners. I'm glad that it worked out for you, and good luck with the rest of your project.

Did you center your flange with the fender washer trick or did you do something else?
I did center it but there was a little readjustment until I finally got it centered. I think the trial and error cut away a little bit of the piece of wood I fastened the flange to.
 
Hm, one question - how do you deal with chips that have had original inlays enough off-center that the centered milling doesn't cover it?
 
Hm, one question - how do you deal with chips that have had original inlays enough off-center that the centered milling doesn't cover it?
Take a Exacto knife and scrape off the access. Normally when the foil is gone, it's not too noticeable.

Or Mill a wider bit, if possible.
 
I was just referring to the excess-recess (not the label itself) that would make the new recess not a perfect circle. So, mostly not noticable?
It's easy for you top-driller-millers to put a wider bit, but the flange method would make this a more complex endeavour I guess.
 
Last edited:
I was just referring to the excess-recess (not the label itself) that would make the new recess not a perfect circle. So, mostly not noticable?
It's easy for you top-driller-millers to put a wider bit, but the flange method would make this a more complex endeavour I guess.

This is why I think, from a purely esthetic point of view, the traditional method of inlay removal is better than trying to mill it out, IF your plan is to replace it with an identically-sized sticker. If the original inlay is really off center, but your mill is on center, then there will be a noticeable odd-shaped recess bulge after you apply your new sticker. Centering and milling out a very slightly larger area will give you a more consistent result.
 

Create an account or login to comment

You must be a member in order to leave a comment

Create account

Create an account and join our community. It's easy!

Log in

Already have an account? Log in here.

Back
Top Bottom