Pictures of my completed Table Build - 1st Table Build in like 15 years! (1 Viewer)

StangCrazy

Waiting List
Joined
Sep 21, 2019
Messages
6
Reaction score
13
Location
Lexignton, SC
Wanted to replace my groups table, just a cheap Amazon table, that was getting worn out. Also wanted to give some additional space for the guys as we on average have 9 people, sometimes a 10th.

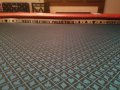
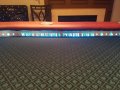
Overall Finished Table Dimensions are 56" wide by 111" long. Each player has a little over 2 feet of elbow space. It has really been a pleasure for everyone this year.

There are a few things I'd do differently, but for my first table build in 15 years or more, I'm happy with it and the guys were quite surprised when they walked into this thing.

Next project, we've got to find some matching chairs.
 

Attachments

  • 20191014_195704_resized.jpg
    20191014_195704_resized.jpg
    126.1 KB · Views: 235
  • 20191014_195717_resized.jpg
    20191014_195717_resized.jpg
    224.6 KB · Views: 242
  • 20191014_195724_resized.jpg
    20191014_195724_resized.jpg
    191.5 KB · Views: 207
  • 20191014_195828_resized.jpg
    20191014_195828_resized.jpg
    152.2 KB · Views: 218
Does it have folding legs? If so, is something this big easily stored when not playing?
 
Does it have folding legs? If so, is something this big easily stored when not playing?

Yes. The person who host our weekly games asked that it have folding legs in case he needed to move it out of the center of the room. Our old table, he would slide behind his bar.

When I brought this over, he quickly realized that wasn't going to be an option, so.......he and his wife are talking about moving the room around. When that happens, a proper leg base will be built, but until then, the thought of it being portable is key.

That thing is massive! Sweet build! :tup:

Thanks!
 
What did you use / where did you get it that made these dimensions possible (standard plywood is 48" x 96")?

Congrats. Looks nice. Is it really that big? It doesn't look that big.

Yes, the finished dimensions are 56" x 111".

Both the top rail and the base sheet of ply are all 4 pieces that were jointed together to create the finished product.

The top rail "end arches" were both cut from one sheet of ply, then the straight side pieces were cut. They were biscuit jointed together and then I had a 1/8" piece of steel secured over the joints to prevent flexing. To further support the joints, I have riser blocks on each side of the steel plate to again, help support those joints.

The bottom base sheet was cut into 32" x 96" strips. Those 32" x 96" strips were then cut in half length wise making them 32x48. I biscuit jointed the two 32x48 pieces together giving me two 64 x 48" pieces. I then used one of the 16" by 96" pieces leftover from my initial cut of 32"x96" to biscuit joint between my two 64x48 pieces. I now have a 64 x 112 sheet of ply.

I took my top rail and centered it on my 64x112 sheet and traced my outline. Cut it, routed and sanded so both top rail and bottom piece matched perfectly.

Built the rest as normally as I could with a few problem solving hurdles along the way.
 

Create an account or login to comment

You must be a member in order to leave a comment

Create account

Create an account and join our community. It's easy!

Log in

Already have an account? Log in here.

Back
Top Bottom