Paulson RHC Relabel to Tournament Set (2 Viewers)

grantc54

4 of a Kind
Supporter
Joined
Oct 1, 2015
Messages
6,042
Reaction score
11,266
Location
Vancouver, BC, Canada
Hello,

I am looking for suggestions as to what denominations to use for relabeling standard Paulson RHC cash chips for a tournament set.

Currently I have the following chips and was thinking of the following high denominations but appreciate any feedback (updated counts and chips):

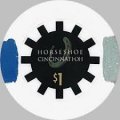
HS Cincinnati $1, 200 chips (plus 20 for later labeling for special events etc) - T1000
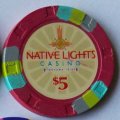
Native Lights $5, 200 chips (plus 20 for later labeling for special events etc) - T5000
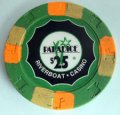
Paradice $25, 200 chips -(plus 20 for later labeling for special events etc) - T25000
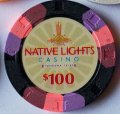
Native Lights $100, 100 chips - T100,000
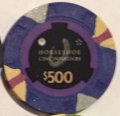
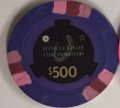
HS Cleveland Secondary $500, 20 chips - T500,000
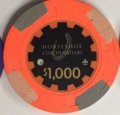
HS Cincinnati $1000, 7 chips - T1000000

I picked this ordering as the spot progression made the most sense to me. As I get more chips I may swap out or add different denoms. I would really like to add a blue at the high end.

Thanks,
Grant
 
Last edited:
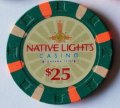
do you have the chips? While there are many folks here that know what they look like, others (like me) could use a visual. Cheers
 
These are just pics from Google / the sellers stores here as the Native Lights are en route and the other chips are at home.

horseshoe_$1.jpg
native_lights_$5.jpg
paradice-paulson-poker-chip-$25-2.jpg
native_lights_$25.jpg
native_lights_$100.jpg

I also have the following chips but I think I am keeping them for a cash set (also need to discuss relabel opportunities with Gear tonight as they are stamped with cancellation stamp):
Crown-Emperor.jpg
 
Cool idea. For my taste...the lower denoms would be the ones you have the highest number of chips. The progression, though may not work out as well, or at least to your liking. Looks like you will have a cool high denom set.
 
Cool idea. For my taste...the lower denoms would be the ones you have the highest number of chips. The progression, though may not work out as well, or at least to your liking. Looks like you will have a cool high denom set.

I am putting this together for a single table tournament and you bring up a good point. I ordered another 100 or the $1 chip (which I will use as a 1000).

I also ordered 2 x primary $500 and 2 x secondary $500 of the HS Cinn to use as T500,000 and 1 of the primary $1,000 to use as a T1Million chip. They won't come into play often but it can be fun to have limited #s of highest denom chip for when someone gets a massive lead (plus I do have to limit my spending a bit).

HS_Cinn_$500-pri.jpg HS_Cinn_$500-sec.jpg HS_Cinn_$1000-pri.jpg
 
HS sans inlay:
20171011_175654-1.jpg


Paradice not so easy :(
20171011_182918-1.jpg


Trying warm water to loosen paper portion, chip warped and then snapped when I applied light pressure on flat surface. I guess that is why you test with one.

Grant
 

Sure, but you are using a black label. I am considering a color match label for the HS and the unlaminated labels had some bleed through of the black underneath. I won't try to remove the inlay for any more Paradice, but the HS $1 comes off so easy I don't see why you wouldn't.

Grant
 
Sure, but you are using a black label. I am considering a color match label for the HS and the unlaminated labels had some bleed through of the black underneath. I won't try to remove the inlay for any more Paradice, but the HS $1 comes off so easy I don't see why you wouldn't.

Grant

Hmm. Were they Gear labels? Or some one else's? I've seen white un-laminated Gear labels over black inlays with absolutely no bleed. I'm just curious that a colored label would show through underneath.
 
Hmm. Were they Gear labels? Or some one else's? I've seen white un-laminated Gear labels over black inlays with absolutely no bleed. I'm just curious that a colored label would show through underneath.

Yes, some samples Gear provided. It was really the 'gear' spokes on the HS that bled through - the black/white contrast. I will try some testing later tonight. Overall my experience has been that the laminated labels are nicer, so that also plays into taking inlays off.

Grant
 
The Horseshoe $1s are about the easiest RHC inlays to remove that I've ever come across. Some of them are kind of a pain but many are pretty straightforward. That said, most of the other RHCs I've ever dealt with are a LOT more difficult.

Also the bleed/visibility issue in that case is about as extreme as it can get -- you have a stark black/white pattern underneath a pure white area of the label (no background tint.) Most other non-extreme cases are just fine :)

Thanks for clarifying, this helps a lot with planning.

Grant
 
Removing RHC inlays can be a pain, why not just apply an Unlaminated Gear label right over em? There's plenty of recess

The other drawback of the stickers is that you need to go all the way to the far edge covering more of the chip.

We'll see. Going to do a test chip each way (except the $1s, they are very easy to remove the inlay).

Grant
 
So I now have a process and can get inlays off quickly on the Native Lights. Going to try a Paradice again.

20171013_203427-1.jpg
 
Do you mind sharing your process? :whistle: :whistling:

Sure. I will add pics later, am done for the night. Worked wonders on the Para-A-Dice too! I am stoked.

Disclaimer - I do not know if there are any long term issues with this process. I am only starting with 4 chips to see how it goes.

1. Cut down the middle of the inlay with a sharp knife at a 90 degree angle to cut into the plastic covering of the inlay. (I used a box cutter) Peal up an edge of the plastic

2. Cut a smaller cut in the middle to make another edge.

3. Pull up on the plastic, but do it slowly so that it pulls up on the paper underneath as it comes up (to help loosen it).

4. The plastic comes off pretty easily.

5. Put 3 drops of non-acetone nail polish remover on the paper, you will see it darken as it gets wet. This is the step I am not sure of. I used this to remove cancellation stamps from chips and it seemed to work ok. It does dry the chip out, I washed the chip with soap and water after. I will oil after I put new labels on.

6. Pull the paper label off in one peice, it slides right off.

Walla!
 
Last edited:

Create an account or login to comment

You must be a member in order to leave a comment

Create account

Create an account and join our community. It's easy!

Log in

Already have an account? Log in here.

Back
Top Bottom