I spent a lot of time following threads talking about the best birdcages and there seemed to be a consensus that it was hard and/or expensive to find the good ones. Well, that didn't excite me much, so I started pondering some other options. The pelican cases were another option, but they were also pricy and didn't allow for showing off the chips while sitting on a shelf. I figured that I had some spare wood and a bunch of tools I'm storing for my father-in-law, so why not take a crack at making something myself. I daydreamed one morning at work and came up with a general design. Went over to Home Depot and found that the missing pieces weren't too expensive, so I went for it. After an admittedly long time (only working an hour or two at night after I put my son to bed), I finally ended up with these:

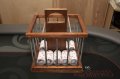
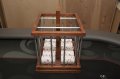
With the counts of my sets (500, 800, 1200), I chose to go with one to hold 600 chips (left) and one to hold 800 chips (right).
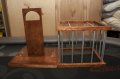
The bases are made from 3/4" birch plywood leftover from my table build. The handle piece is attached to the base using 3 pocket screws. Seems to be very sturdy, though I haven't exactly torture tested. The carry handle holes were free hand cut with a jigsaw. I added pegs in the base so the racks can't slide around. How I did this ended up being a huge PITA, and I still ended up having to cut a notch out of one of the pegs to get the rack to fit right. One of many lessons learned.


For the cages, I miter cut 5/8" dowels to create a square just slightly smaller than the base. The bars are 1/4" aluminum rod cut to 7.5" for the taller cage and 6" for the shorter. I hand cut all the bars with a hacksaw, so there wasn't much for precision. Looking back, I'm not sure it would help the assembly to have them all the same exact length, but it sure as hell would have been easier if I had a machine to cut them. I spaced 5 bars (somewhat) evenly on the long side and 4 (somewhat) evenly on the short, starting with an inch from each end. I figured the most important aspect was having the holes drilled straight and consistent, so I wouldn't recommend trying something like this without a drill press. I went with 1/4" holes for 1/4" rod, which required hammering to seat the rods all the way. Even with the tight fit, I did add a drop of gorilla glue in each hole just as insurance. They came out very sturdy, even more than I expected. The final assembly did require the help of my lovely wife, as it was very much a job requiring four hands.


The two bars at the top were a part of my design from the beginning, but that didn't stop me from gluing the squares without drilling and setting the rods. So those had to be broken apart and redone. Whoops.
This was also my first woodworking project that I did complete sanding and finishing with stain and clear. I quickly learned that I do not have the patience to do complete finishing with stain and clear. So you will notice plenty of spots where I didn't wipe off or sand down wood glue, some tool marks, weird sanding patterns, etc. It gives them character...or at least that's what I say to make myself feel better.
All in all, I'm thrilled with how they came out. It's just like a casino, if you need more chips, you'll have to go to the cage.

With the counts of my sets (500, 800, 1200), I chose to go with one to hold 600 chips (left) and one to hold 800 chips (right).
The bases are made from 3/4" birch plywood leftover from my table build. The handle piece is attached to the base using 3 pocket screws. Seems to be very sturdy, though I haven't exactly torture tested. The carry handle holes were free hand cut with a jigsaw. I added pegs in the base so the racks can't slide around. How I did this ended up being a huge PITA, and I still ended up having to cut a notch out of one of the pegs to get the rack to fit right. One of many lessons learned.
For the cages, I miter cut 5/8" dowels to create a square just slightly smaller than the base. The bars are 1/4" aluminum rod cut to 7.5" for the taller cage and 6" for the shorter. I hand cut all the bars with a hacksaw, so there wasn't much for precision. Looking back, I'm not sure it would help the assembly to have them all the same exact length, but it sure as hell would have been easier if I had a machine to cut them. I spaced 5 bars (somewhat) evenly on the long side and 4 (somewhat) evenly on the short, starting with an inch from each end. I figured the most important aspect was having the holes drilled straight and consistent, so I wouldn't recommend trying something like this without a drill press. I went with 1/4" holes for 1/4" rod, which required hammering to seat the rods all the way. Even with the tight fit, I did add a drop of gorilla glue in each hole just as insurance. They came out very sturdy, even more than I expected. The final assembly did require the help of my lovely wife, as it was very much a job requiring four hands.
The two bars at the top were a part of my design from the beginning, but that didn't stop me from gluing the squares without drilling and setting the rods. So those had to be broken apart and redone. Whoops.
This was also my first woodworking project that I did complete sanding and finishing with stain and clear. I quickly learned that I do not have the patience to do complete finishing with stain and clear. So you will notice plenty of spots where I didn't wipe off or sand down wood glue, some tool marks, weird sanding patterns, etc. It gives them character...or at least that's what I say to make myself feel better.
All in all, I'm thrilled with how they came out. It's just like a casino, if you need more chips, you'll have to go to the cage.
")