I recently purchased a bunch of THC solids from @allforcharity with the plans to mill and label them, making myself a custom tourney set. Well my 1 table tourney set turned into a 40 person tourney set. I have plans on running charity tourney in my neighborhood. Plus I just like chips.

Anyway, I've seen many threads here with HowTos on milling. Seems easy enough.
Got a drill press

Rigged up with a jig

Let the milling begin...

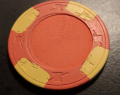
Works fine enough. Tricky part it getting the chip perfectly centered. Notice above that I was off a bit.
Also notice that the center of the chip was not milled flat. You can still see part of the hot stamp. Seems the bit I was using is not flat. If I want to mill the center clean, I'm going to have to mill deeper than I want to on the sides. I can probably solve this with a better, flatter bit. But still this process is very time consuming. So it got me thinking. Could I use a CNC machine to do this. If set up and programmed correctly, it would be much more precise and I could do maybe an entire barrel at the same time.
Starting researching CNC machines for home use and found some relatively inexpensive ones. But I have no idea if they are just glorified toys or not. Still researching. But during this researching, I discovered that my local library has a CNC machine that anyone can use! I packed up some sample chips, my digital caliper and off I went.
This is the device they have. Super simple to use. The CAD software is basic, but then again, all I need is a circle. And it's precision is well better than my tolerances of 0.05mm. So I defined my circle, proper radius, location, mill depth, and secured the chip.

Press the go button and....

Oops. Screwed up the initial milling height. Anyone need a spare Lucky Derby $1, slightly used?
OK, fix that setting, load another chip and try again...

Worked great! About 20 seconds.
Still a little off center, that can be adjusted. And the mill is a bit rough, but I had it on the quick setting. A finer bit and a slower mill setting will fix that.
So now the task is to come up with a jig that will hold 15-20 chips securely in the exact position I need them and make it repeatable.
Anyway, I've seen many threads here with HowTos on milling. Seems easy enough.
Got a drill press
Rigged up with a jig
Let the milling begin...
Works fine enough. Tricky part it getting the chip perfectly centered. Notice above that I was off a bit.
Also notice that the center of the chip was not milled flat. You can still see part of the hot stamp. Seems the bit I was using is not flat. If I want to mill the center clean, I'm going to have to mill deeper than I want to on the sides. I can probably solve this with a better, flatter bit. But still this process is very time consuming. So it got me thinking. Could I use a CNC machine to do this. If set up and programmed correctly, it would be much more precise and I could do maybe an entire barrel at the same time.
Starting researching CNC machines for home use and found some relatively inexpensive ones. But I have no idea if they are just glorified toys or not. Still researching. But during this researching, I discovered that my local library has a CNC machine that anyone can use! I packed up some sample chips, my digital caliper and off I went.
This is the device they have. Super simple to use. The CAD software is basic, but then again, all I need is a circle. And it's precision is well better than my tolerances of 0.05mm. So I defined my circle, proper radius, location, mill depth, and secured the chip.
Press the go button and....
Oops. Screwed up the initial milling height. Anyone need a spare Lucky Derby $1, slightly used?
OK, fix that setting, load another chip and try again...
Worked great! About 20 seconds.
Still a little off center, that can be adjusted. And the mill is a bit rough, but I had it on the quick setting. A finer bit and a slower mill setting will fix that.
So now the task is to come up with a jig that will hold 15-20 chips securely in the exact position I need them and make it repeatable.
")